Introduction to Active Directory Provisioning
In an HR-driven workflow, users can be synced from an HRIS directory such as Workday or UltiPro and provisioned into the client's Active Directory.
While this process sounds simple at a high-level discussion, it is actually very complex due to the sensitivity of the user data. Incorrect mappings could potentially remove users’ access rights or, worst case, completely overwrite all of the client’s Active Directory identities.
Provisioning Process
Scoping Process
What are the parameters of this implementation?
- How many directories need to be integrated in the environment?
- If multiple, what is the matching attribute between the directories to enable a single user (i.e. email & employee ID)?
- Which OUs will need to be accessed?
Configure the AD Connector and Settings
The AD connector has export to Active directory settings to enable, and arrows that need to be flipped to enable provisioning from OneLogin’s directory into the Active Directory.
Note: Specific attributes need to be created for userAccountControl & unicodePwd.
Note: If bi-directional sync will be enabled, then sAMAccountName, userPrincipalName, & distinguishedName will need to be synced into custom attributes.
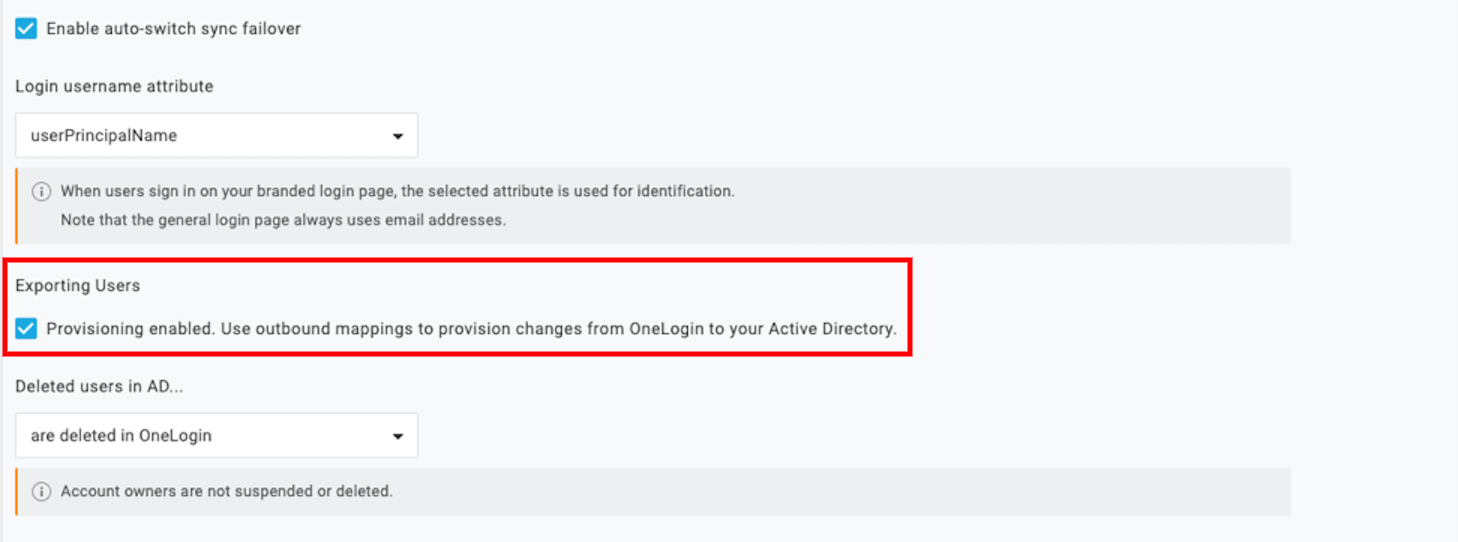

Note: The export user checkbox requires a restart of ADC.
Mapping Creation
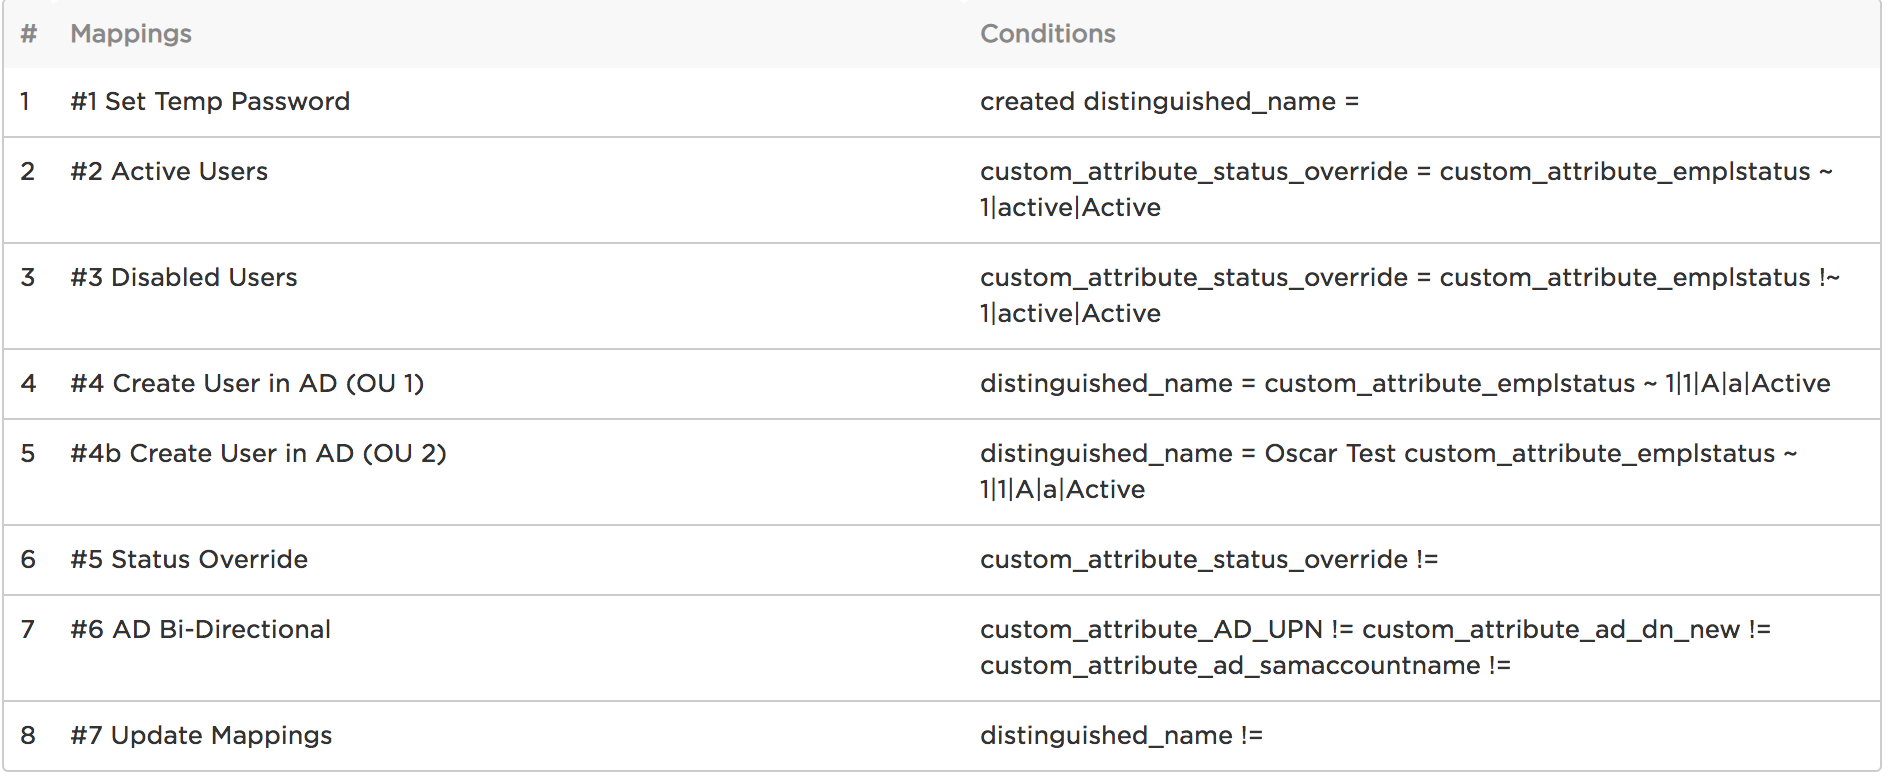
There are seven steps in the Active Directory provisioning and mapping process. Only two of these are required for non-HR driven implementation: Set Temp Password and Create User in AD.
As shown in the example below, these mapping steps will be numbered by the implementation consultant and must be kept in this order of operations to perform successful user creation i.e. moving the temporary password mapping as a later step will result in a provisioning failure.
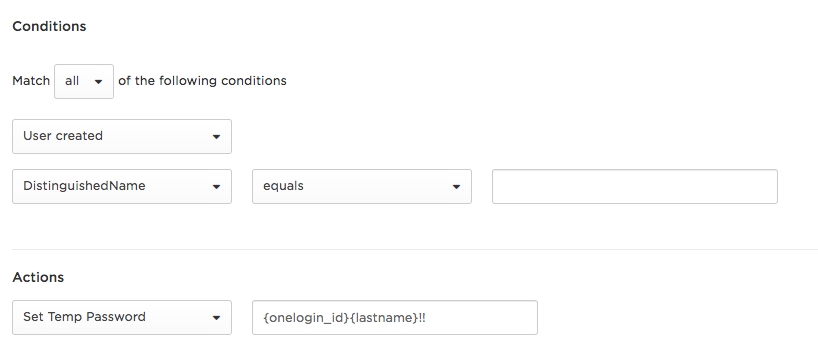
Step 1: Set a temporary AD password
Upon user account creation, a temporary password must be set to allow the account to be activated once AD considers it a valid account. To meet the complexity of AD password requirements, the best idea is to set it with a macro containing the a known OneLogin field + alphanumeric characters + special characters.
- {onelogin_id}{lastname}!!
Note: You must create a custom user field called "Temp password" in order to create the mapping described here.
To ensure that this trigger condition is only configured for newly created users, OneLogin sets two conditions:
- User created
- DistinguishedName = blank
Step 2: Trigger Active Users from the HR Directory
The second step triggers the AD provisioning flow actions when active users are imported from the HR directory and located in OneLogin. Separate mappings should be created for individual OU requirements.
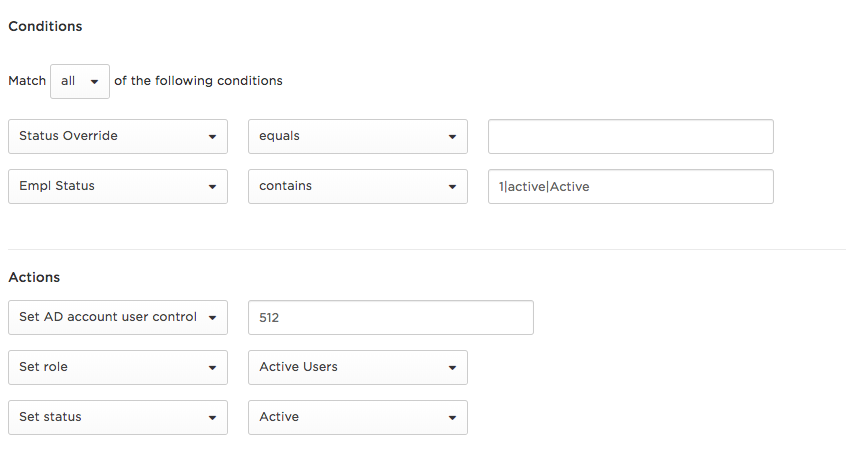
Conditions
Status Override - A custom field in OL that lets you control the status of the user. With Status Override enabled, admins know when someone was manually enabled, and gives them the ability to instantly terminate users.
Employee Status - Set to the multiple ways the HR directory statuses appear to consider the user Active. The pipe modifier ( | ) can be used to read the multiple possible active statuses in the same condition, ex. “1|active|Active”.
Actions
Set status - This field enables and sets the user in OneLogin to Active.
Set Role - You can use this field to label and categorize all Active Users.
Set AD account user control - this sets the user’s AD-specific status to control critical flows of information like disallowing passwords expiry or no-password-required rules. This field is optional and used for specific customer requirements.
User Account Control Table
| 512 | Enabled Account |
| 514 | Disabled Account |
| 544 | Enabled, Password Not Required |
| 546 | Disabled, Password Not Required |
| 66048 | Enabled, Password Doesn't Expire |
| 66050 | Disabled, Password Doesn't Expire |
| 66080 | Enabled, Password Doesn't Expire & Not Required |
| 66082 | Disabled, Password Doesn't Expire & Not Required |
| 262656 | Enabled, Smartcard Required |
| 262658 | Disabled, Smartcard Required |
| 262688 | Enabled, Smartcard Required, Password Not Required |
| 262690 | Disabled, Smartcard Required, Password Not Required |
| 328192 | Enabled, Smartcard Required, Password Doesn't Expire |
| 328194 | Disabled, Smartcard Required, Password Doesn't Expire |
| 328224 | Enabled, Smartcard Required, Password Doesn't Expire & Not Required |
| 328226 | Disabled, Smartcard Required, Password Doesn't Expire & Not Required |
Step 3: Removing Disabled Users
This step triggers the AD deprovisioning flow of actions when the deactivated user status is imported from the HR directory and user deletion/suspension is required.
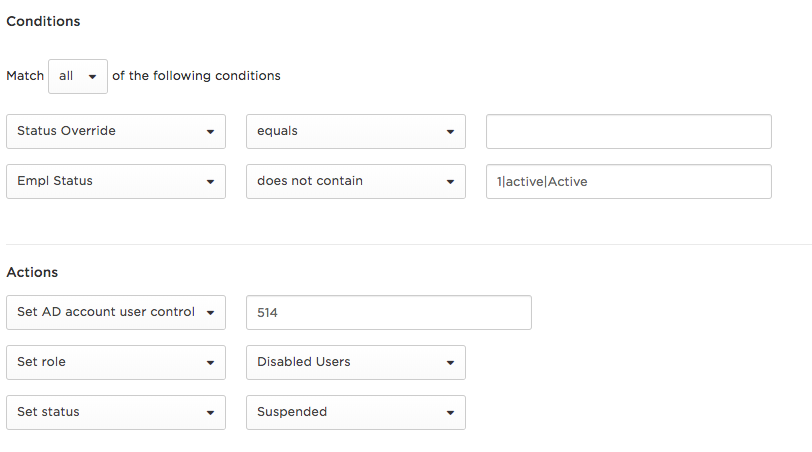
Conditions
Status Override - A custom field in OL that lets you control the status of the user. Lets the admin know when someone was manually enabled, but more importantly, it gives the admin the ability to instantly terminate users.
Employee Status - Configured to the multiple ways the HR directory statuses can appear if the user does not contain the active statuses. The pipe modifier ( | ) can be used to set multiple possible active statuses in the same condition, ex. “1|active|Active”.
Actions
Set status - This field actually enables and sets the user in OneLogin to Suspended.
Set Role - You can use this field to label and categorize all Disabled Users.
Set AD account user control - this sets the user’s AD-specific status to Disabled. Use UAC code 514 to disable the user.
| 514 | Disabled Account |
Step 4: User creation in Organization Unit 1
Once a user is activated, it must be routed to the correct OUs. Multiple mappings will need to be created for users to be created in individual Organization Units (OUs).
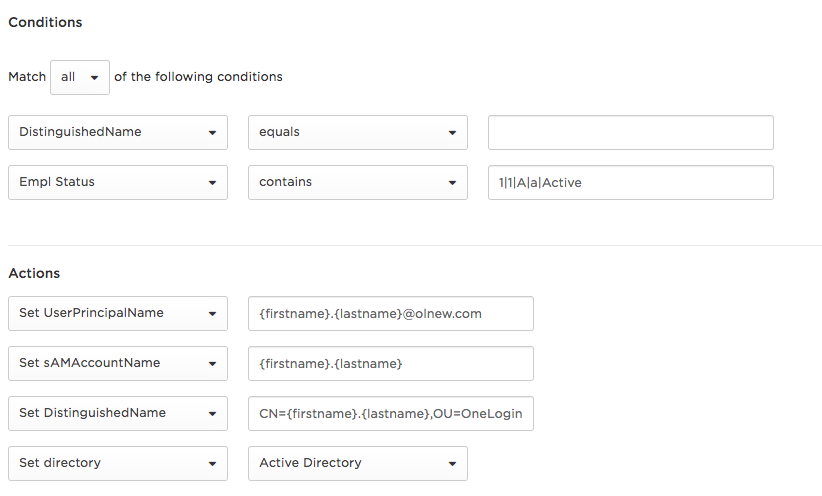
Conditions
DistinguishedName - If the active user is new, it won’t have DN placement in OneLogin or AD. this condition triggers only for new users.
Empl Status - Empl status checks the current status of the user’s employment where if the user is an active employee then continue placing the user into the distinct OU.
Actions
Set UserPrincipalName - Create a format in which the user will be identified.
- Example:. {firstname}.{lastname}@domain.com
Set sAMAccountName - sAMAccountName must be set for every user and it has a limitation of 23 characters.
Set DistinguishedName - This is the distinguished name of the OU to place the users into.
Set Directory - Authentication Directory must be set to Active Directory.
Note: OUs can be created in AD when a NEW user is created.
Other Fields for Complex OU structures
- Example: when an organization has 10 OUs and mappings, but also a final OU used to stage the remaining users. This is normally done when administrators need to assign PCs upfront to users. Admins will stage the laptop and manually assign the user to the correct OU.
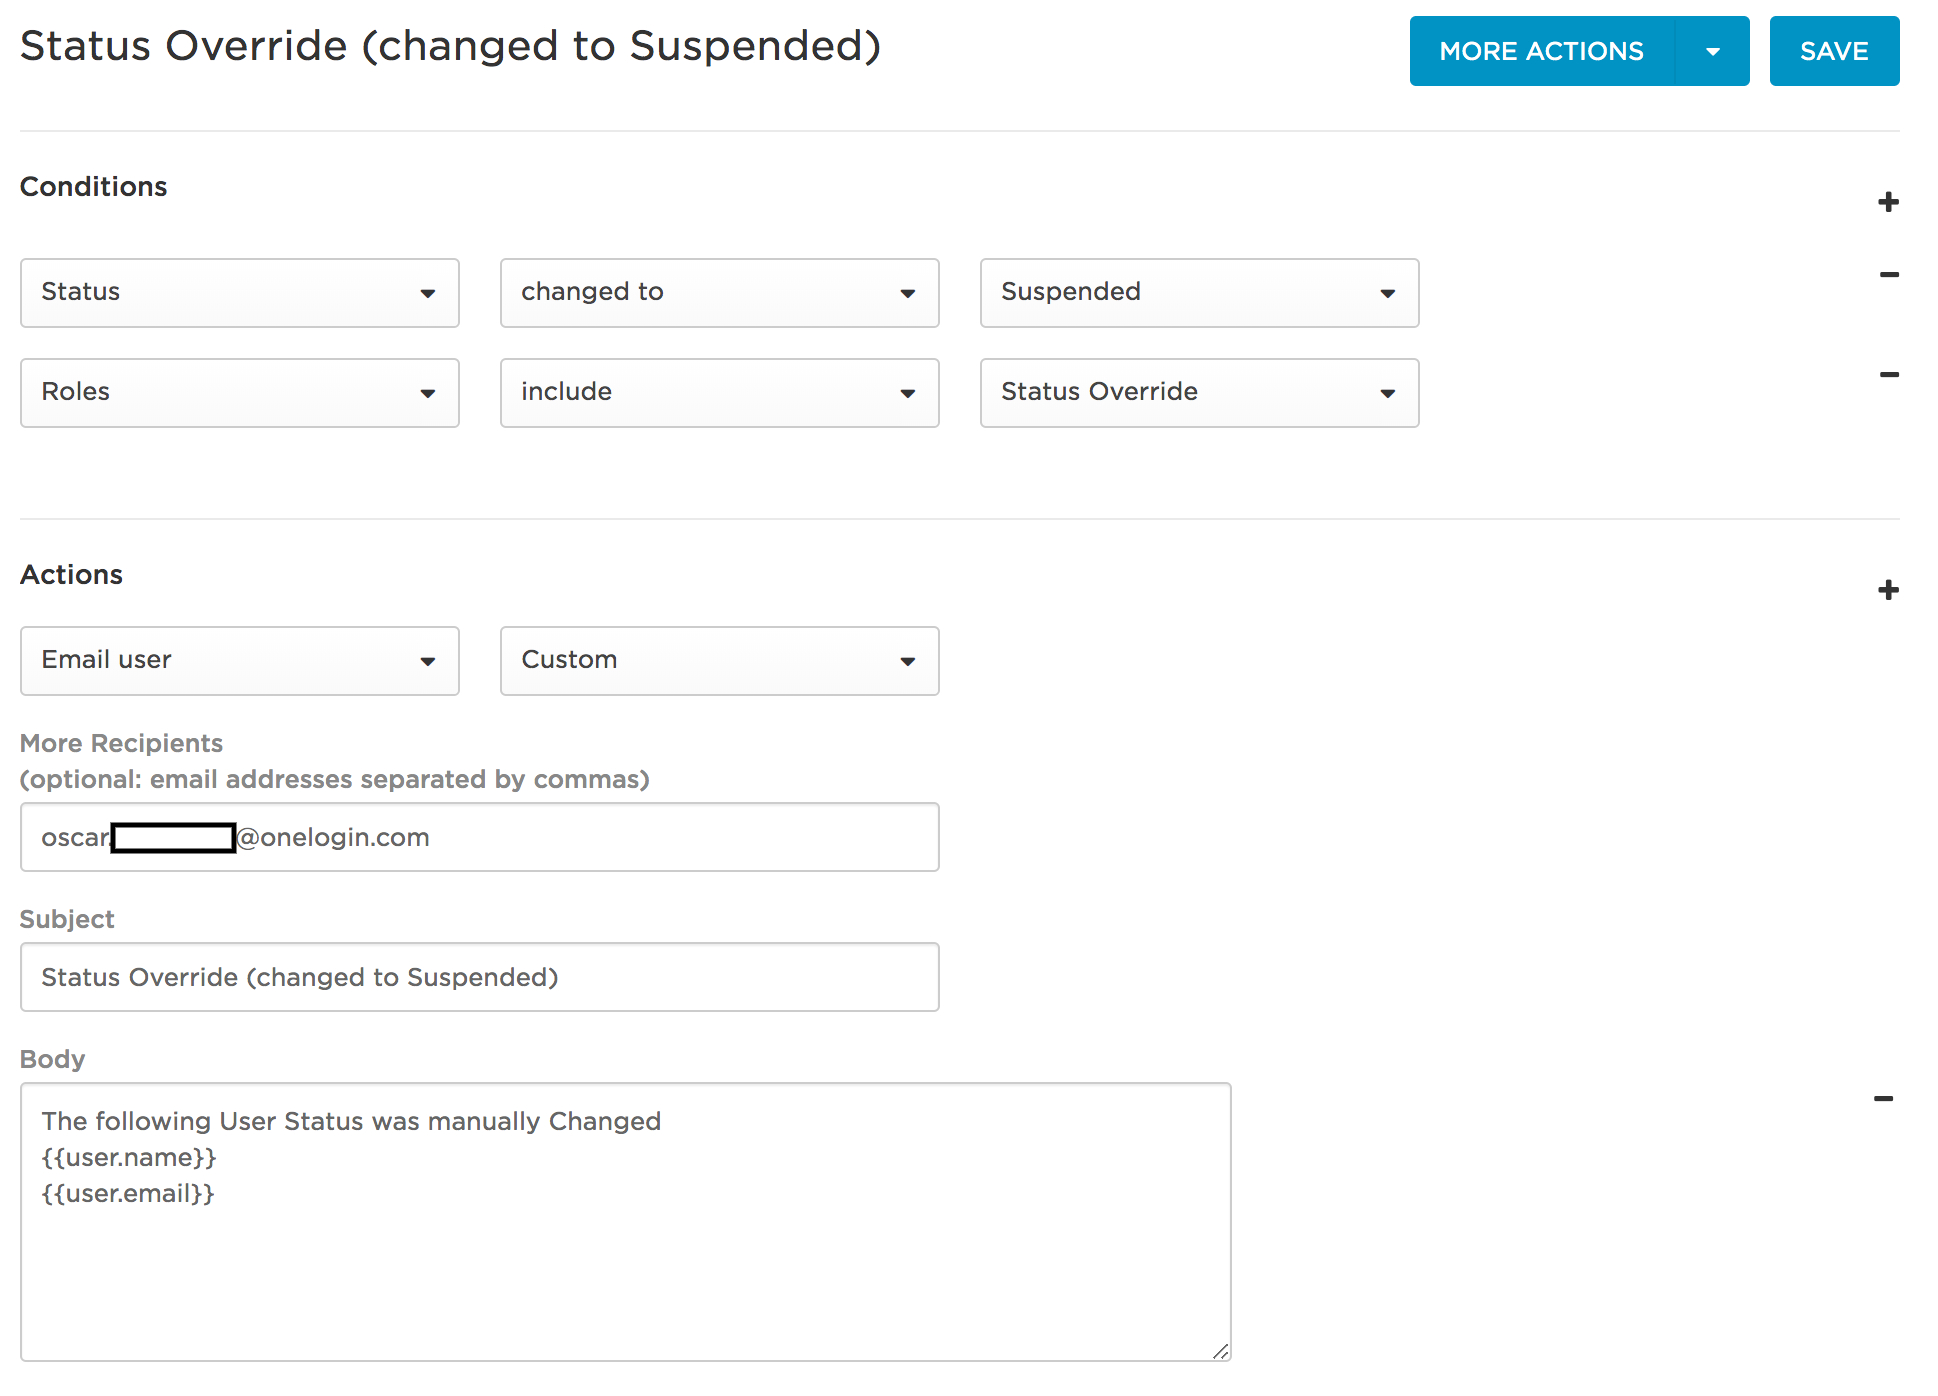
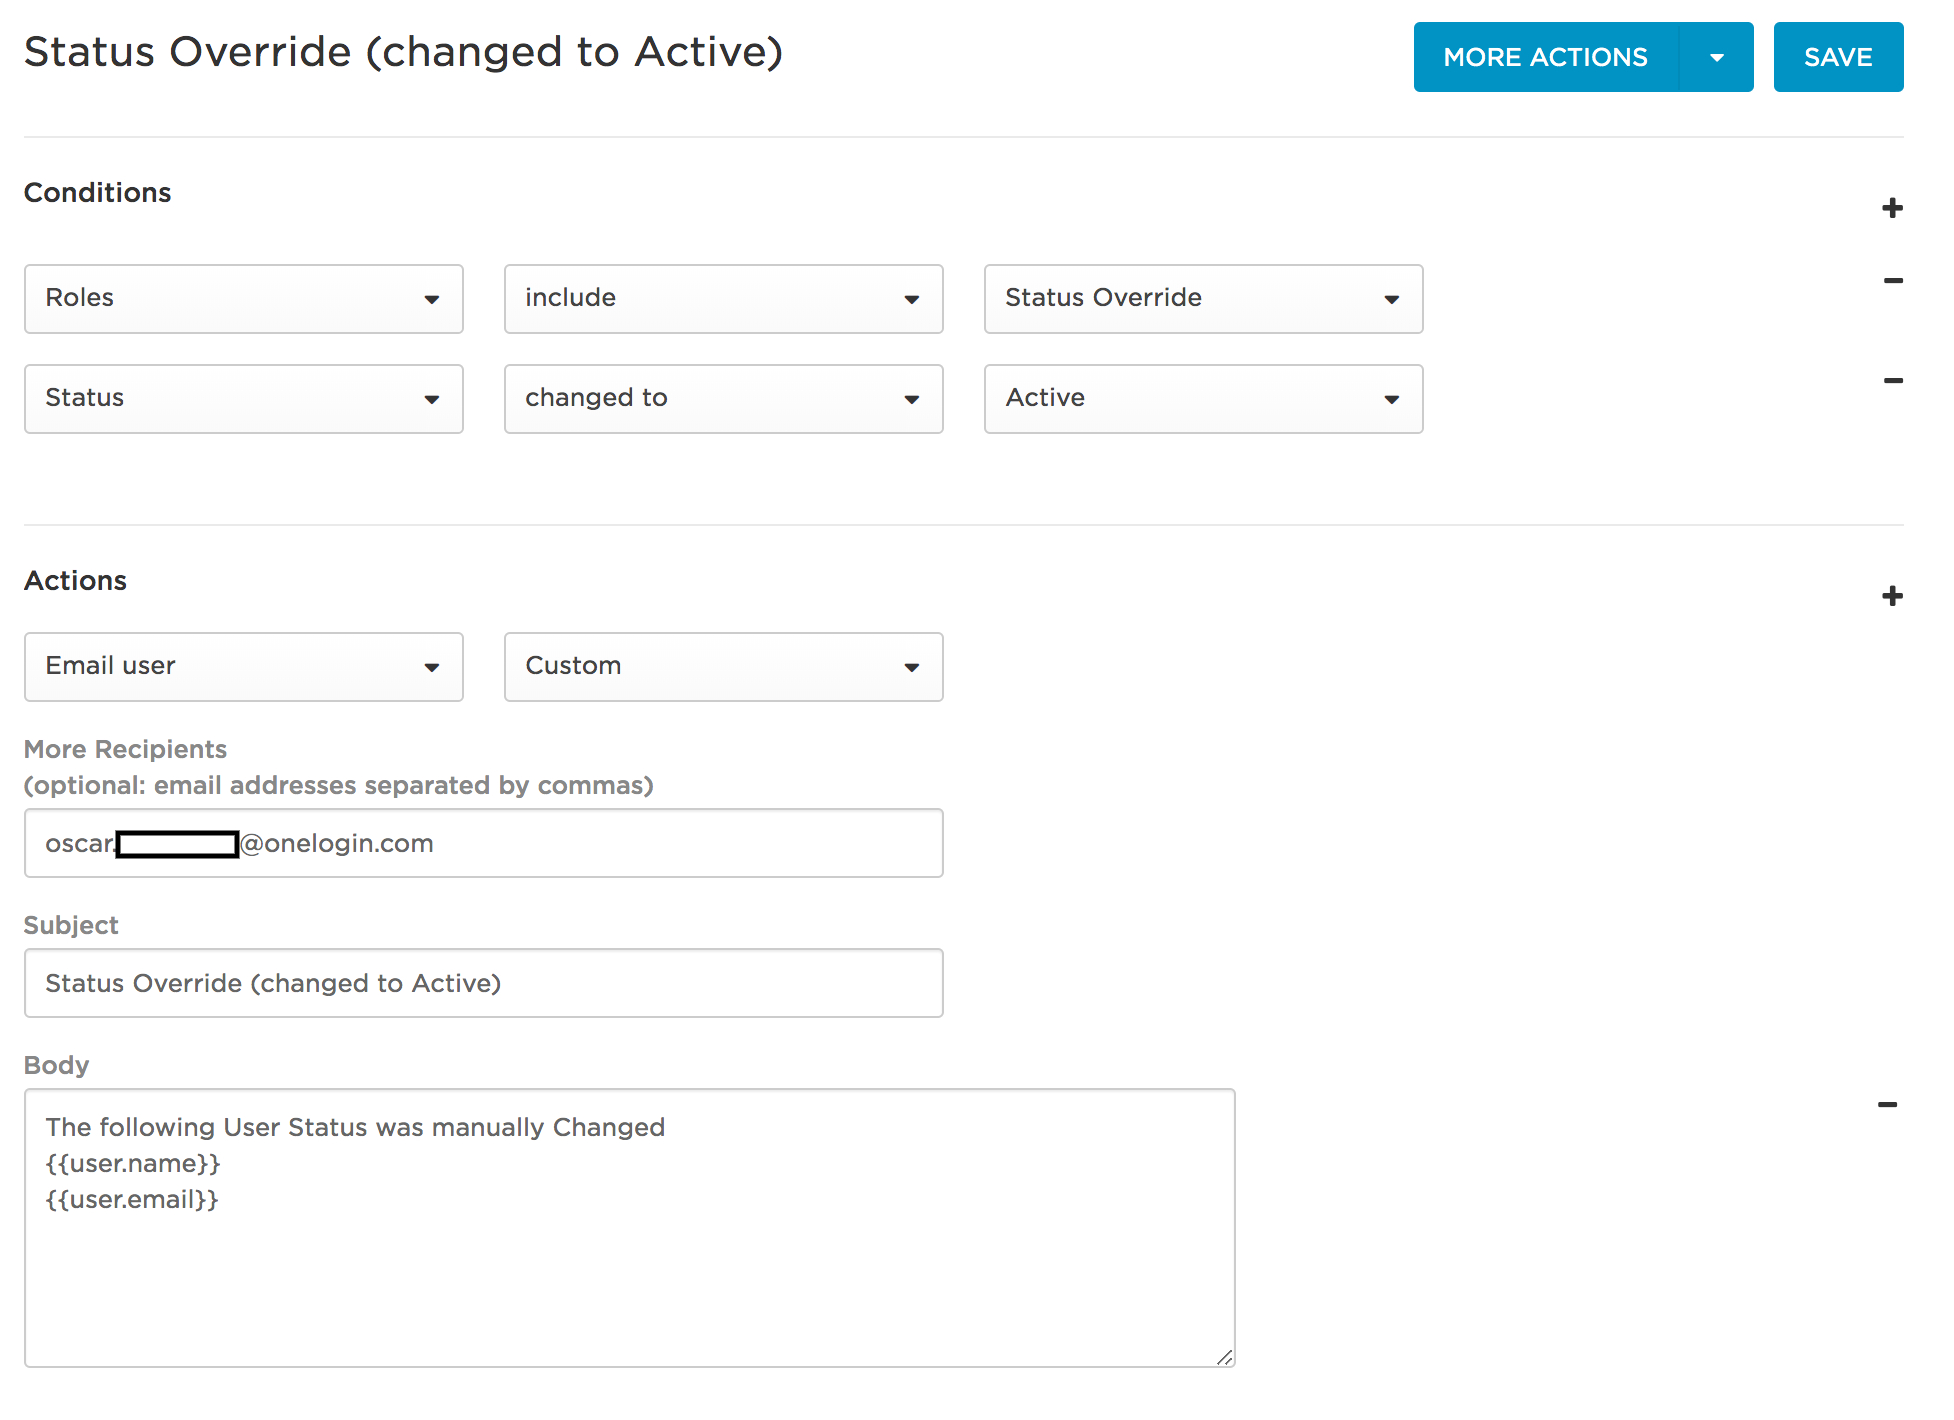
Step 5: Status Override
When someone manually changes status in OneLogin, an email gets sent to the administrator that the user has been overridden. This status allows administrators to be added to the Status Override role.
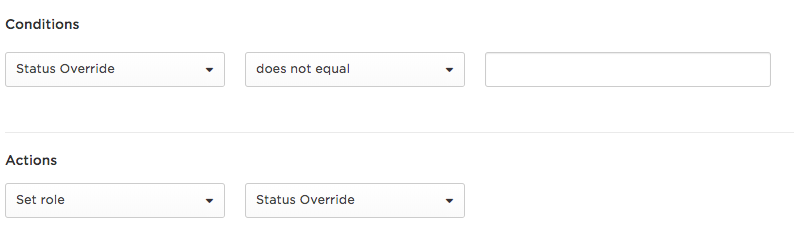
Condition
Status Override - check the custom attribute per user for the “Status Override” field. If it’s not empty, then trigger the condition.
Actions
Set role - the user is added to the Status Override role.
Specific Use Cases
- Termination - clean up an account without the users knowing (even when the user being cleaned is an IT admin).
- Using a custom field for a status code populated with a specific phrase that can be changed when they need to be deleted.
Step 6 (optional): Bi-Directional Sync
We are able to configure a bi-directional sync to/from AD for specific attributes.
- Create a bidirectional sync
- Attributes are mapped to AD in the ADC attribute mappings.
- New custom attributes are created that are synced from AD to OneLogin.
- Mappings add these custom fields back to the standard OneLogin fields.
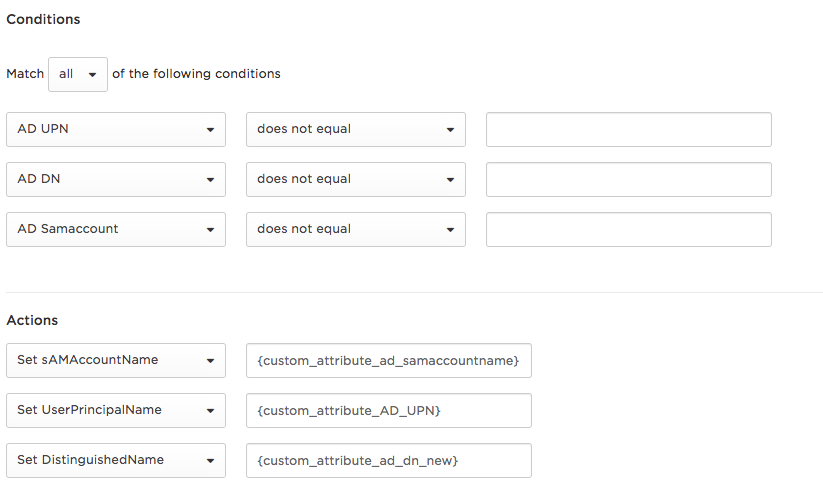
Conditions
AD UPN | AD DN | AD sAMAccountName - these are the custom attributes which will be synced from the Active Directory for bi-directional sync. If these are synced in by AD, then they will not be equal to Blank.
Actions
Set sAMAccountName | Set UserPrincipalName | Set DistinguishedName - Sets the principal attributes to the newly updated AD attributes pulled from the manual AD update.
Step 7: Update Authentication Directory Mapping
Anytime a directory touches a user, it updates the user to switch to a new directory i.e. Workday will take over the directory when it updates. This is required to keep it in sync with Active Directory.
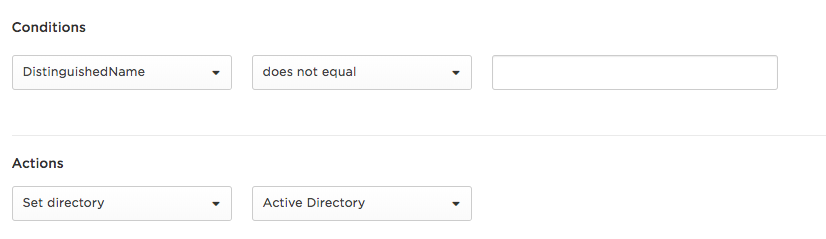
Condition
DistinguishedName - as long as the user has been created in AD, trigger this Active Directory condition.
Actions
Set directory - Configure the authentication directory back to Active Directory.
Validation of Mappings
How to validate that mappings and provisioning were correctly configured?
Validation Steps
Scenario 1: AD user provisioning testing
- Create a test user with a specific email.
- Configure the conditions to trigger upon this email being set.
- Test provisioning five users minimum to have a user flow to each OU mapping.
Optional Test
- Create a copy of their AD OU structure in a test AD.
- Bring all users into the test structure from the Workday report.
- Ensure there are no duplicates.
- The exact replica of their AD is kept for users and attributes.
Events
Check the event update by Active Directory where it shows that the user has been created in Active Directory.
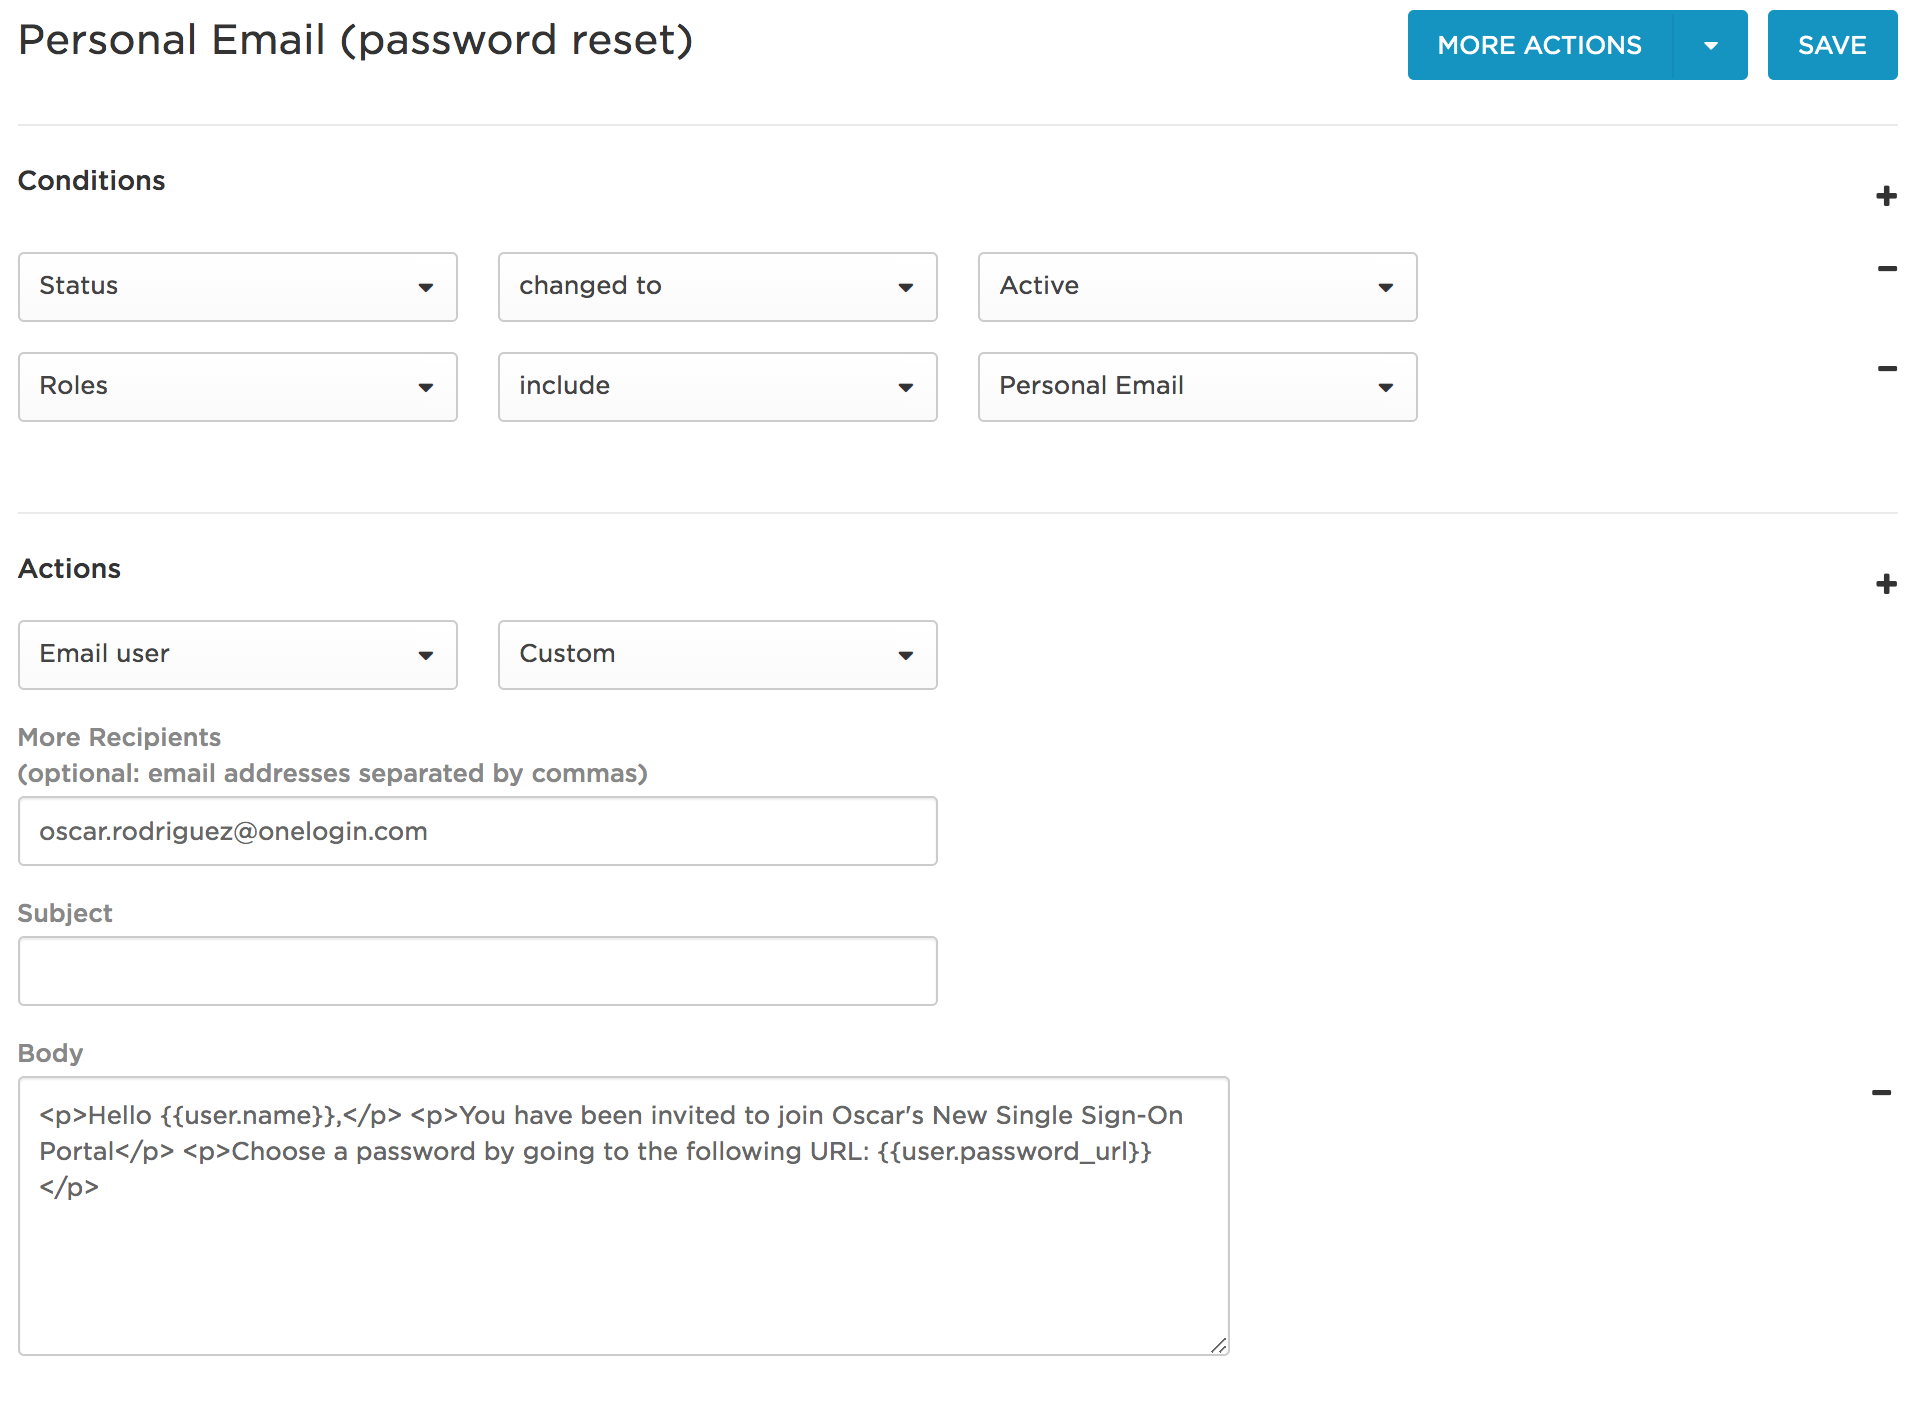
Configure Notifications
When new users are created, notifications are set up so an email sent to an admin to notify them of each user that was added, suspended, or an activation email is sent to a personal email.

FAQs
How do admins delete users?
They need to move them to a deleted OU and the user is deleted in OneLogin.