OneLogin (as an Identity Provider) and One Identity Manager (as an IGA service) provide a powerful integration to address many common identity use cases such as:
- Self-service access requests
- Access recertifications and attestations
- Approval workflows
- User onboarding
All such use cases can benefit from strong and flexible authentication and single sign-on policies including MFA, risk evaluation and passwordless flows.
The OIDC authorization code flow is used as the basis for the single sign-on mechanism.
Table of Contents
User Login Flow
In a SAML federated relationship, there are typically two types of flows that are referred to as SP-initiated and IdP-initiated. With an OIDC federated relationship like this, the same results can effectively be achieved, despite the OIDC specification having no real concept of an IdP-initiated authentication. The OneLogin to Identity Manager integration supports both flows which can be summarized as follows.
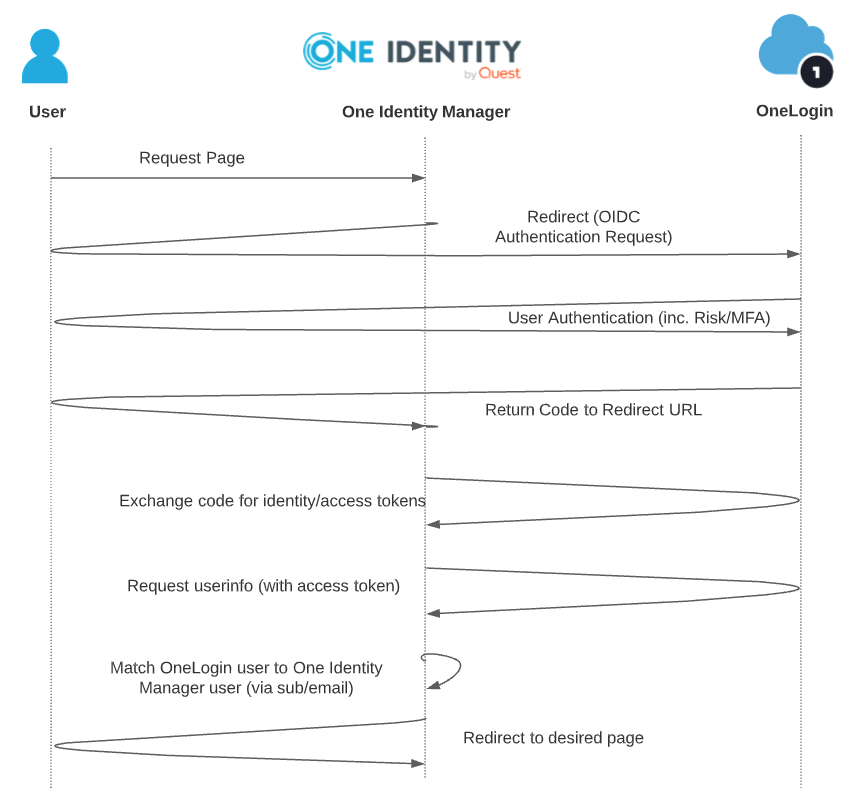
SP-Initiated Flow
-
User attempts to access content at the Identity Manager web portal. (Identity Manager recalls this page request later.)
-
As the user isn't authenticated, Identity Manager prepares an OIDC authentication request and redirects the user to send it to OneLogin.
-
OneLogin authenticates the user and applies any risk/MFA policies as per administrative requirements.
-
OneLogin redirects the user back to Identity Manager’s registered Redirect URL and in doing so passes along the authentication code.
-
Identity Manager extracts the code and builds a request direct to OneLogin to exchange the code for identity and access tokens.
-
Although not strictly necessary (as OneLogin returns the required information within the identity token), Identity Manager builds a further request to OneLogin’s userinfo endpoint, using the access token as a bearer token.
-
Identity Manager extracts the user sub value (in this scenario, containing the user’s email address) and uses it to match to a local account.
-
Now that the user is considered authenticated and is assigned permissions in accordance with local policy, Identity Manager redirects the user to the desired content that was originally requested in Step 1.
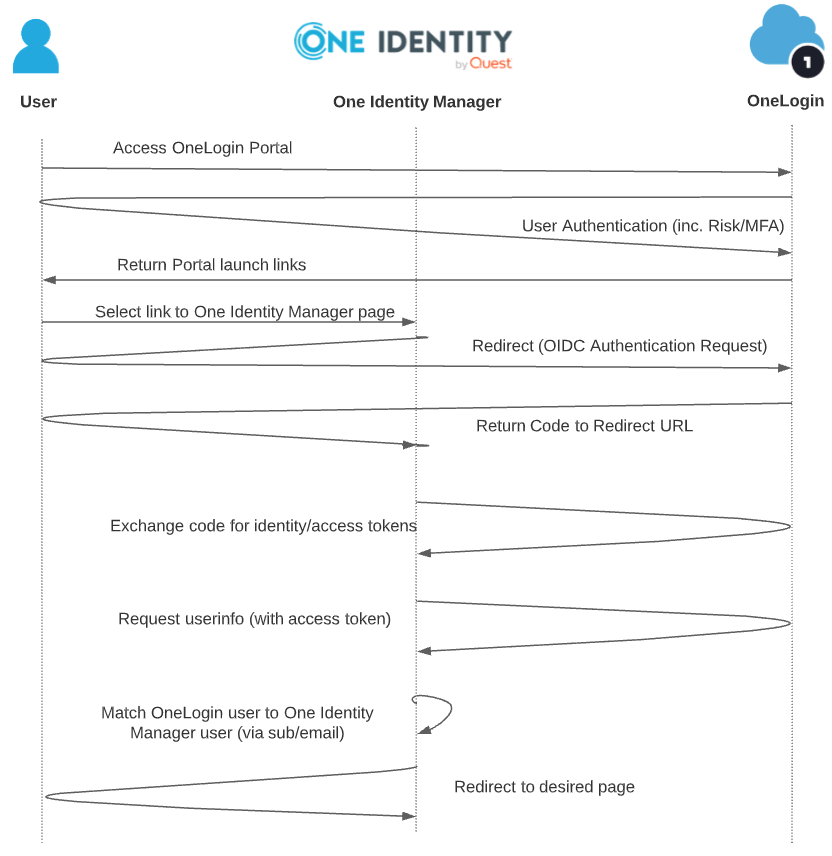
IdP-Initiated Flow
-
User attempts to access the OneLogin portal.
-
As the user is not yet authenticated, OneLogin authenticates the user and applies any risk/MFA policies as per administrative requirements.
-
OneLogin returns the portal content containing the assigned Identity Manager application launch tiles.
-
The user selects the desired application launch tile and in doing so is redirected to the desired page on the Identity Manager web portal. (Identity Manager will recall this page request later.)
-
As the user is not yet authenticated to Identity Manager, Identity Manager prepares an OIDC authentication request and redirects the user to send it to OneLogin.
-
As the user is already authenticated to OneLogin, OneLogin is able to simply redirect the user back to Identity Manager’s registered Redirect URL and in doing so pass along the authentication code. (Note: OneLogin can enforce additional authentication requirements at this point in accordance with any assigned application policy.)
-
Identity Manager extracts the code and builds a request direct to OneLogin to exchange the code for identity and access tokens.
-
Although not strictly necessary (as OneLogin returns the required information within the identity token), Identity Manager builds a further request to OneLogin’s userinfo endpoint, using the access token as a bearer token.
-
Identity Manager extracts the user sub value (in this scenario, containing the user’s email address) and uses it to match to a local account.
-
Now that the user is considered authenticated and is assigned permissions in accordance with local policy, Identity Manager redirects the user to the desired content that was originally observed in Step 4.
Configuring OneLogin
OneLogin acts as an OIDC Provider and is responsible for user authentication (including MFA/risk as desired) and transfers identity information to Identity Manager via an OIDC JWT-based identity token (and the userinfo endpoint).
Prerequisites:
- Administrative access to a OneLogin tenant.
- Test user account(s) created with email address(es) that match Identity Manager accounts. (Automated provisioning from Identity Manager to OneLogin would typically also be implemented, although that is beyond the scope of this document.)
Adding & Configuring an OIDC Application
-
From the Applications tab, select Add App.
-
Within the search box, enter Identity Manager and Enter.
-
Select the One Identity Manager app connector.
-
Click Save.
-
On the Configuration tab, enter:
Login Url Redirect URI's https://your-identity-manager-host.your-domain/IdentityManager/
e.g., https://iamserver.iamdemo.com/IdentityManager/The same URL as above, and https://your-identity-manager-host.your-domain/IdentityManager/page.axd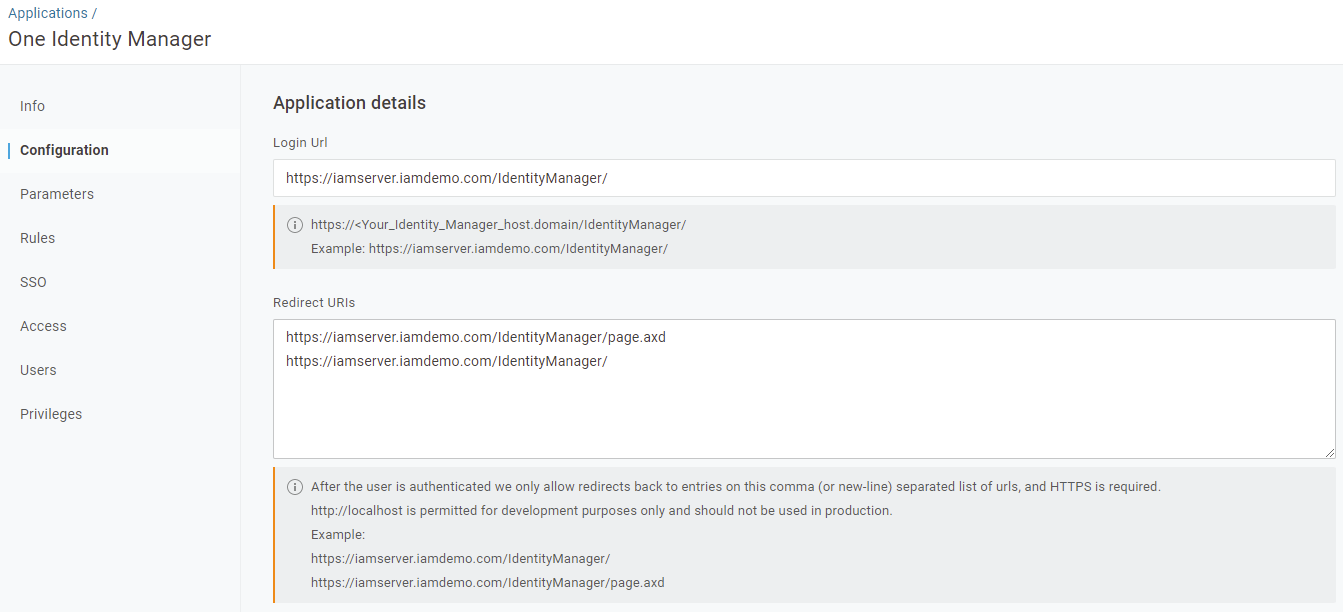 The Login Url is used when the user invokes the application from the OneLogin portal and the Redirect URI's is a list of acceptable redirect_uris that an Identity Manager can use when sending its OIDC authentication request to OneLogin.
 -
From the SSO tab, take note of the Client ID and Client Secret; you will need these later to configure Identity Manager.
-
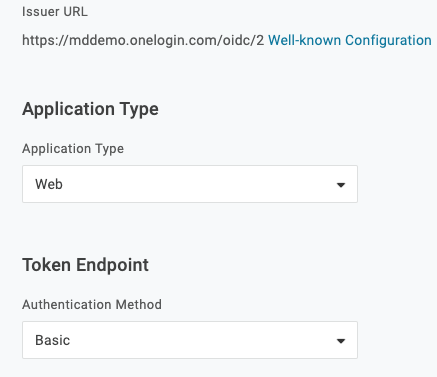
The Application Type is Web and the Token Endpoint is Basic.
-
Right-click the Well-known Configuration link and copy it for the Identity Manager configuration. It's in the form of:
https://tenant.onelogin.com/oidc/2/.well-known/openid-configuration. -
On the Access tab, assign the application to any desired roles, e.g. Default, by selecting and observing that the selection turns a dark blue. Alternatively, assign the application from the user objects.

-
Click Save.
Configuring One Identity Manager
One Identity Manager will be acting as the OIDC relying party and instead of presenting its normal forms-based login page, it will be configured to automatically invoke OneLogin for authentication purposes.
Prerequisites:
- Administrative access to a One Identity Manager instance
- Access to the Designer
Enabling & Configuring Identity Provider
-
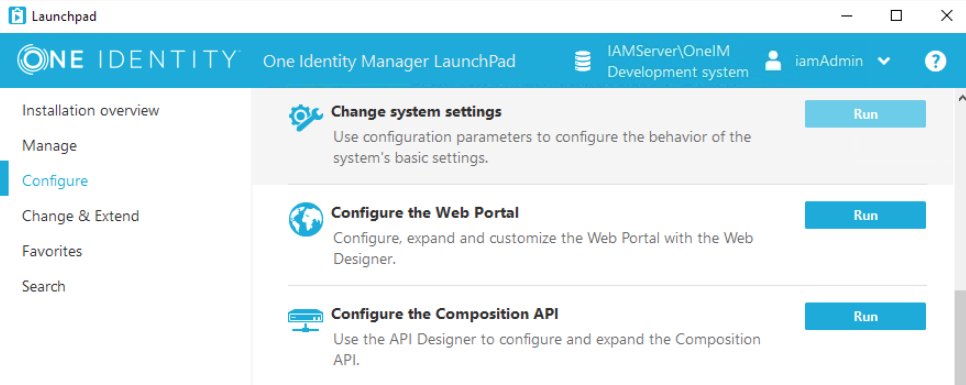
Authenticate to the Identity Manager Launchpad.

-
Open the Designer via Configure > Change system settings.
-
In the bottom-left panel, select Base Data.
-
From the top-left Navigation panel, expand Security Settings and go to Authentication modules.
-
In the List Editor in the central panel, select OAuth 2.0/OpenID Connect (role based).
-
From the Properties edit view in the bottom panel, set Enabled to
True.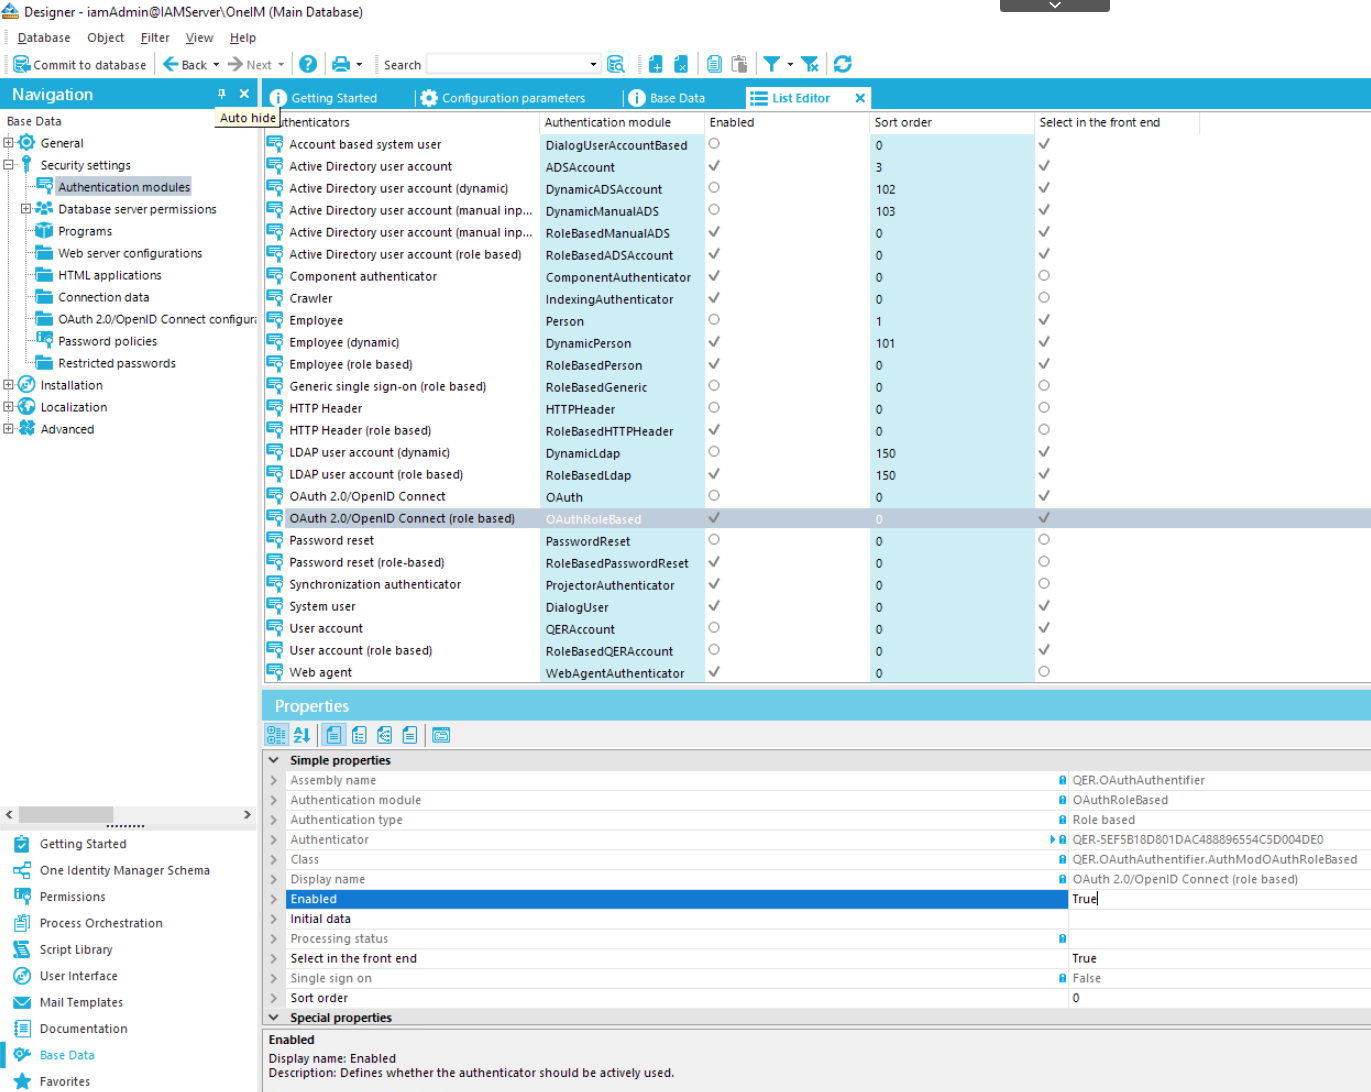
-
In the top-left Navigation panel, select OAuth 2.0/OpenID Connect configuration and in the right-hand Tasks panel, click Create a new identity provider.

-
On the start page of the wizard, click Next.
-
Enter a Display name, such as
OneLogin, and a description (optional). -
Click Next.
-
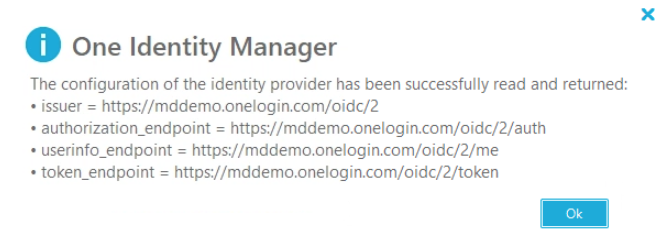
In the Automatic configuration data discovery option, enter the Well-known Configuration URL obtained from OneLogin above. It's in the form of:
https://tenant.onelogin.com/oidc/2/.well-known/openid-configuration.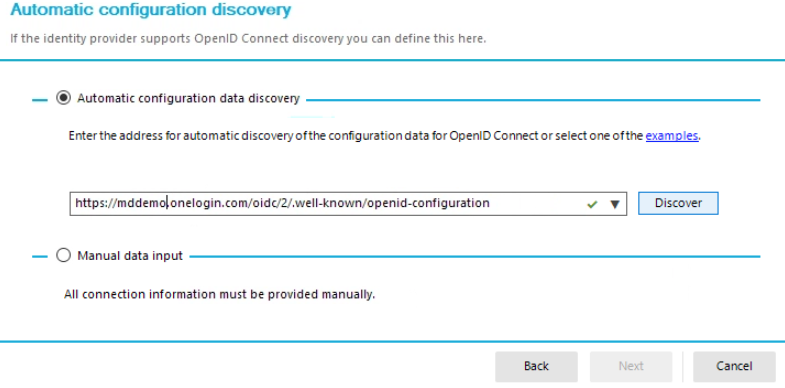
-
Click Discover and then OK.
-
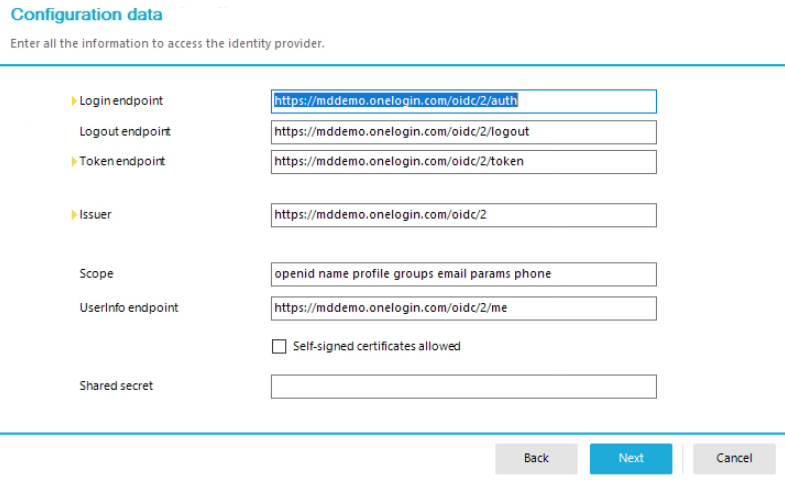
Verify the displayed information, then select Next.
-
On Configure certificates, confirm the JSON web key endpoint. It's in the form of:
https://tenant.onelogin.com/oidc/2/certs.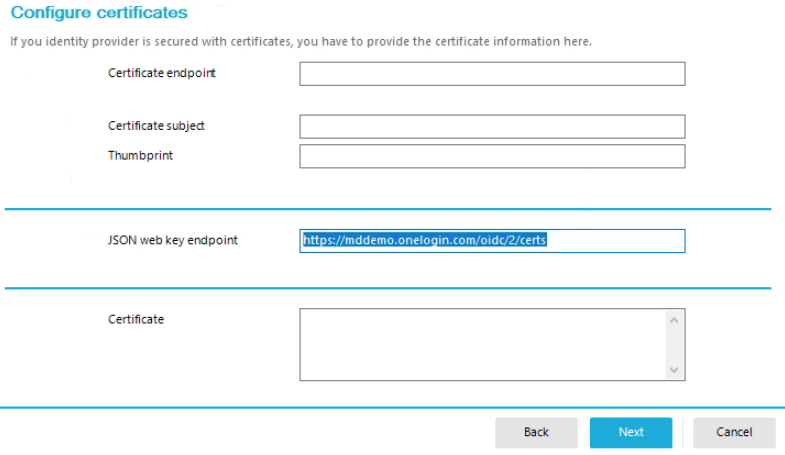
-
Click Next.
-
On the Search rule for user information page:
Search value Column to search User name value sub Person - DefaultEmailAddress* sub 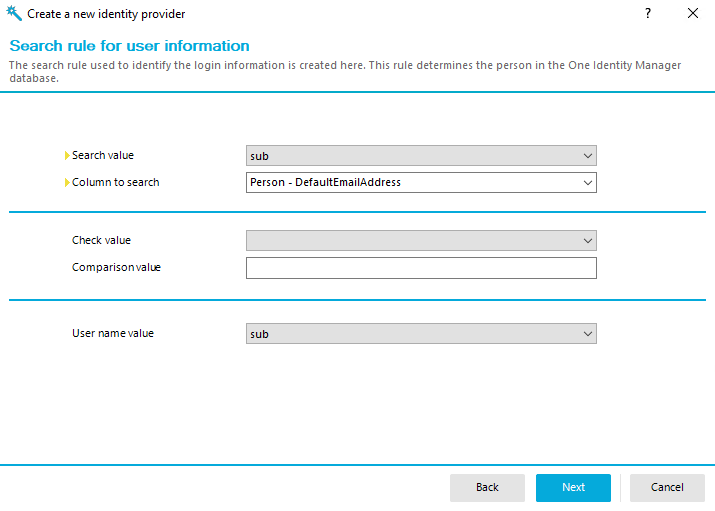
*other columns may be viable depending upon your Identity Manager configuration -
Click Next.
-
On the Create OAuth 2.0/OpenID Connect applications page, click the symbol next to the Applications input field to make the central panel editable.
- Populate the following fields:
Display name ClientID Shared secret Redirect URI OneLoginEnter the Client ID obtained from the OneLogin configuration above. Shared Client Secret enter the value obtained from the OneLogin configuration above. Enter the Identity Manager URI in the form of https://your-identity-manager-host.domain/IdentityManager/. -
Select the Authentication tab. For the Authentication method, select client_secret_basic.
-
Click Next and Finish to close the dialog.
-
From the Navigation panel at the top-left, select Web server configurations.
-
In the central List Editor panel, select the web application in the form of:
https://your-identity_manager_host.domain/IdentityManager/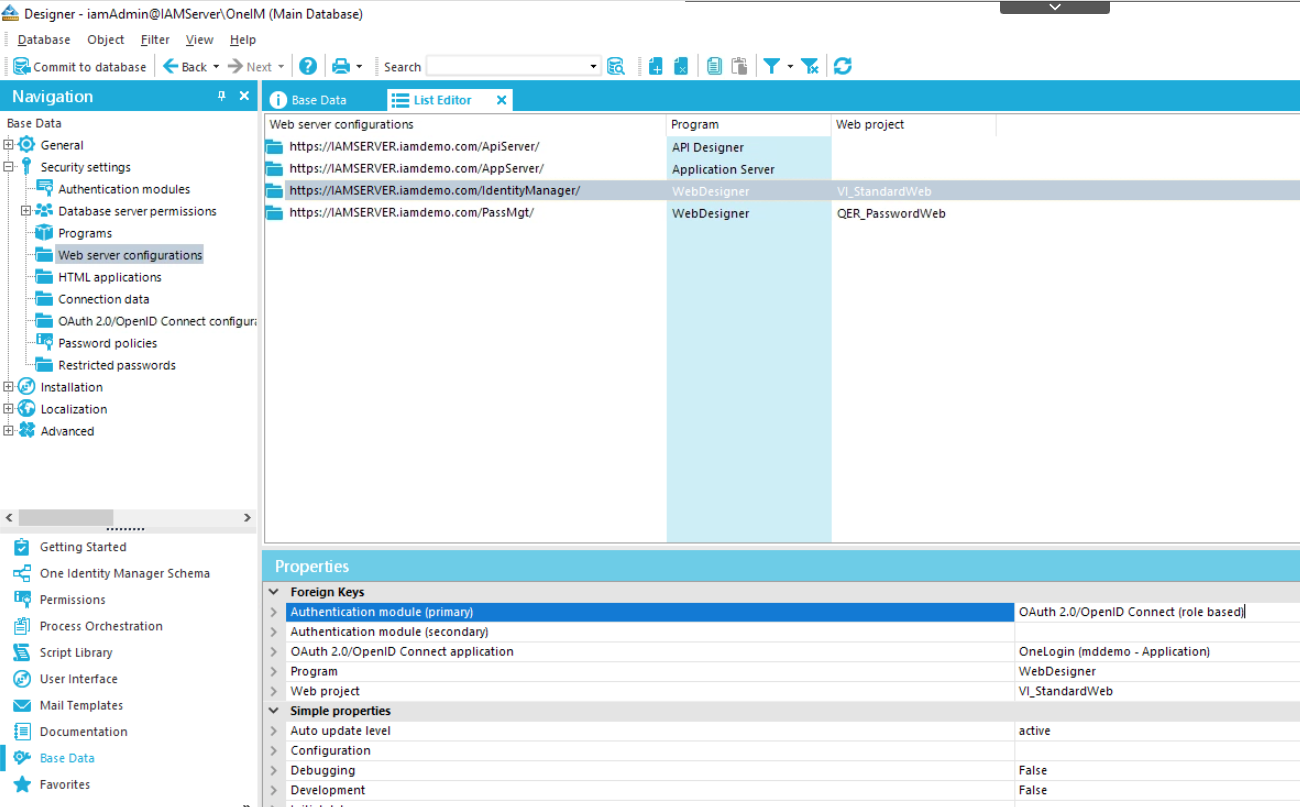
-
In the Properties panel at the bottom, select:
Authentication module (primary) OAuth 2.0/OpenID Connect application OAuth 2.0/OpenID Connect (role based) Select the application created above. -
At the top-left, select Commit to database, then click Save.

Configuring Skytap
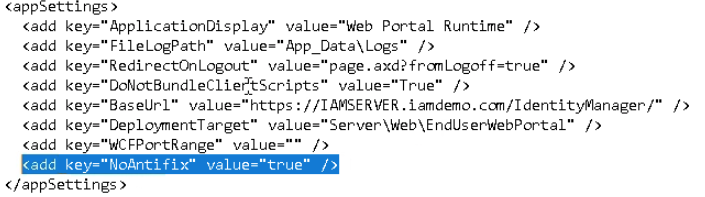
If using Skytap, there's a cookie setting issue that requires an additional configuration step. Access the Identity Server host's web.config file at C:\inetpub\wwwroot\IdentityManager, go to the <appSetting> section, and add this line:<add key="NoAntifix" value="true" />
Testing
SP-Initiated Flow
Access the Identity Manager portal at https://your-identity-manager-host.domain/IdentityManager/ and observe a redirect to your OneLogin tenant.
Once authenticated, you're redirected to the Identity Manager where you're seamlessly logged in based on the email address of the OneLogin user account.
IdP-Initiated Flow
Access your OneLogin portal at https://your-tenant.onelogin.com and select the assigned Identity Manager title after authenticating. You're then redirected to Identity Manager and seamlessly logged in based on the email address of the OneLogin user account.
Log files for a Windows Identity Server web application can be found at C:\inetpub\wwwroot\IdentityManager\App_Data\Logs\log.txt.
Deep-Linking for Improved User Experience
The above configuration will support SSO for any Identity Manager URL that is directly invoked by the user (e.g., an SP-initiated flow). It will also provide SSO if the user journey begins at the OneLogin portal where the user selects the Identity Manager application tile.
In the latter case, the user will be directed to the One Identity Manager Home page, where the user can go to all the relevant services that are available to them as defined by local role-based authorization policies.
In some cases, administrators may wish to provide the users with dedicated deep-links to specific tools in the Identity Manager platform, such as a deep-link to take the user directly to create a new Access Request. Quick Links is a user convenience that acts like a simple published bookmark and saves the users time and clicks to get around. Just like the OIDC application configured above, these can be assigned to users with role-based assignment.
Defining a Quick Link
- Go to an Identity Manager page that you want to deep-link to and note its URL. Remove all parameters from the request except for
MenuIDandContextID.
-
For example, if selecting the option to make a new Access Request, the address bar URL indicates:
https://iamserver.iamdemo.com/IdentityManager/page.axd?RuntimeFormID=101b3676-0ca1-48c1-97f7-0cb41fa595f2&aeweb_handler=p&aeweb_rp=&wproj=0&MenuID=QER_Request_MyRequests&ContextID=VI_ITShop_ProductSelection -
After removing the parameters other than
MenuIDandContextID, the URL becomes:https://iamserver.iamdemo.com/IdentityManager/page.axd?MenuID=QER_Request_MyRequests&ContextID=VI_ITShop_ProductSelection
-
-
From the Applications page, select Add App.
-
Search for and select your preferred quick link application, such as Quicklink SP (GET).
-
Provide a suitable Display Name, such as New Access Request and upload a suitable icon, if desired.
-
In the Configuration tab, paste in the URL you obtained above.
-
In the Access tab, select the roles you want to assign the quick link to.
-
Click Save.
When a user invokes the quick link, Identity Manager authenticates the OIDC SSO connection with OneLogin and returns the user to the URL you entered.
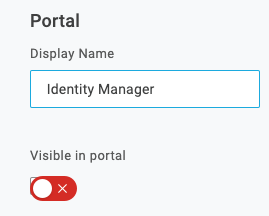
All potential Identity Manager users need to be assigned to the OIDC application, but only relevant users should be assigned to the quick links. To prevent confusion, you can hide the OIDC application from the Portal view so that users can only see their assigned quick links but the OIDC app can still function behind the scenes and provide SSO regardless of which quick link is invoked.