Workday Bidirectional Directory Integration
This topic describes how to sync users between OneLogin and Workday using the Workday Get_Workers API. Before following the steps below, read How to Configure Workday Directory Connectors to understand what the options are for your organization.
Note: If you just want to set up SSO for Workday, see Configuring SAML for Workday.
Configuration Overview
To configure Workday sync with OneLogin, you must:
- Create a Workday Integration System User with access to the Workday domains that you will sync with OneLogin.
- Configure OneLogin to sync users with Workday.
Create a Workday Integration System User
Workday integrations with OneLogin require an Integration System User account with Get access to all of the Workday security domains touched by the integration. If you want to export attributes from OneLogin to Workday, you must create an Integration System User account with both Get and Put access to those domains that can be exported from OneLogin to Workday. These instructions tell you how to create and configure a read-only Integration System User account with Get access and an admin Integration System User account with both Get and Put access.
Note: This procedure takes place in Workday and these instructions are provided as a convenience. For complete and up-to-date instructions, see Workday documentation.
Create an admin Integration System User to import and export attributes between Workday and OneLogin
- Log in to Workday with an administrator account, then locate and open the Create Integration System User task.
- Create the user, configure the integration system user details, and Save the configuration.
- Search for and open the Create Security Group task.
- In the Type of Tenanted Security Group field, select Integration System Security Group (Unconstrained).
- Add the Integration System User you created above to the group and save the configuration.
- Add the domains that you want to sync with OneLogin to the security group.
- Search for and select domain: Worker Data: Public Worker Reports, then click the ellipsis (...).
- In the window that opens, hover your cursor over Domain and click Edit Security Policy Permissions.
- Under Integration Permissions, add the security group that you created.
- Select the checkbox in the Get column, then click OK.
- For any domains whose fields you want to export from OneLogin to Workday, repeat the above steps, selecting the checkboxes in both the Get and Put columns when you Edit Security Policy Permissions. The domains that OneLogin can write to include Worker Data: Work Email and Worker Data: Work Address.
Add your security group to the business process security policy for the Maintain Contact Information (web service).
- Search for Business Process Security Policies for Functional Area and select it, then enter Contact Information in the Functional Area field, then click OK.
- In the left pane, select Contact Change and scroll to the bottom of the page and click the Edit Permissions button.
- Under Initiating Action: Maintain Contact Information (Web Service), add your security group, then click OK.
- Search for security changes and open Activate Pending Security Policy Changes, then enter a comment, click OK, and confirm the changes.
Configure OneLogin
After you created a Workday Integration System User with permission to read or modify the fields synced with OneLogin, configure OneLogin to sync with Workday.
- Login to OneLogin as an administrator and go to Users > Directories.
- Click New Directory and select Workday Bidirectional, ensuring you have selected the Directory Connector with the correct name.
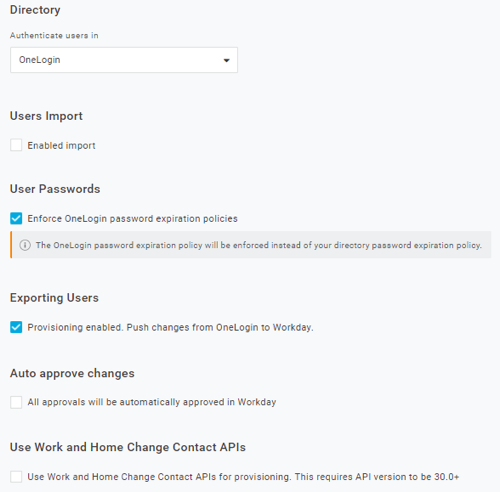
- Name the directory and choose OneLogin under Authenticate users in.
- Click Save to enable additional configuration fields and tabs.
- Since we recommend using the Workday Custom Report directory connector to synchronize users from Workday to OneLogin, clear the Enabled checkbox under Importing Users.
- To enable this directory connector to export user attributes from OneLogin to Workday, select Provisioning enabled.
- To automatically approve all user updates exported from OneLogin to Workday, select Auto approve changes.
- Select Use Change Contact API to use the Workday Update Contact API to update user contact information when the user record is in a workflow. (Workday v30 or above is required to use this API. To find your current version, consult the URL in the API Endpoint field)
Security Groups
Prior to working with the v30 API, you must create a general set of permissions. Perform the following in the Workday UI.
- Search and select the domain Integration build.
- Click the ellipsis (...) next to Worker Data: Public Worker Reports.
- In the dialog, place the cursor over Domain and click Edit Security Policy Permissions.
- Under Integration Permissions, add the security group you created.
- Select the checkbox in the Get column, then click OK.
- Activate your security policy changes.
- Search for security changes and open Activate Pending Security Policy Changes.
- Enter a comment, click OK, and confirm the changes.
To work with the new endpoint, you must create separate sets of permissions for Work Contact Data and Home Contact Data, as they are 2 separate API calls. Perform the following in the Workday UI.
Work Contact Data
- Search for Business Process Security Policy, then click Edit Business Process Security Policy.
- Select Work contact change as the Business process type and locate Change Work Contact Information (Web Service), then set security groups for permissions and click Save.
- Navigate to Profile > Workbench > Security and Audit, then locate Activate pending security policy changes on the Actions tab, enter a comment, and confirm.
Home Contact Data
- Search for Business Process Security Policy, then click Edit Business Process Security Policy.
- Select Home contact change as the Business process type and locate Change Home Contact Information (Web Service), then set security groups for permissions and save.
- Navigate to Profile > Workbench > Security and Audit, then locate Activate pending security policy changes on the Actions tab, enter a comment, and confirm.
Enter the API Settings required to connect to the Workday API.

API username and API password are the credentials for the Integration System User account you created in Creating a Workday Integration System User. Include @ + your Workday tenant name (@tenant_name) in the username, e.g. integration_user@acme. If you intend to export OneLogin attributes to Workday, use the Integration System User with admin rights (both Get and Push permissions).
API endpoint is the Workday web service URL. For example: https://server_name.workday.com/ccx/service/tenant_name/Human_Resources/v30.0?wsdl. If you do not know your endpoint URL, contact Workday or see the Workday Getting Started documentation for more information.
Worker ID for fetching Schema is a Worker ID for any employee in your Workday system that has values populated in all fields that you are synching with OneLogin.
- Click Save to connect to the API and retrieve available Workday fields to sync with OneLogin.
These fields appear on the Directory Attributes tab, which appears after Save is clicked. - On the Directory Attributes tab, map the Workday fields you want to sync with OneLogin by selecting the Workday field from the dropdown in the Directory Field column for each required field.
- Click the + plus button at the top right to add mapping rows. For any new mappings, you must create a OneLogin custom user field to hold the value you want to sync with the Workday field.
The fields in the following table are the fields you must map between OneLogin and Workday and the fields you can sync in both directions. All of the other fields in the Workday Field dropdown are optional and can only be imported from Workday to OneLogin.
Directory Attributes
| Workday domain | Field name on Directory Attributes tab | OneLogin Field | Export? | Required? |
| Worker Data: External ID | worker_id |
external_id |
Y | |
| Worker Data: Work Email | primary_work_email |
email |
Y | Y |
| Worker Data: Legal Name | legal_first_name |
firstname |
Y | |
| Worker Data: Legal Name | legal_last_name |
lastname |
Y | |
| Worker Data: Username | user_id |
username |
Y | |
| Worker Data: Preferred Name | preferred_first_name |
custom field | ||
| Worker Data: Preferred Name | preferred_last_name |
custom field | ||
| Worker Data: Work Phone | phone_number_work |
custom field | Y | |
primary_work_phone_device_type* |
custom field | Y | ||
| Worker Data: Home phone | phone_number_home_1 |
custom field | Y | |
home_phone_1_device_type* |
custom field | Y | ||
| Worker Data: Work Address | business_address |
custom field | Y | |
| Worker Data: Work Address | business_address_city |
custom field | Y | |
| Worker Data: Work Address | business_address_state |
custom field | Y | |
| Worker Data: Work Address | business_address_zip |
custom field | Y | |
| Worker Data: Work Instant Messenger | primary_home_messenger_provider |
custom field | Y | |
| Worker Data: Work Instant Messenger | primary_home_messenger_id |
custom field | Y | |
| Worker Data: Home Instant Messenger | home_messenger_1_provider |
custom field | Y | |
| Worker Data: Home Instant Messenger | home_messenger_1_id |
custom field | Y |
Note: If you export a phone device type field (for example, primary_work_phone_device_type) from OneLogin to Workday, all user records must include a value for the corresponding phone number field (for example, phone_number_work).
When you're done, click Save.
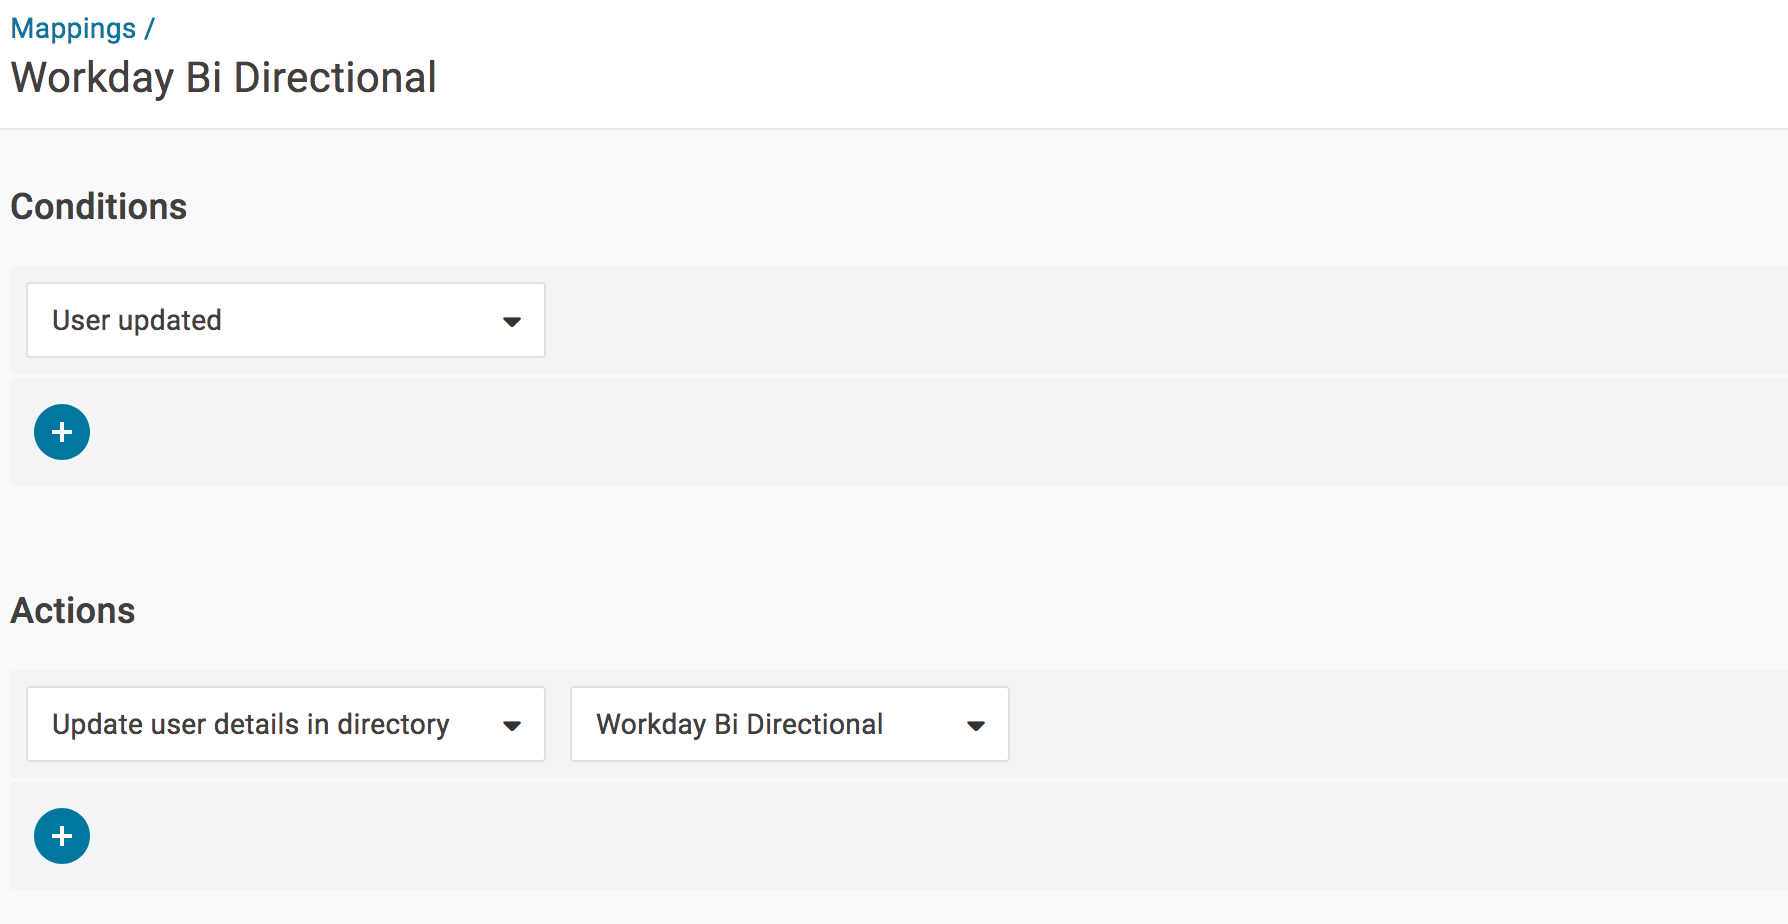
Configure Mapping to Update Workday User
The final step is to set up a mapping so that when a user is updated in OneLogin the change will trigger the update to be sent to Workday. The simplest mapping fires whenever a user is updated in OneLogin and triggers an update of user details to be sent back through the Workday Bi Directional directory connector.