|
OneLogin's integration with G Suite ties together your existing G Suite user management system with the web-based applications used by your company, providing an Identity and Access Management system rooted in your G Suite account. This is achieved by:
- Importing user accounts from G Suite into OneLogin, so you don't have to import them by hand
- Continuously monitoring G Suite for new or updated users and instantly creating/updating those users in OneLogin.
When used together with the G Suite SAML connector, the G Suite Directory Connector can create a real-time bidirectional integration between OneLogin and G Suite, keeping OneLogin updated whenever users are added or updated in G Suite, and G Suite updated whenever users are added or updated in OneLogin. To find out more, watch our Configuring OneLogin's G Suite App Connector (Google Workspace) two-part video series.
Prerequisites: G Suite Administrator account with access to create/delete/update users and groups data.
Configuring the G Suite Directory Connector
-
In OneLogin, go to Users > Directories, click the New Directory button, and click the Choose button for G Suite or G Suite Advanced (if your plan includes the Advanced Directory add-on). Or, if you are editing a directory connector that you have already saved, select it directly from the Users > Directories page.
If G Suite Advanced is not available when adding a new directory:
- Make sure your plan includes the Advanced Directory add-on.
- Contact your OneLogin account manager and ensure that your account has Enabled Advanced Directory Field Mappings.
-
On the Basic tab, enter the name of the directory.

-
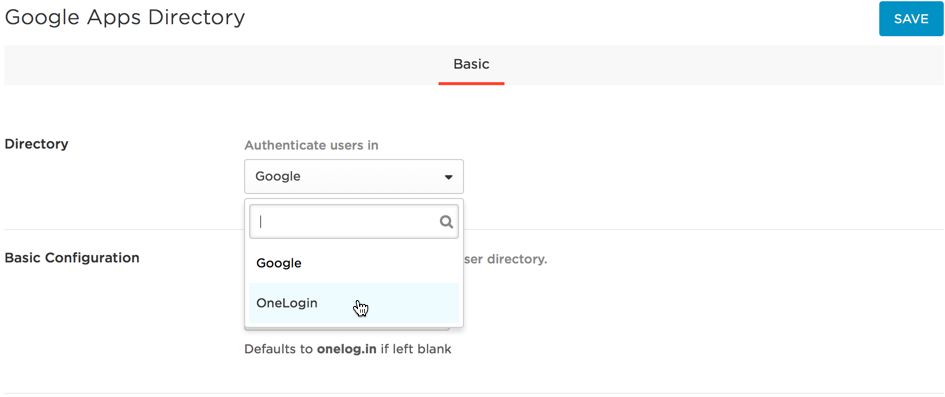
Under Directory, select OneLogin as the app to Authenticate users in.
Warning: As of May 29th, 2022, Google disabled the ability to allow users to authenticate their directory at the G Suite directory level for all but Google Workspace or Google Cloud Identity customers. The enforcement date for these customers will be announced on the Workspace blog at a later date. If you are not a Google Workspace or Google Cloud Identity customer, you must select OneLogin as your authentication directory. Failure to do so will cause user-affecting service disruptions and require immediate attention to resolve.
-
Under Basic Configuration, enable G Suite as your user directory and enter your primary G Suite domain in the Google Apps Domain field (such as acme.com)

-
Under Importing Users, configure the settings that determine how users will be imported from G suite.

-
Enable Mappings: Select if you want to assign users to OneLogin attributes based on their G Suite Group membership or admin role. This setting is selected by default. For more information, see Mapping Google Groups to OneLogin Attributes.
-
Enable real-time updates: Select if you want new users or updates to be imported to OneLogin immediately whenever they are added or updated in G Suite. This setting is selected by default when you are setting up new G Suite directory connectors. In most cases, selecting this option provides the best integration with OneLogin. If you don't select it, user updates are imported to OneLogin every six hours.
-
Sync User Status from Google: Select to update the OneLogin status (suspended, active) whenever the user status changes in G Suite (suspended, active). In most cases, selecting this option provides the best integration with OneLogin. If you selected OneLogin as your authentication source in the steps above, we recommend that you also select this option. If you don't opt to sync user status from Google, the Smart Passwords feature could allow a user who is suspended in G Suite to continue to access G Suite through OneLogin using the cached password hash.
Note: Due to processing limitations on the G Suite side, OneLogin will not be notified of a user's group membership changes in real time unless another user attribute changes at the same time. Otherwise, group memebership changes are passed through only during the 6-hour periodic sync.
If you have service accounts configured in Google that you don't want enabled in OneLogin, you can use mappings to set user status (active or suspended) in OneLogin based on G Suite status (active or suspended), excluding service accounts. For more information, see Mappings below. Note that this setting does not affect the way user deletion in G Suite is handled in OneLogin. That synchronization setting is configured in the Deleted users in Google drop-down menu.
-
Select how users who are deleted in G Suite should be handled in OneLogin:
-
Select a value from the Deleted users in Google... drop-down menu. Users can be deleted or suspended -- or you can leave their OneLogin status unaffected by their G Suite status. No matter your selection, admin users are neither suspended or deleted.
-
Click Save to save the directory, display the field that enable you to perform authentication against G Suite API, and display the Directory Attributes tab, where you can map G Suite attributes to OneLogin directory attributes.
-
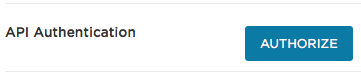
Authenticate OneLogin with the G Suite API:
-
On the Basic tab, click the Authorize button to initiate authentication.
-
When prompted by G Suite, enter your G Suite Super Admin credentials and accept OneLogin's request for access.
-
When you click Accept, you return to the Basic tab on the G Suite directory setup page in OneLogin, where a brief message indicates that your directory connection was successful.
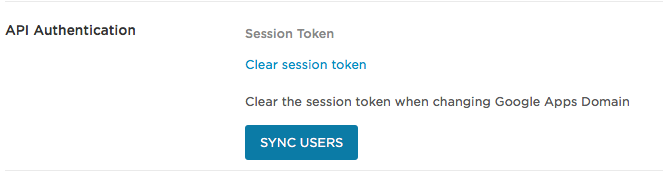
If you want to reauthenticate to the API (for example, if you change your G Suite domain), click Clear session token and repeat the API authentication steps listed above.
If you clear the OAuth token due to security concerns, delete the old token from G Suite. To do that, you must log in to G Suite in an incognito browser window with the administrator credentials that were used to create the OAuth token, at https://myaccount.google.com/permissions?pli=1 (if you don't have access to those credentials, contact G Suite support for assistance).
This should not be done unless there was a security breach in your environment in which you want to delete the OneLogin token.
-
While using your Gsuite global account admin user in a private/incognito browser, navigate to https://admin.google.com.
-
Paste the following URL into the same browser tab: https://myaccount.google.com/permissions?pli=1.
-
You will see a section called Third-party apps with account access. Click OneLogin.com and then click Remove Access.
In order to connect Gsuite’s Directory with your OneLogin portal again:
-
Log into OneLogin as an administrator.
-
Hover over Users, click on Directories, then click on your Gsuite Directory.
-
Under API Authentication, you will need to click on Authenticate in order to re-authenticate the API between OneLogin and Gsuite for directory services.
(Optional): Map G Suite attributes to OneLogin attributes from the Directory Attributes tab.
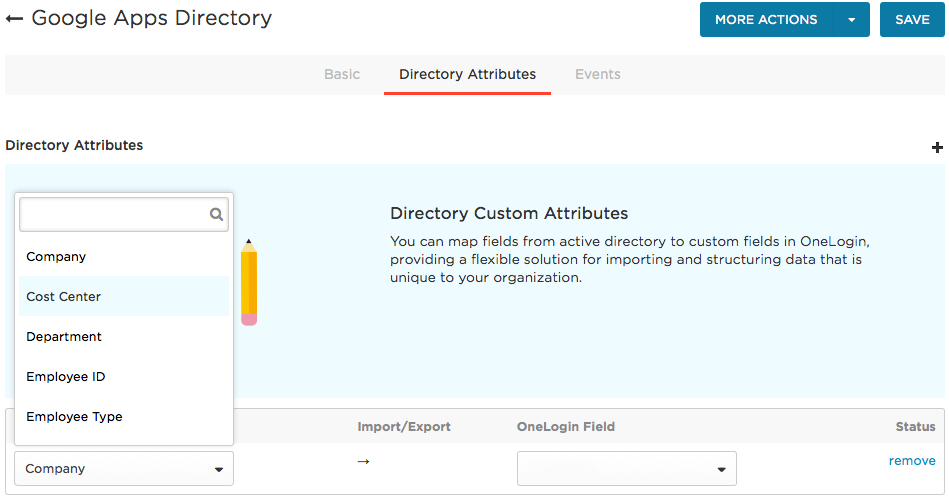
In addition to the key user attributes imported from G Suite to OneLogin (email, first name, last name, externalID, etc), there are additional attributes that you can import from G Suite:
- Company
- Cost Center
- Department
- Manager
- Employee ID
- Employee Type
- Groups
- Phone
- Title
To map one of these G Suite attributes to OneLogin, create a custom field in OneLogin to hold the value. For example, you can create a custom OneLogin field and select that attribute on this tab to hold a user's Google Group value upon user import from G Suite to OneLogin.
For instructions, see Mapping Google Groups to OneLogin Attributes, below. These instructions use the example of mapping Google Groups, but the process is the same for all available attributes.
Click Save if you make any changes on this tab.
-
To initiate user import from G Suite, return to the Basic tab and click Sync Users to provision users from G Suite to OneLogin.
Note: If you want to verify that the API connection is working and that your users are being imported successfully, go to Activity > Events and view the user import logs.
Mapping Google Groups to OneLogin Attributes
If you are using G Suite as your user directory, you may want to use Google Group membership to determine OneLogin security Levels (through OneLogin group membership) or app access (through OneLogin roles). These instructions can also be applied to mapping any available G Suite attribute to a OneLogin attribute. To enable this mapping of Google Group membership to OneLogin roles, security policies, or other attributes, the best practice is to map your users' Google Group value to their MemberOf attribute in OneLogin.
Note: A common identification for the correct mapping group is MemberOf. While Google Groups does not natively use that phrase, this guide will use it as a reference point for the sake of simplicity.
-
Create a custom user field to hold the attribute.
-
Go to User > All Users and select Custom User Fields under More Actions
-
Click New User Field.
-
Enter a Name and Shortname (no spaces) for the user field.
-
Map the new user field to the MemberOf attribute.
-
Go to Users > Mappings and click the New Mappings button.
-
Name the mapping and select the Conditions for the mapping.

-
Set the Actions to Set MemberOf and the value to the short name of the customer user field, using the syntax custom_attribute_short_name_of_field

-
Return to the Users > Mappings page and click Reapply all mappings.
-
Map Google Groups to the new custom user field.
-
Go to Users > All Users and select a user that was imported from your G Suite directory.
-
On the Directories Attributes table, click the + plus sign to add an attribute mapping.
-
Under Directory Field, select Groups from the drop-down.
-
Under OneLogin Field, select the user field that you created above.

-
Click Save.
-
Open your Gsuite Directory in OneLogin and click on Sync Users.
-
Verify that your users' Google Group group membership is mapped as their MemberOf value.
-
Go to User > All User and select a user that was imported from your G Suite directory.
-
On the User Info tab, view the Directory Details section. The Member of value must be name=users_google_group.
The actual name of the Google Group will not import into OneLogin; for example, a Google Group in Gsuite called Non Admins will import into OneLogin as name=Non Admins. It is necessary to include the name= portion when creating mappings, or they will not work properly.
Now when you sync users from G Suite to OneLogin, each users MemberOf attribute will hold that user's Google Group value. And you can use Google Group membership to assign OneLogin roles, statuses, security policy (through OneLogin group membership), or any other OneLogin attribute that you want, simply by mapping from MemberOf. For more information about using mapping to assign roles, see Mappings |