|
OneLogin's trusted identity provider (TIdP) feature enables you to configure multiple identity providers to securely sign users into OneLogin and OneLogin-protected applications. This guide walks you through how to create and configure TIdPs for your OneLogin tenant.
This feature requires a OneLogin subscription that includes Advanced Directory. Speak with your account representative for more information.
Overview
TIdP, also called inbound federation or relying party trust, is most often used in OneLogin when users from one OneLogin account need access to resources in another, or when administrators want to enable their users to log in to OneLogin with credentials from a different identity provider (IdP) such as Google, Facebook, or another business partner. For example, if your users already have accounts with Entra ID (previously known as Azure AD), you can add Entra as a trusted IdP and allow your users to authenticate their OneLogin accounts with their Entra credentials instead of having to keep track of a separate set of login information.
This is helpful in cases where you want to provide apps for partners and want that partner to manage their own user identities. This allows you to provide and extend your company apps to partners, let them authenticate using their own credentials, and allow greater control over user identity and provisioning costs. If you think of your company as the hub or source of an application, and a partner company is a spoke or target, one hub can provide apps to many spokes. This same hub-and-spoke model could also apply within distributed organizations where there are multiple business units with shared services.
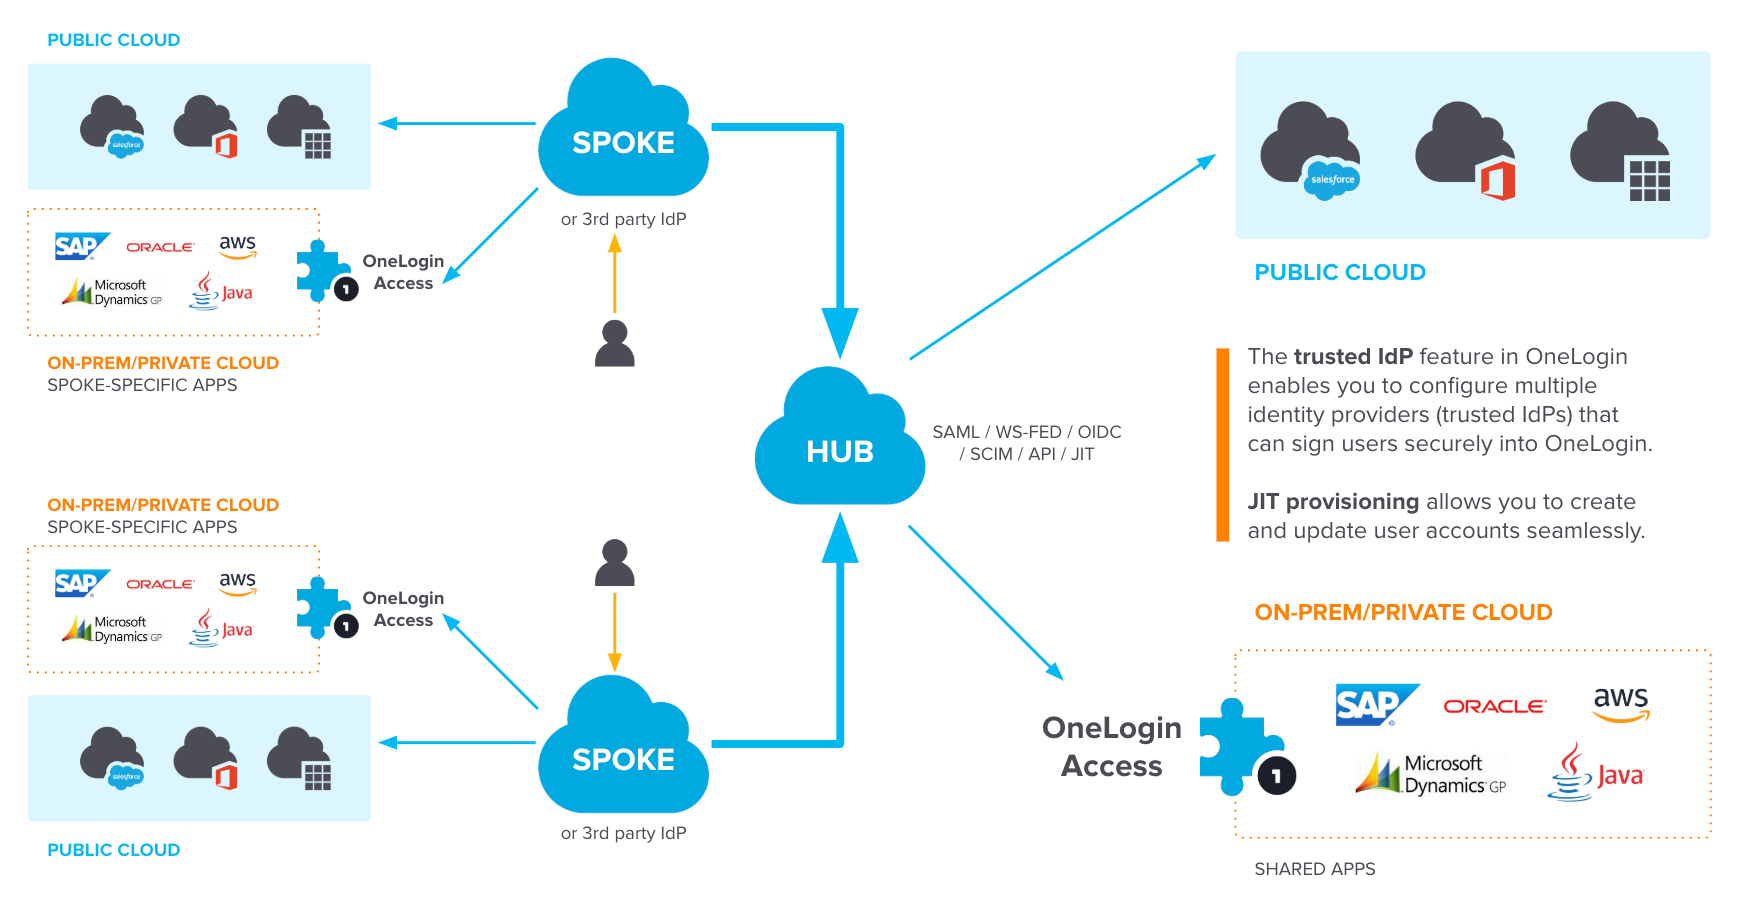
The TIdP feature is especially powerful when combined with other features!
-
With OneLogin's Managed Service Provider (MSP) Reseller model, MSPs can create and manage all their customer accounts from a single OneLogin MSP account and provide isolated tenants for their end customers. TIdP can link those accounts for SSO provisioning and provide seamless access to shared services.
-
Using multi-factor authentication (MFA) increases security and gives users more flexibility by allowing you to configure multiple ways to authenticate users beyond the traditional username and password. A TIdP can be added as one of these factors to authenticate the user with both their OneLogin and their IdP credentials.
Login Flows
If your OneLogin tenant is the hub of a wheel, then when TIdP is implemented, any identity provider you enable becomes one of the wheel's spokes. This includes any IdP from any vendor (including other OneLogin tenants), provided they support at least one of the three authentication protocols used by TIdP:
- Security Assertion Markup Language (SAML)
- OpenID Connect (OIDC)
- Open Authorization (OAuth) 2.0
Depending on the protocol and the IdP being used, the user might sign in to the IdP first or they could go directly to OneLogin and sign in with the credentials that are managed by the IdP.
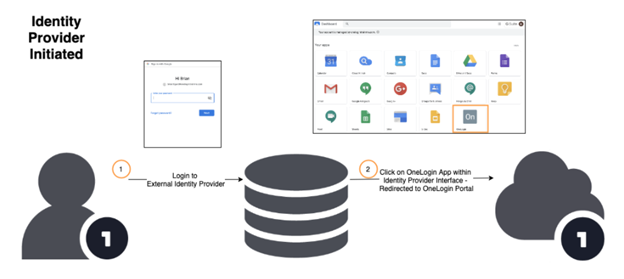
IdP-Initiated Flow
In this example of an IdP-initiated flow, the user logs in to Google (their IdP) as usual and sees a OneLogin tile in their G App Launcher or their Google Dashboard. When the user clicks the OneLogin tile, they're redirected to the OneLogin user portal, where they can then access any apps assigned to them through OneLogin.
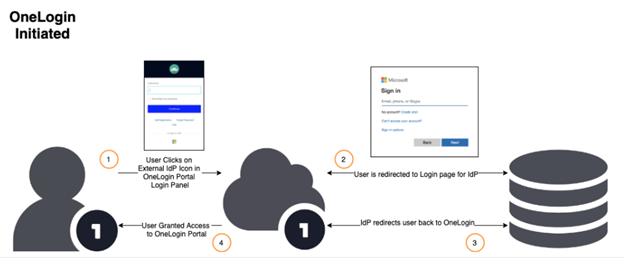
OneLogin-Initiated Flow
By contrast, this example shows us how the login flow might work for a user browsing to the OneLogin portal first. They see an icon on the OneLogin login screen that represents Entra ID as their IdP. When they click that icon, they're automatically redirected to the Entra login screen. Once they've successfully logged in with Entra, they're redirected back to the OneLogin user portal to access their assigned apps. The IdP-initiated flow can even be used to allow users direct SSO access to any application integrated with OneLogin without interacting with the OneLogin portal at all.
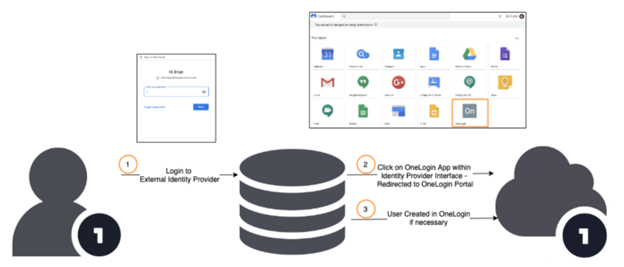
Just-In-Time (JIT) Provisioning
With JIT provisioning, users who do not already have a OneLogin account can still sign in to OneLogin by authenticating with their IdP as described in the OneLogin-initiated flow. The authentication causes a OneLogin account to be automatically created for them at the moment they sign in. This makes managing users much easier and less time-consuming, because their OneLogin user accounts don't have to be manually created or imported in bulk, but are instead generated on the fly as each user signs in for the first time.
Example User Flow
Here's a quick overview of what happens behind the scenes of a OneLogin-initiated authentication process, when a user attempts to log into your OneLogin tenant with their IdP credentials.
-
The user visits your OneLogin portal at https://example.onelogin.com and, when prompted to log in, enters their existing username from your trusted IdP, user@example-partner.com.
-
OneLogin then checks whether a user record with this email address already exists in your OneLogin tenant:
-
If a local user record is already associated with the email address, then they'll be authenticated with the TIdP selected in the Trusted IDP field in the record's Authentication settings.
Note: If -- NONE -- is selected, then OneLogin will attempt to authenticate the user locally with the password stored in the user record. If the record does not have a password stored, the user will not be able to authenticate. An administrator must then either select a different Trusted IDP for the user, enter a password in their user record, or send the user an email invitation so they may set their own password.
-
If no existing user is currently associated with the email address, then OneLogin will instead check the example-partner.com domain against the Email Domains listed in your Trusted IdP configurations to determine which TIdP handles the authentication.
-
When a TIdP is chosen based on the above criteria, OneLogin generates an assertion for the example IdP and redirects the user to example-partner.com's login page to enter their password for that account.
-
When the user authenticates at that page, the partner sends back an assertion to the OneLogin.
-
If JIT provisioning is enabled, the user record in OneLogin is then either created or updated based on the JIT configuration for that TIdP.
-
From the user's perspective, this entire process happens quickly and seamlessly as they enter their username, then are prompted to enter their password, then are given immediate access to their applications in OneLogin, even if they did not previously have a OneLogin account.
Configuring a TIdP
-
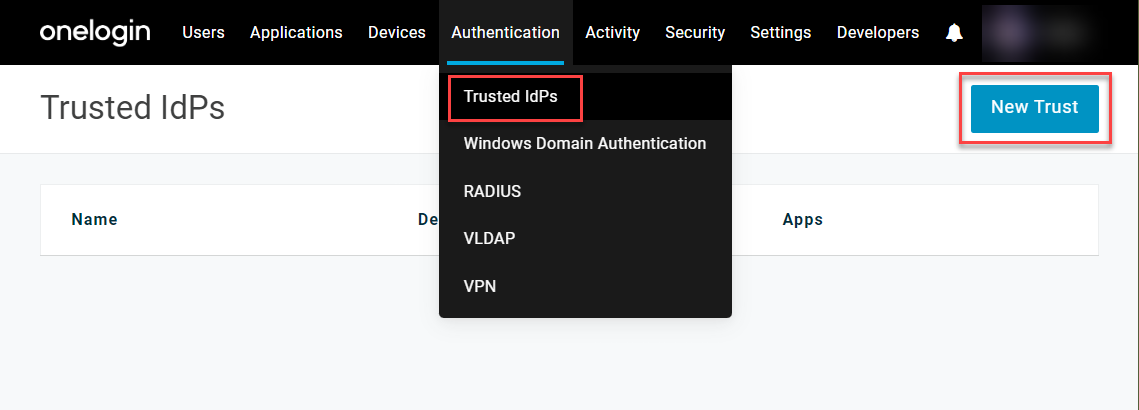
In your OneLogin admin portal, go to Authentication > Trusted IdPs and click New Trust.
-
Provide a name for the new TIdP and configure your settings as described below. Your configuration will vary depending on the IdP you want to add as a trust, but you can consult your third-party documentation or the IdP-specific OneLogin articles for details.
-
Go to the admin interface for the IdP you're using and provide them with your OneLogin tenant's return URL endpoint: https://your-subdomain.onelogin.com/access/idp. The field to use for this value may differ by provider, but it's generally referred to as the Assertion Consumer Service URL (ACS URL) for SAML configurations and the Redirect URI for OIDC and OAuth.
Settings
Enable/Disable
|
Enable Trusted IDP
|
This box must be checked in order to enable your TIdP. For SAML configurations, it will be unselectable until you have provided your trusted IdP certificate. Return to this section after configuring your remaining settings to enable and save your TIdP.
|
Login Options
|
Show in Login panel
|
Check this box if you want an icon for this TIdP to appear as an authentication option on your OneLogin tenant's login page.
|
|
Login icon
|
Provide a URL to the icon you want to represent the TIdP. IdPs often host a favicon.ico file for this purpose. For example, OneLogin's icon URL is https://www.onelogin.com/favicon.ico.
|
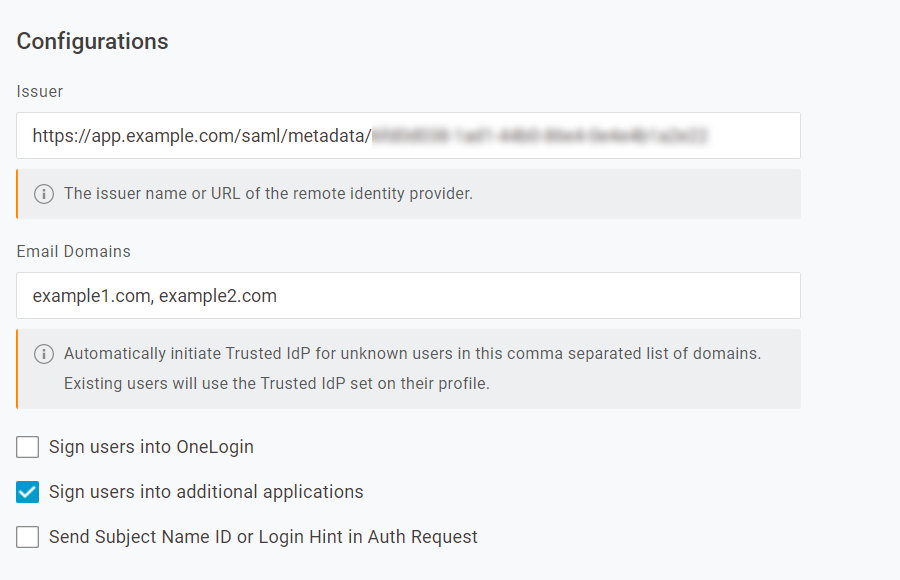
Configurations
|
Issuer
|
- For SAML and OIDC configurations, enter the unique issuer identifier provided by your IdP.
- For OAuth configurations, this field may be left blank.
|
|
Email Domains
|
List one or more domains, separated by commas. TIdP authentication will be initiated for users who enter any email address with one of these domains, even if the user isn't recognized by OneLogin.
|
|
Sign users into OneLogin
|
This box must be checked for TIdP to function. This allows inbound identities from the IdP to be matched to existing OneLogin user accounts, using responses to the /access/idp endpoint.
|
|
Sign users into additional applications
|
Verify that this box is not checked. Current TIdP standards no longer require this setting and enabling it may interfere with its function.
|
|
Send Subject Name ID or Login Hint in Auth Request
|
Check this box to have OneLogin send the requested user identity to the TIdP and prevent the user from having to manually enter their identity twice in a row.
For SAML configurations, the authentication request is sent as a Subject NameID parameter; for OIDC and OAuth configurations, the request is sent as a query string parameter called login_hint.
Note: Not all IdPs support this feature, and may cause errors for users. Consult your IdP documentation before enabling.
|
User attribute
|
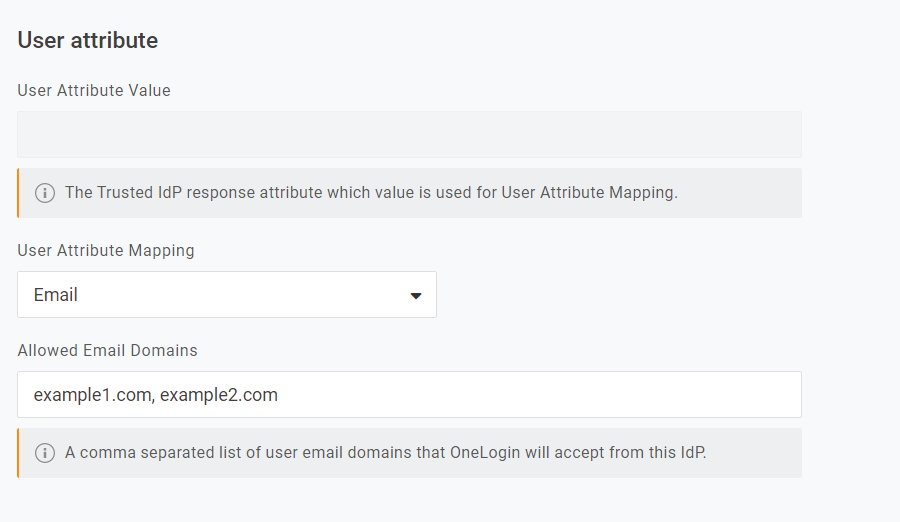
User Attribute Value
|
This option varies based on the protocol type selected below.
- For SAML configurations, the field is unavailable and cannot be changed, as the SAML is automatically configured.
- For OIDC configurations, enter the TIdP response attribute used to map user attributes with the format
{tidp.example}. If left blank, the value defaults to {tidp.email}.
- For OAuth configurations, enter the TIdP response attribute used to map user attributes with the format
{tidp.example}. There is no default value, and will not be correctly configured if left blank.
|
|
User Attribute Mapping
|
Select the unique attribute that will be used to match users from OneLogin to your TIdP, such as a username or email address.
|
|
Allowed Email Domains
|
This field only appears if Email is selected as the user attribute used for mapping. To restrict the email domains that can be accepted from the IdP, enter one or more domains, separate with commas. Alternatively, leave this field blank to permit any email domain to be used.
|
Third-Party Initiated Login Settings
|
Allowed Redirect URIs
|
Use this field to allow any initiate URLs that you want to be able to invoke the IdP from any website. Use the format your-domain/access/initiate?iss=your-idp-issuer, with the optional parameters &login_hint=username-at-idp and &target_link_uri=redirect-url, and separate multiple entries by line breaks.
|
Protocol
|
Protocol Type
|
Select your preferred protocol type: OAUTH, OIDC, or SAML. Your selection will determine the next set of configuration options available to you.
|
OAuth Configurations
|
Authentication Endpoint
|
Enter the endpoint at the IdP where OneLogin will send the authentication request.
|
|
Token Endpoint Auth. Method
|
Select how the OneLogin tenant will authenticate to the IdP's token endpoint: GET, POST, or BASIC.
|
|
Token Endpoint
|
Enter the endpoint at the IdP where OneLogin will obtain the identity/access tokens when the authorization code is presented.
|
|
User Information Endpoint
|
Enter one or more endpoints at the IdP where OneLogin will retrieve user identity information when the access token is presented. Separate multiple entries with pipes ( | ).
|
|
Scopes
|
Enter one or more scopes required by the IdP, separated by spaces. These will generally be provided by the IdP
|
|
Client Id
|
Enter the OneLogin tenant ID that your IdP provided during client registration.
|
|
Client Secret
|
Enter the OneLogin tenant secret that your IdP provided during client registration.
|
OIDC Configurations
|
Authentication Endpoint
|
Enter the endpoint at the IdP where OneLogin will send the authentication request.
|
|
Token Endpoint Auth. Method
|
Select how the OneLogin tenant will authenticate to the IdP's token endpoint: GET, POST, or BASIC.
|
|
Token Endpoint
|
Enter the endpoint at the IdP where OneLogin will obtain the identity/access tokens when the authorization code is presented.
|
|
User Information Endpoint
|
Enter the endpoint at the IdP where OneLogin will retrieve user identity information when the access token is presented.
|
|
Scopes
|
Enter one or more scopes required by the IdP, separated by spaces. This is generally the OpenID profile email, but can be verified with your IdP.
|
|
Client Id
|
Enter the OneLogin tenant ID that your IdP provided during client registration.
|
|
Client Secret
|
Enter the OneLogin tenant secret that your IdP provided during client registration.
|
SAML Configurations
|
IdP Login URL
|
Enter the endpoint where OneLogin will send the authentication request if an SP-initiated flow is used.
Tip! If you want your IdP to know what the user was trying to do before OneLogin redirected them to the TIdP, you can include the origin URL in the IdP Login URL, using this macro: https://your-tidp.your-provider.com/saml?url={origin}.
|
|
SP Entity ID
|
This is the Audience element that your IdP will use as the Issuer of the generated SAML AuthN request. Provide it to your IdP during registration.
|
|
Trusted IdP Certificate
|
Paste the X.509 certificate provided by your IdP. This is used to validate the signature on the inbound SAML responses, and must be provided before the TIdP feature can be enabled.
|
|
Encryption
|
Check this box if you want to enable encrypted assertions with your IdP. When checked, the entire message must be signed. OneLogin does not support SAML responses with encrypted assertions unless the message is also signed.
|
JIT
Just-in-time provisioning
|
Enable
|
Check this box to enable JIT provisioning.
|
|
Set User TIDP after user creation
|
This option appears after JIT provisioning is enabled. Enable it if you want the user record to reflect the TIdP that was used in account creation.
|
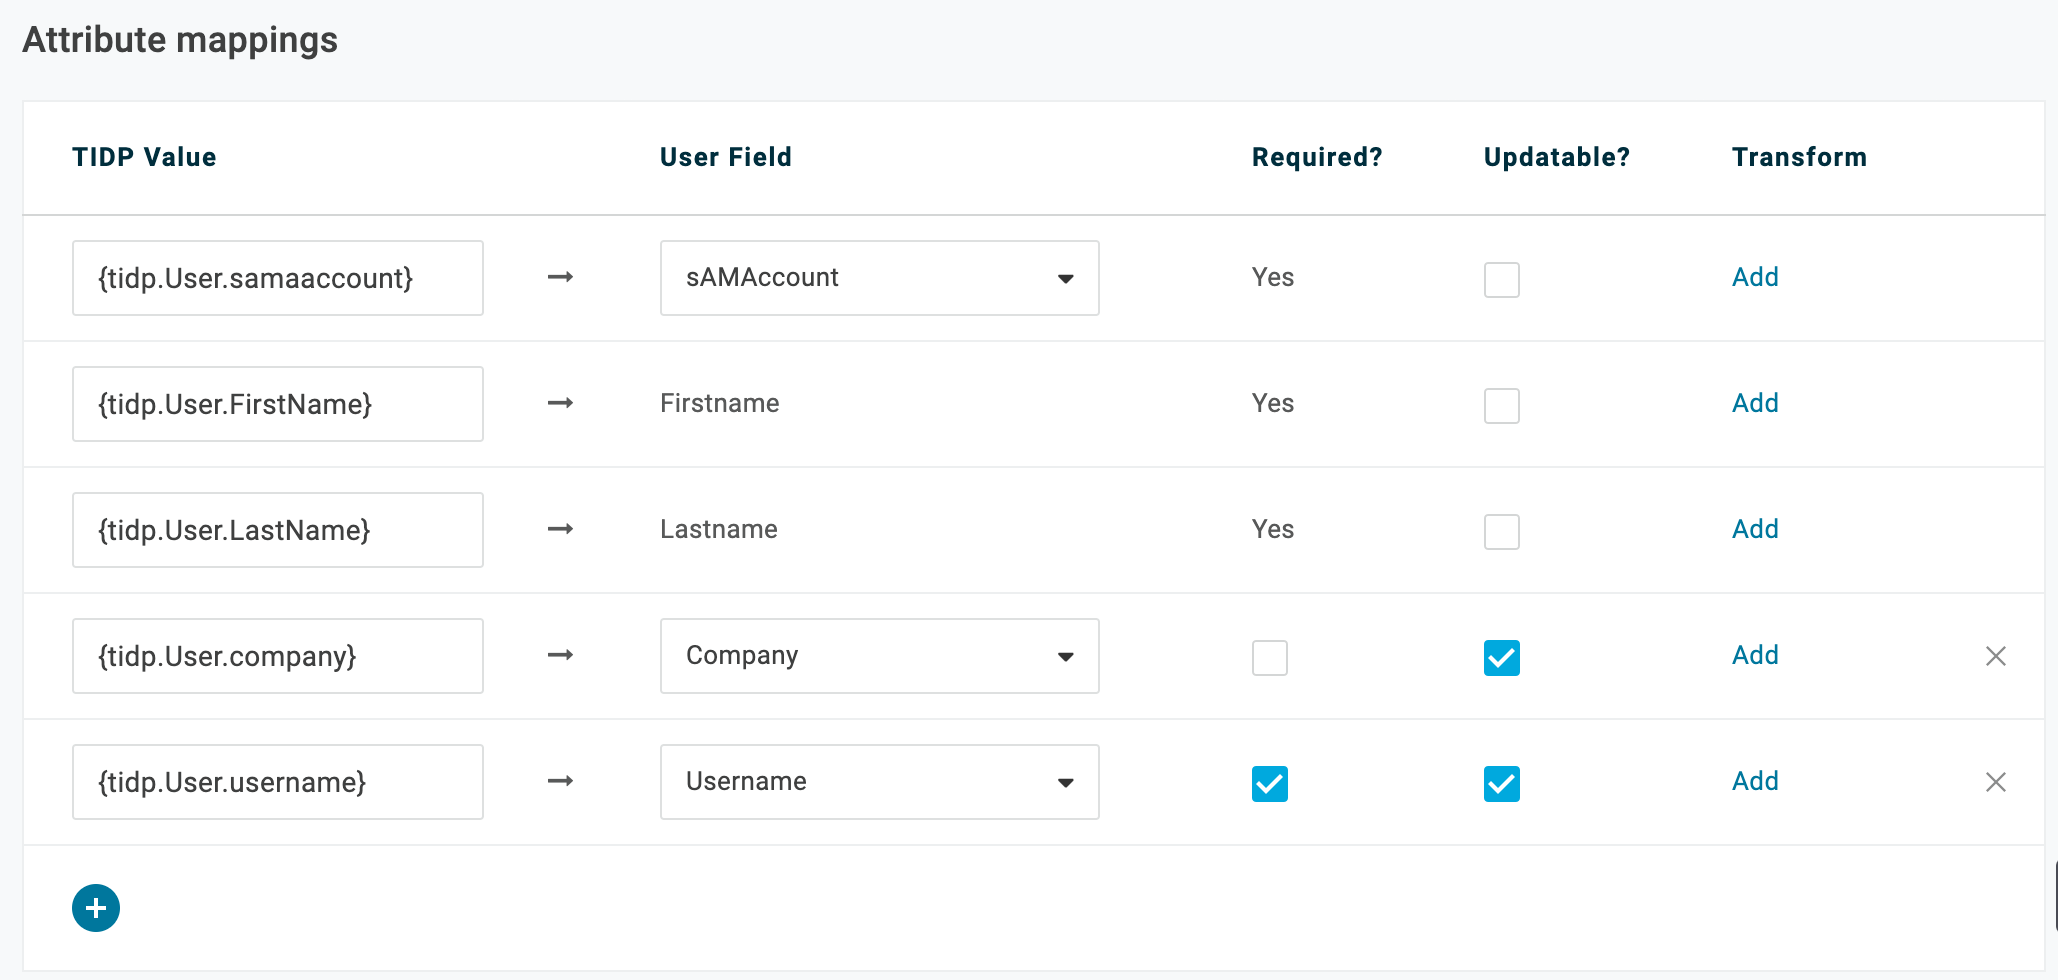
Attribute mappings
The three default attributes that appear on this page during initial configuration are required for JIT mapping, but additional attributes may be configured.
|
TIDP Value
|
Enter the name of the attribute exactly as it appears in your IdP.
These values are case-sensitive.
|
|
User Field
|
Select the name of the OneLogin attribute to map it to.
|
|
Required?
|
Check this box if you want to require that attribute.
|
|
Updateable
|
Check this box if you want to update the user record with new information when it comes in from the IdP.
|
|
Transform
|
Add or edit the transformation details with the attributes and access parameters you would like to customize.
|
After the user authenticates with the IdP, they're shown the OneLogin sign-in page and prompted to authenticate again.
The user does not currently exist in OneLogin and JIT is not configured correctly to create them in OneLogin. Check the JIT attribute mappings and ensure they match the correct values shown in OneLogin.
The transform editor uses Javascript in a limited capacity to transform user attributes, allowing you to automatically configure a user's roles or attributes based on other attributed that have been mapped with your IdP. For example, it might assign a user to a specific role based on their job title as listed in their IdP account. The editor supports the following parameters and functions:
Parameters
|
|
current_value
|
The value of the parameter in use
|
|
tidp_attributes
|
A hash of the rest of the attribute statement inside the SAML assertion, e.g. tidp_attributes["User.Email"]
|
|
saml_response
|
The string containing the entire SAML response
|
Functions
|
|
setPameter_Name
|
Use this function to set the attribute's value.
Capitalize the first letter of the parameter name as well as the first letter following any underscores included in this function and leave the rest lowercase.
|
|
reject
|
Use this function to reject the attribute's value and reject the assertion completely.
Calling this function generates an event and disallows the user from being created, and by extension from logging in.
|

In this example, users are rejected based on their email domain.
In order to avoid malicious scripts from causing any kind of harm, the code in the transform editor runs in its own sandbox environment. It doesn't have access to any other information other than the parameters described here. Additionally, scripts must follow these security restrictions:
- Only two kinds of parameter types can successfully call a setter function: strings, and arrays of strings.
- The script will terminate when exceeding resource usage and execution time limits.
- Transforms will not run when exceeding 8000 ASCII characters or when written with any non-ASCII characters.
This is a basic transformation that parses the user's email address and assigns the "Sales" role to any users with the "acmesales.com" domain, but you can adapt it for your own purposes or create much more complex scripts as needed for your organization's purposes:
var email = tidp_attributes["Email"].split("@");

var domain = email[1];

if (domain === "acmesales.com") {

setRoles("Sales");

}
An Access Denied error message appears after the user authenticates into an application.
The user was most likely not assigned to a necessary the role in OneLogin. Check the script in the JIT transform editor to verify that it is assigning roles correctly. Additionally, ensure there are no app policies enabled for that specific application that may be preventing access.
Apps
This page only appears when Sign users into additional applications has been enabled. If it appears in your setup, return to Configurations and disable Sign users into additional applications to prevent interference with your TIdP connection. |