| This article describes how to provision users from OneLogin to Box using the Box API. Provisioning requires a OneLogin subscription with the Advanced Directory add-on.
Alternatively, you can perform just-in-time user provisioning via SAML SSO. This method allows provisioning of a limited number of user attributes. See Configuring SAML SSO for Box.
Enabling Provisioning
-
Go to Apps > Company Apps and select the Box app to which you want to provision users.
-
Go to the Configuration tab to connect to the Box API.
-
Click Authenticate.
-
At the prompt, click the link to go to Box.
-
Enter and submit your Box credentials.
Note. To enable OneLogin to create Box user folders when it provisions new users to Box, you must log in here as the Box Admin for your account. If you log in as a Co-admin, you must have collaborator rights for the root folder that will hold the new user folders. For more information, see "Auto-Creating Box User Folders."
-
Grant access to Box.
OneLogin returns you to the Box app configuration page.
You can also confirm that the authorization was successful by going to the Configuration tab and confirming that the Clear Token button appears.

You can click this button if you ever need to reauthenticate with the Box API.
-
Go to the Provisioning tab.
-
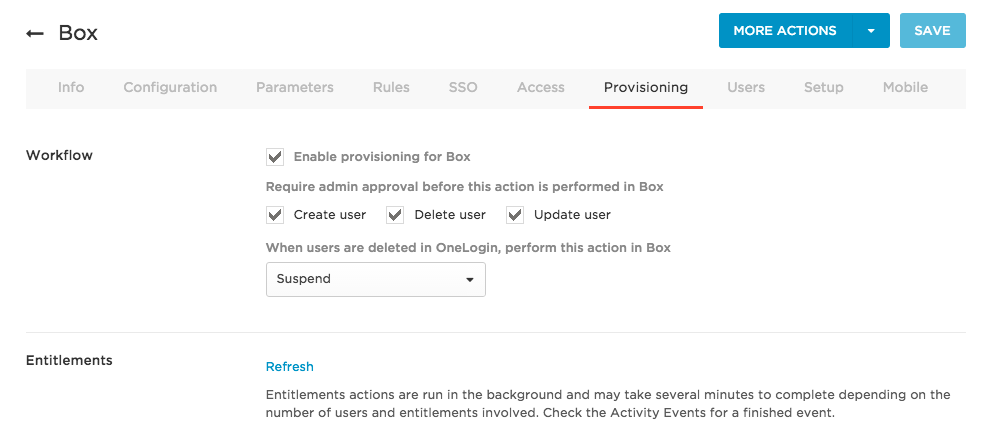
Select Enable provisioning for Box. Once you enable this option and give users access to the app, the provisioning process will begin.
Note: You must select this option now to enable options required to complete subsequent steps. To ensure that you do not inadvertently provision users to Box before you are ready, enable the action controls described in the next step.
-
Choose the provisioning actions for which you want to require administrator approval. For example, based on the settings in the screenshot above, any time a user is created, deleted, or updated, a OneLogin administrator will need to go to Users > Provisioning to manually approve or ignore each of these actions.
Enabling these action options is useful especially before you intend to start provisioning because with the Enable provisioning for Box option selected, you may just trigger provisioning during the course of setup and testing. With this safeguard enabled, a OneLogin administrator can just choose to ignore any inadvertent provisionings.
Once you are done configuring and testing provisioning, you can update the settings to leave one or more action options clear if you want OneLogin to make the provisioning change in Box without requiring administrative approval.
Note: Box has three options to manage user content for users who have been deleted or suspended: Force Content Delete, Transfer Docs on Delete, or Destination User. These can be set in the Box administrative console.
-
Select what happens to a user in Box when that user is deleted from OneLogin. Select Delete, Suspend, or Do Nothing.
- Click Save.
Mapping Box Attributes to OneLogin Attributes
In this task, you'll map Box user attributes to OneLogin user attributes. These mappings tell OneLogin how to populate user attribute values to Box when provisioning users from OneLogin. If you have a OneLogin attribute value that you want to send over to populate a Box field, you'll define it in this task.
-
Go to Apps > Company Apps and select the Box app to which you want to provision users.
-
Go to the Parameters tab.
-
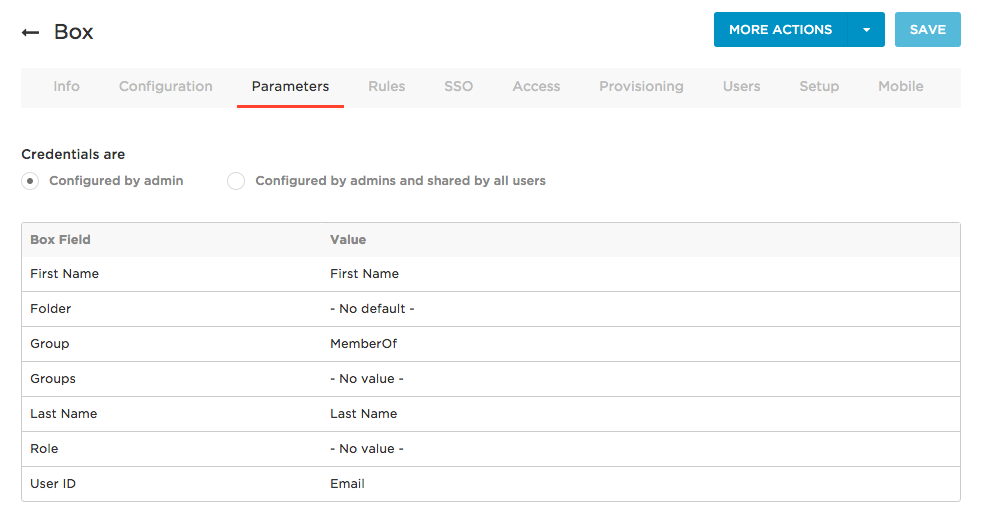
Select Configured by admin.
-
For each field that you want to include in user provisioning, click the parameter row; change the default, if necessary; and select the Include in User Provisioning option. If including a field requires more information, details are listed in the table below.
|
Box Field
|
Default OneLogin Value
|
SAML or Provisioning?
|
Notes
|
|
First Name
|
First Name
|
SAML and Provisioning
|
---
|
|
Folder
|
- No default -
|
Provisioning
|
To create a new user folder in Box whenever a user is provisioned to Box through OneLogin, see Auto-Creating Box User Folders.
|
|
Group
|
MemberOf
|
SAML
|
Using just-in-time provisioning through SAML, you can provision a user as a member of a Box group.
For example, if you want to provision users to groups based on their membership in Active Directory security groups, leave Value set to MemberOf.
Alternatively, you can set this to any other available user attribute that makes sense for your organization. For example, setting Value to Department will provision each user to a group with the same name as their OneLogin Department.
In Box, you'll need to manually create groups based on the user attribute you set in the Value field. For example, if you set Value to MemberOf, you'd create groups based on MemberOf values in OneLogin.
For API provisioning, use the Groups parameter described below.
|
|
Groups
|
- No value -
|
Provisioning
|
Use this parameter to provision users to Box groups using the API.
To have your Box groups display as available values when configuring provisioning, you must first refresh entitlements. To do this, in your Box app, go to the Provisioning tab and click Refresh.
If you want to provision all of your users to one or more existing Box groups, configure provisioning using the Groups parameter alone. To do this, move the Box groups to which you want to provision users from the Available values column to the Selected values column. This configuration will provision all of your users to each of the selected Groups.
If you want to provision subsets of your users to one or more existing or new Box groups, configure provisioning using the Groups parameter and rules. See Using Rules to Provision Users to Box Roles and Groups.
If you want to manually provision users to groups based on Group values that you'll set in Box user logins, leave Value set to - No value -. In the Default if no value selected drop-down, select - No default -. In Box, manually create groups based on the Group values you've set in the Box user logins.
Groups provisioning uses Safe Entitlements, a OneLogin feature that prevents provisioning from deleting users that were added directly via Box.
|
|
Last Name
|
Last Name
|
SAML and Provisioning
|
---
|
|
Role
|
- No value -
|
Provisioning
|
To have your Box roles display as available values when configuring provisioning, you must first refresh entitlements. To do this, in your Box app, go to the Provisioning tab and click Refresh.
To provision roles to Box, set Value to User and use provisioning rules to apply the Co-Admin role to specific users. See Using Rules to Provision Users to Box Roles and Groups.
|
|
User ID
|
Email
|
SAML and Provisioning
|
Leave Value set to Email. Most Box implementations use email as the user ID.
|
Note. Never set Default if no value selected to anything but - No default - and -- no transform -- for entitlements, like Groups, Folders, and Roles.
Auto-Creating Box User Folders
You can enable OneLogin to auto-create user folders in Box for new and existing users.
Auto-Creating New Box User Folders
You can enable OneLogin to create a user folder in Box whenever OneLogin provisions a new user to Box.
Note: To enable OneLogin to create Box user folders when it provisions new users to Box, you must have logged in as the Box Admin for your account when you configured SAML SSO for Box. If you logged in as a Co-admin, you must have collaborator rights for the root folder that will hold the new user folders. For more information, see Configuring SAML SSO for Box.
-
Go to Apps > Company Apps and select your Box app.
-
Go to the Parameters tab and click the Folder row.
-
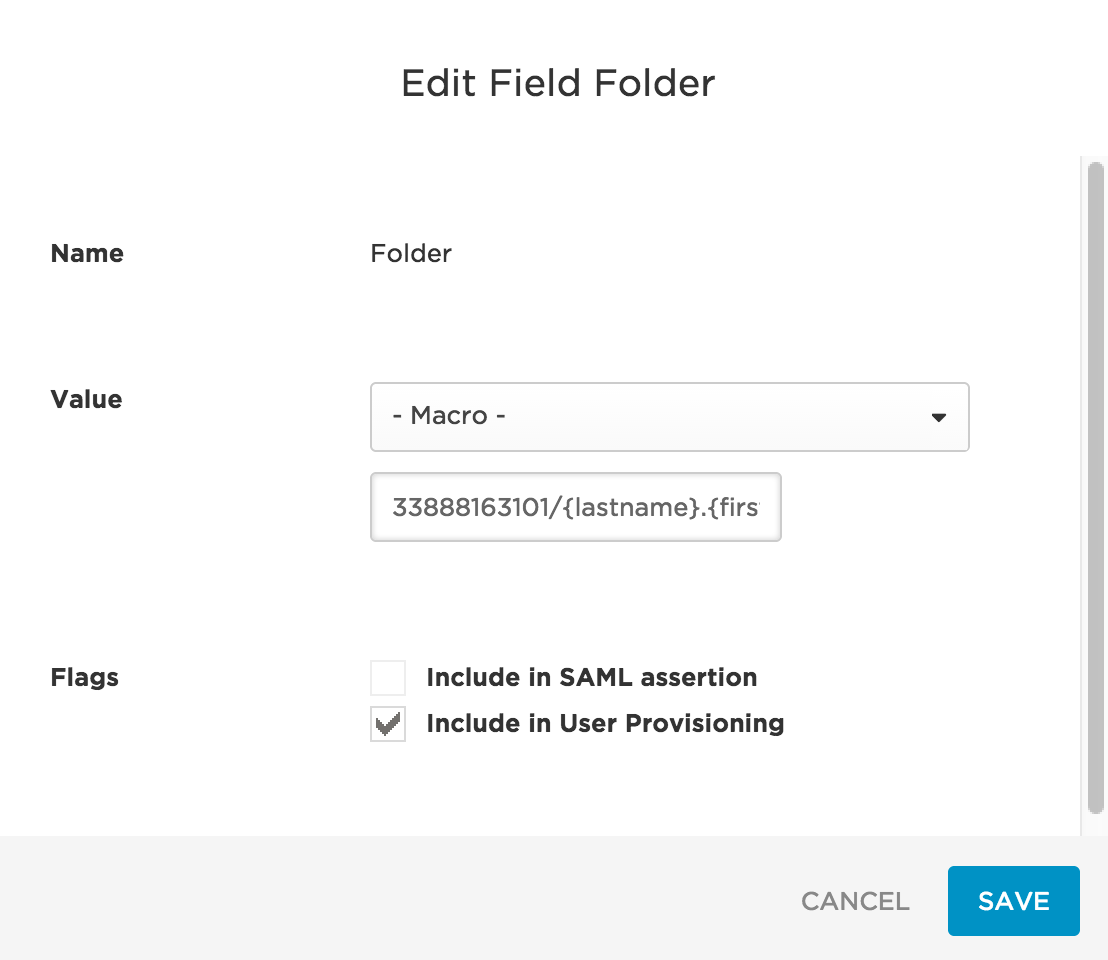
Select a Value of -Macro-. In the adjacent field, enter the information needed to generate the user folders in Box. For example: folder_id/{macro}.
-
folder_id: Set this value to the ID of the Box folder that you want to use as the root folder for Box user folders.
To get the folder ID, access the folder in Box and view the URL. For example, if you want to make the root folder the Users folder and the User folder URL is https://acme.box.com/files/0/f/33888163101/, set folder_id to 33888163101.
Note: You do not need to include root or parent folder IDs in the path. Only include the folder ID of the folder in which you want the user folders to be created.
-
{macro}: Set this value to the OneLogin macro that will provide the value needed to generate user folder names. For a complete list of OneLogin attribute macros, see Attribute Macros.
For example, let's say that you want to create user folders using the format Lastname.Firstname (for example, Brown.Sara). To do this, set {macro} to {lastname}.{firstname}.
In this case, you'd enter a value of 33888163101/{lastname}.{firstname} into the adjacent field and the user folder generated for Sara Brown, for example, will appear as /Users/Brown.Sara/ in Box.
As another example, consider creating user folders named Users/Lastname.Firstname/private, enter the value 33888163101/{lastname}.{firstname}/private in the macro field.
Note that you can create as many directory levels as you like, using both macros and hard-coded string values.
-
Select Include in User Provisioning.
- Click Save.
Auto-Creating Box User Folders for Users Who Already Have OneLogin Access to Box
To create user folders for existing OneLogin users who already have access to the Box app:
- Go to Apps > Company Apps and select your Box app.
- Go to More Actions > Create user folders in Box.
- Click Confirm in the confirmation dialog.
Note: If an existing user changes the attributes that are used to build their Box user folder name (for example, a user changes her last name, which is used as part of the user folder name), you must use Create user folders in Box to create the new user folder. Be aware that in this case, OneLogin will not delete the old folder.
Using Rules to Provision Users to Box Roles and Groups
You can define rules to provision subsets of your OneLogin users into Box roles and groups. For example, you can define a subset of users by filtering on a specific OneLogin user attribute value and then define an action that provisions the subset of users to a specific Box role or group.
-
Go to Apps > Company Apps. Search for and select your Box app.
-
Go to the Rules tab.

-
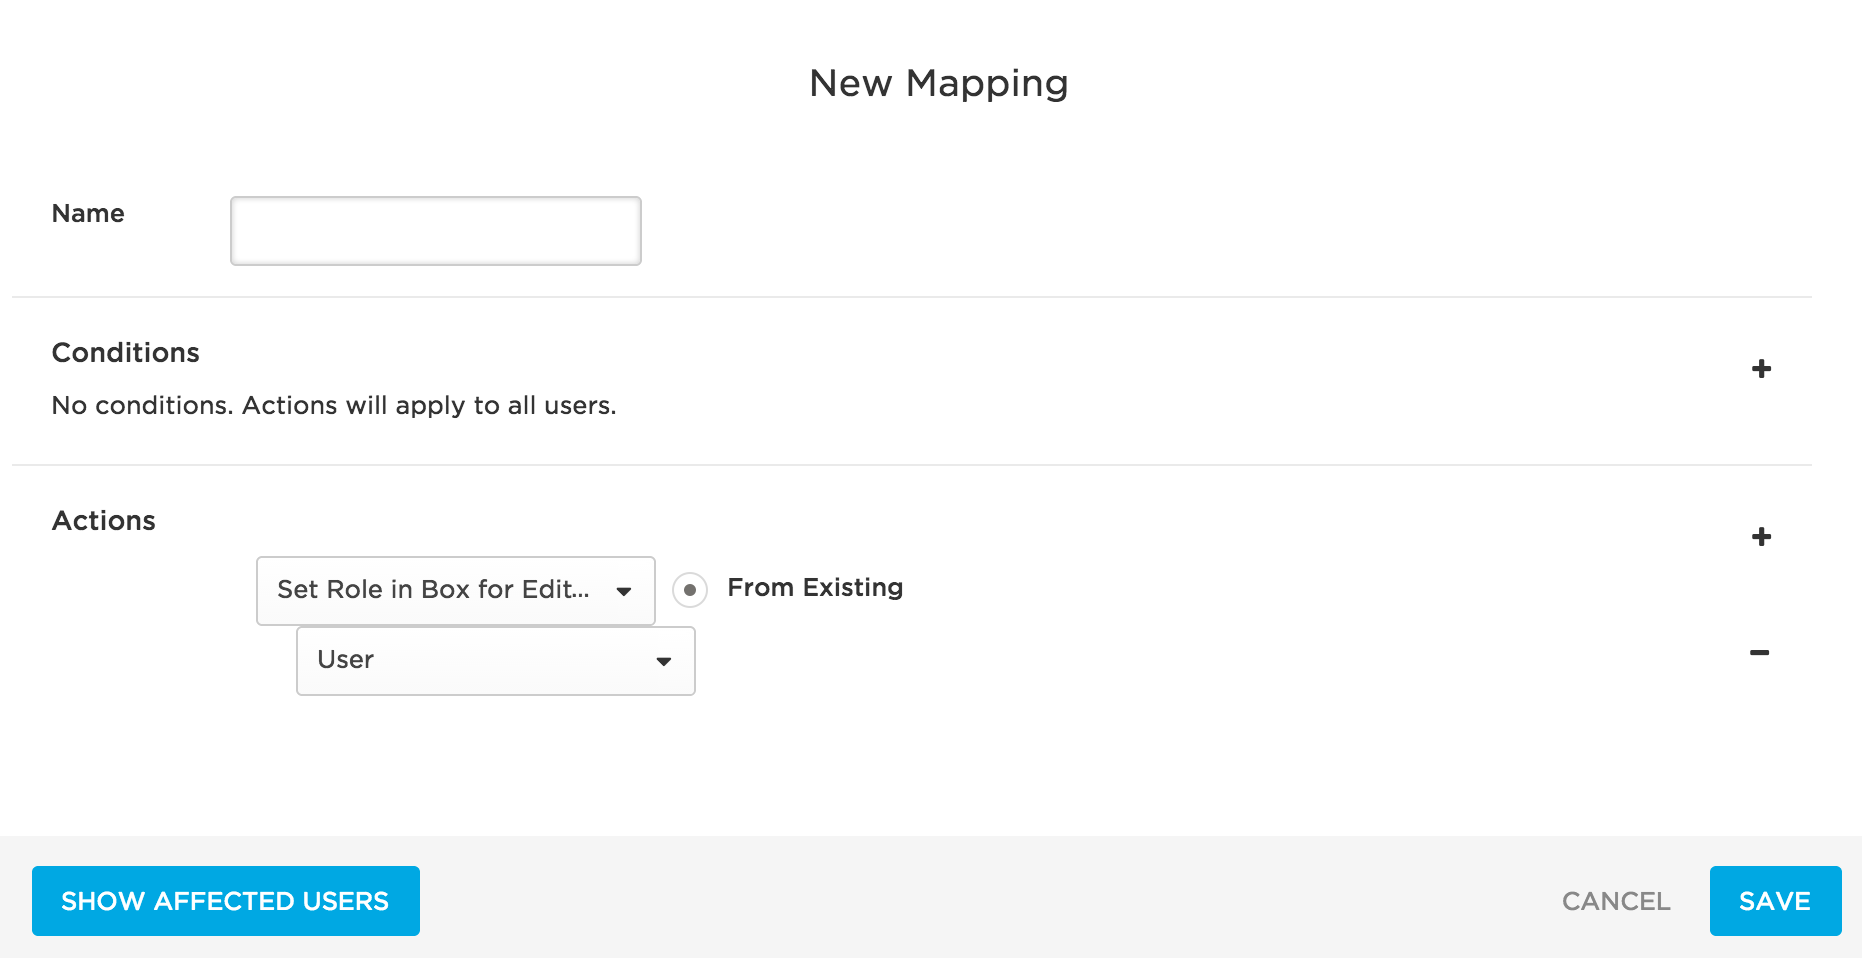
Click New rule to open the New Mapping dialog, where you can set the conditions and actions that determine which users will be provisioned from from OneLogin to specific Box roles or groups.
-
Give your rule a name.
-
In the Conditions area, click + to add a condition. Use the fields to define a condition that defines a subset of users to be acted upon by the rule. Conditions are based on OneLogin user attribute values.
For examples, see Rule Mapping Examples below.
-
In the Actions area, click + to add an action. Use the fields to define the action that will be performed on users by the rule. Available actions include:
-
Create a new Box group and provision users to it
-
Provision users to an existing Box group
-
Provision users to an existing Box role
For examples, see Rule Mapping Examples below.
-
Click Save.
-
To add another provisioning rule, click New rule.
-
The order in which rules are applied matters and can impact provisioning results. Drag and drop the rule rows to put them in the order that produces correct results. To test results, see the next step, as well as Testing Provisioning.
-
Click Show Affected Users to see which users will be affected by the provisioning rule as configured. Review the list to ensure that only intended users are listed.
-
Click Save.
-
Go to the More Actions menu and click Reapply Provisioning Mappings to apply the new rule.
Important! You must reapply mappings any time you create or update rules!
Rule Mapping Examples
Here are some rule configuration examples that address common implementation scenarios.
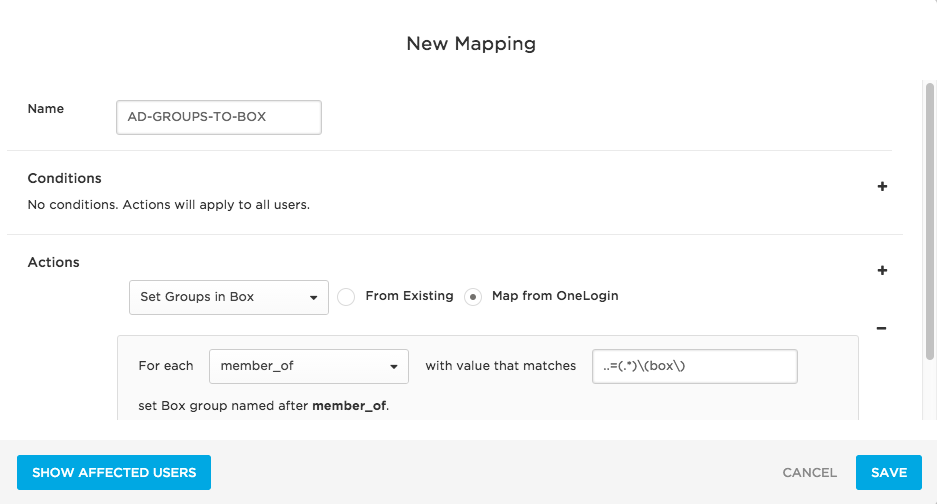
Provision Members of an AD/LDAP Security Group to New Box Groups
To do this, define a rule mapping like this one:
Conditions
For use cases like this one in which you are provisioning users to new Box groups, no conditions need to be set. All settings are configured in the Actions area.
Actions
-
In the first drop-down, select Set Groups in Box App Name to provision OneLogin users to groups in Box.
-
Select the Map from OneLogin option to provision users to new Box group created based on information in OneLogin.
-
Select a For each value of memberOf to provision users to Box based on their member_of user attribute value.
The OneLogin member_of user attribute value is populated by Active Directory (AD) and reflects the user's membership in an AD/LDAP security group.
-
To identify the AD/LDAP security groups that will be used to create groups in Box and provision users to them, provide a regular expression (regex) in the adjacent field.
Provisioning will parse through AD/LDAP security group data and apply the regex. For each matching value, a group will be created in Box. Any users who are members of a matching AD/LDAP security group in OneLogin will be provisioned to the newly created group in Box.
For key regex guidance and examples, see Using Regex to Provision Members of AD/LDAP Groups to New App Groups.
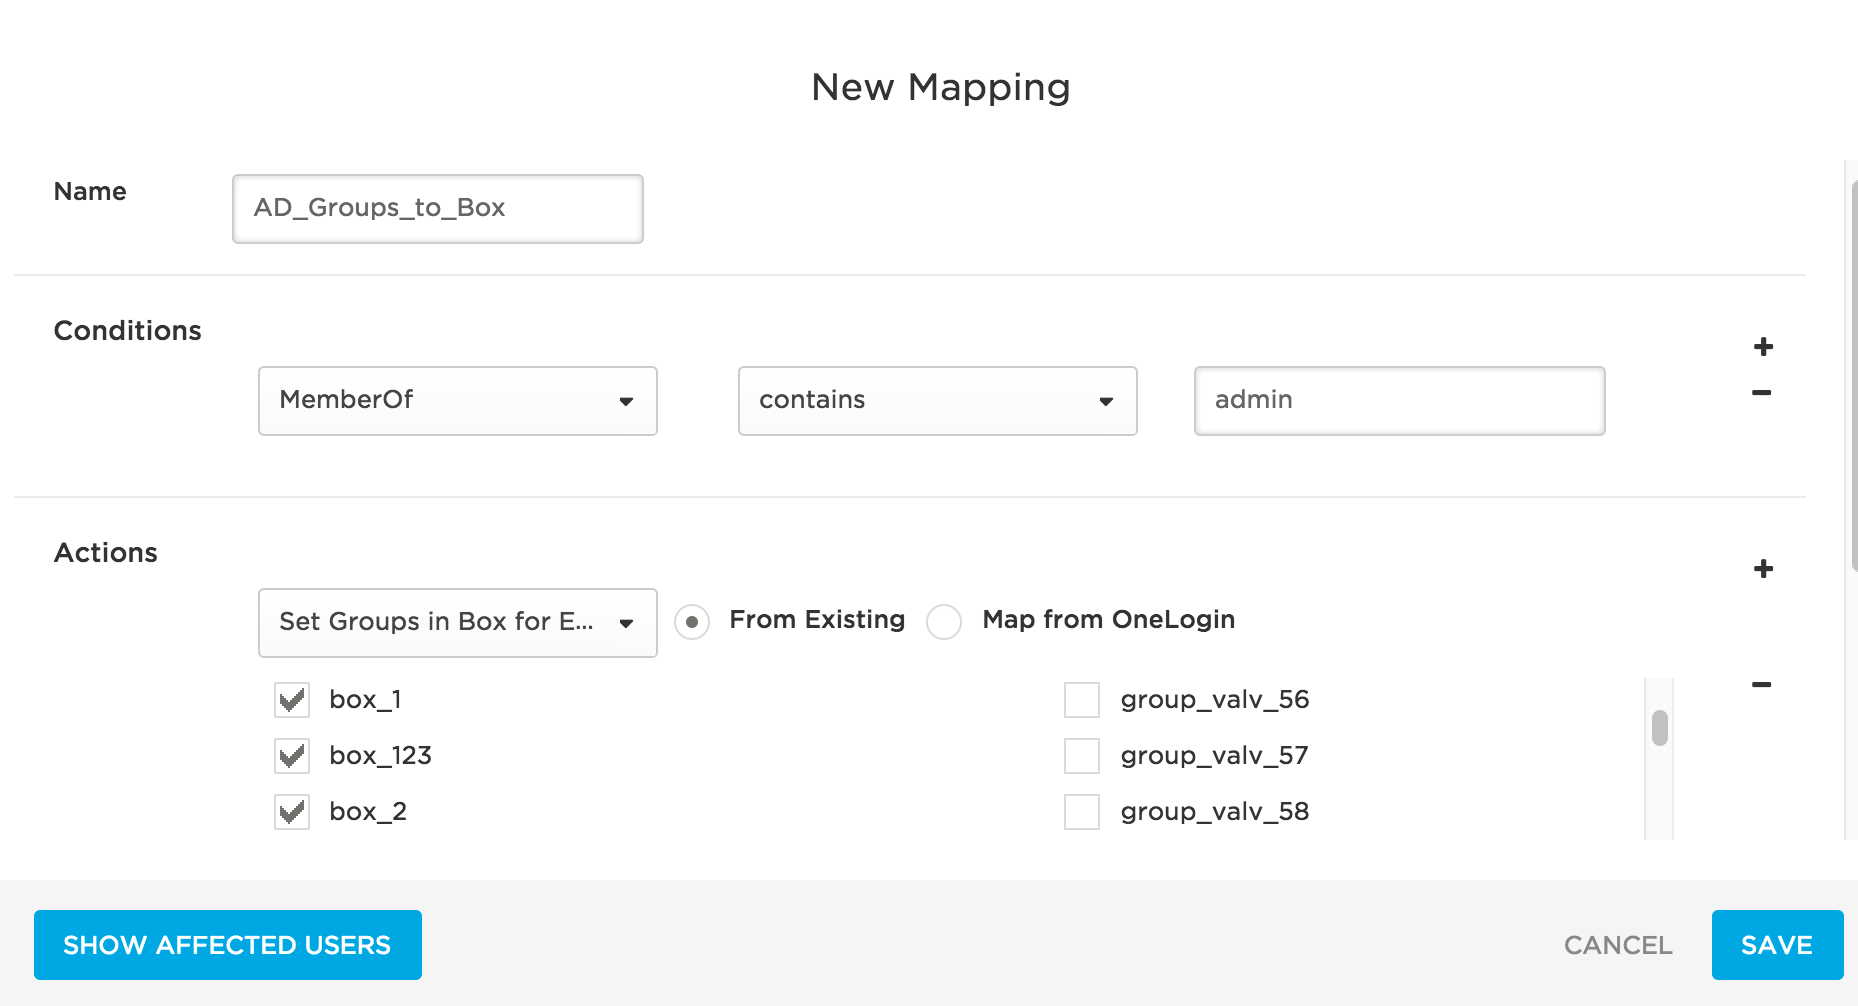
Provision Members of an AD/LDAP Security Group to an Existing Box Group
To do this, define a rule mapping like this one:
Conditions
-
In the first drop-down, select MemberOf to provision users based on their member_of user attribute value. The OneLogin member_of attribute value is populated by AD and reflects the user's membership in an AD/LDAP security group.
-
Use the two adjacent fields to write a condition to select the AD/LDAP security groups that contain the users that you want to provision to Box.
Actions
-
In the first drop-down, select Set Groups in Box App Name to provision users in the selected AD/LDAP security groups.
-
Select the From Existing option to provision users to an existing Box group.
-
Select the existing Box group to which you want to provision the users who are members of the selected AD/LDAP security group.
If you selected a subset of Box groups on the Parameters tab as discussed in Mapping Box Attributes to OneLogin Attributes, only that subset of groups will be selectable here.
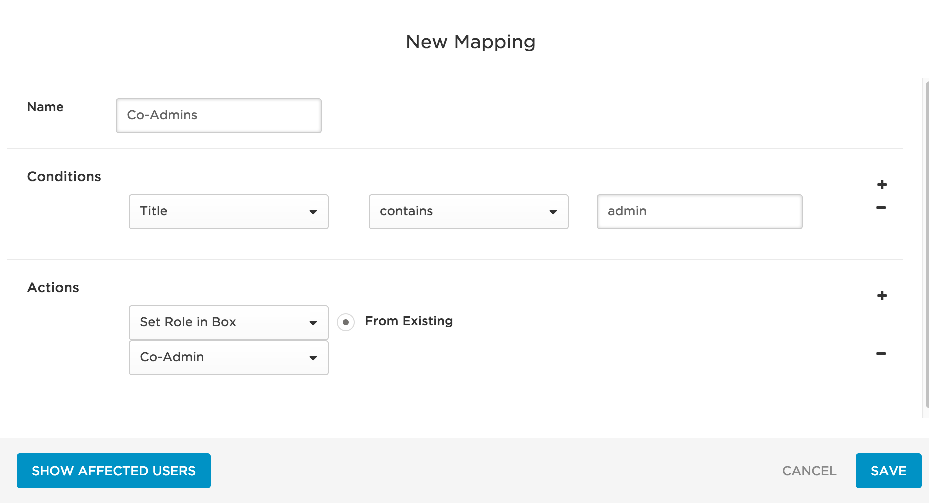
Provision Users with Specific Titles to an Existing Box Role
To do this, define a rule mapping like this one:
Conditions
-
In the first drop-down, select Title to provision users with a specific OneLogin title user attribute value.
-
Use the two adjacent fields to write a condition to select the titles that you want to use to provision users with an existing Box role.
Actions
-
In the first drop-down, select Set Role in Box App Name to provision users with the selected titles to an existing Box role.
-
The From Existing option to provision users to an existing Box role is selected by default.
-
In the adjacent drop-down, select the existing Box role, User or Co-Admin to which you want to provision users who have the selected titles.
A common scenario for this use case is one in which you have set up the Role parameter to provision all users to the User Box role as described in Mapping Box Attributes to OneLogin Attributes.
You can then configure a rule like the one described here to provision a subset of users with the Co-Admin role. For this subset of users, this Co-Admin role provisioning will override the User role provisioned by the Role parameter.
Writing Good Rules
Take the time to design your rules to produce provisioning results that are useful to your users. Be wary of writing rules that result in confusing or arbitrary provisioning. For example, take this rule that uses the regex \AJ.*
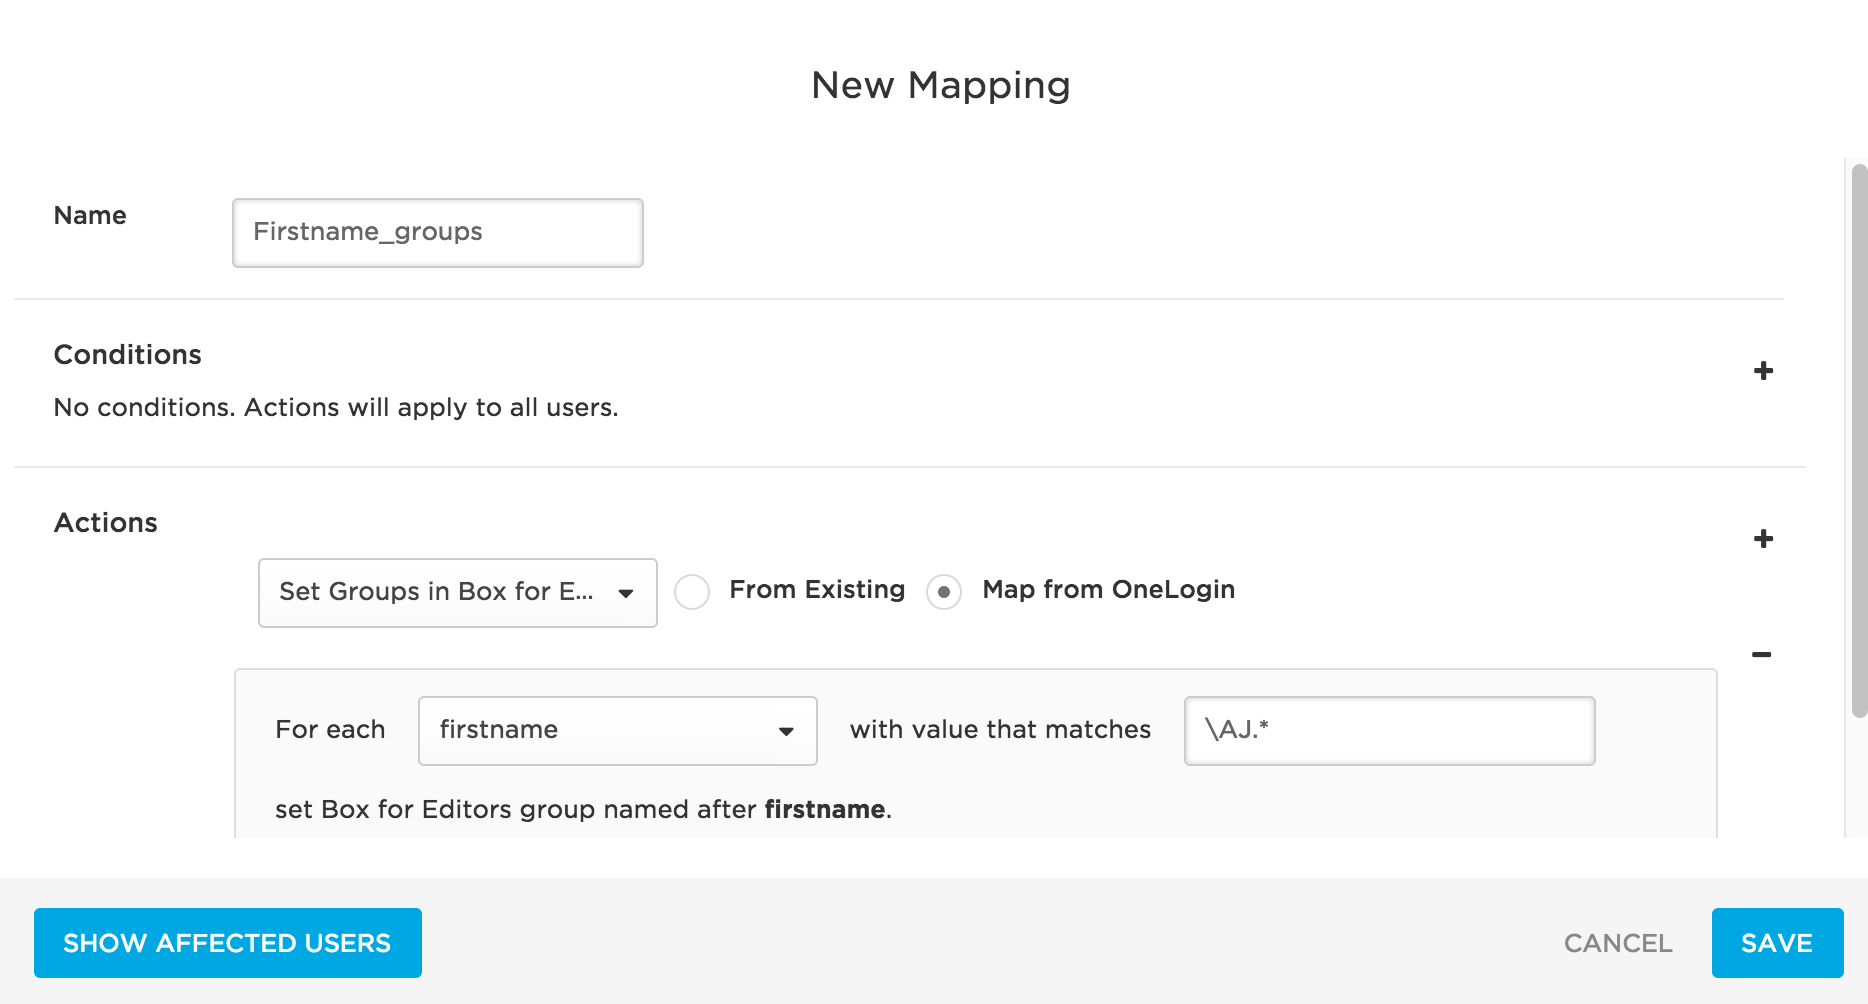
Consider provisioning applying the regex to each individual string in this comma-delimited list representing firstname user attribute values: Arturo, Benjamin, Cathy, Jennifer, John, Jonathan, Joshua, XiLin, Yelena, Zenith
This rule will take all firstname user attribute values that begin with J and create matching groups in Box and provision users to them. In this case, provisioning will create groups in Box for Jennifer, John, Jonathan, and Joshua. Users with the selected firstname values would then be provisioned to their matching groups in Box.
For most organizations, this rule would result in less-than-useful Box group creation and user provisioning.
Testing Provisioning
Test your provisioning setup to confirm that provisioning from OneLogin to Box is working.
-
Go to Apps > Company Apps. Search for and select your Box app.
-
Go to the Provisioning tab. Ensure that the following options are selected for reasons described in Enabling Provisioning.

-
Click Save.
-
Go to Users > Roles.
-
Create a test role and add your Box app to it.

-
Click Save.
-
Access the test role you just created.
-
Go to the Users tab.
-
Under Add Users to Role Manually, add your test user(s).
-
Click Save. This will trigger provisioning of the test user to your Box app.
-
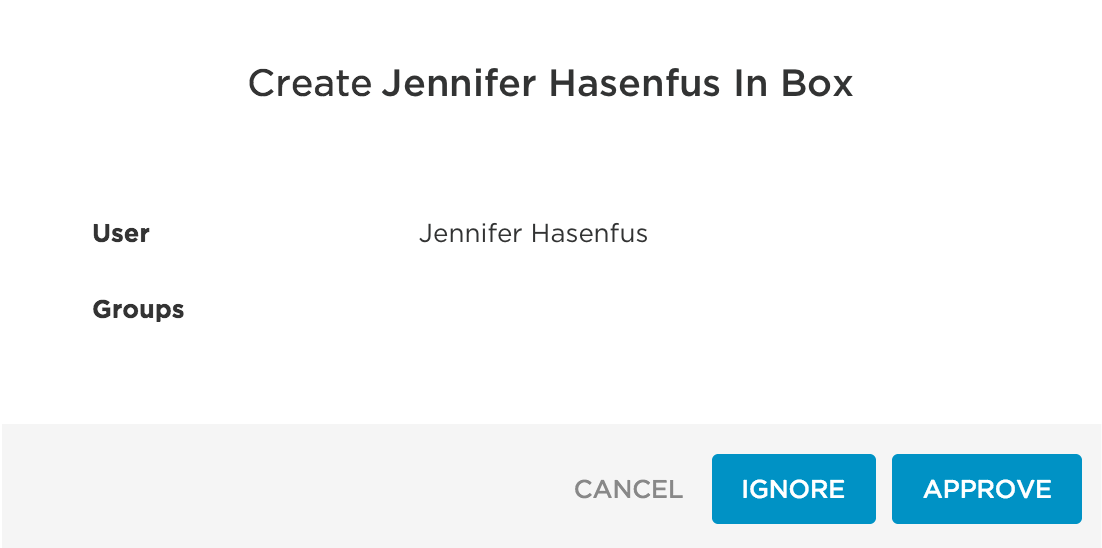
Per the settings in step 2, you must approve the provisioning action before it can proceed. To do this, go to Users > Provisioning. Use search and filters to locate your provisioning task. It should be in Pending status, as shown below:

-
Click the row. Click Ignore or Approve, depending on your test case.
-
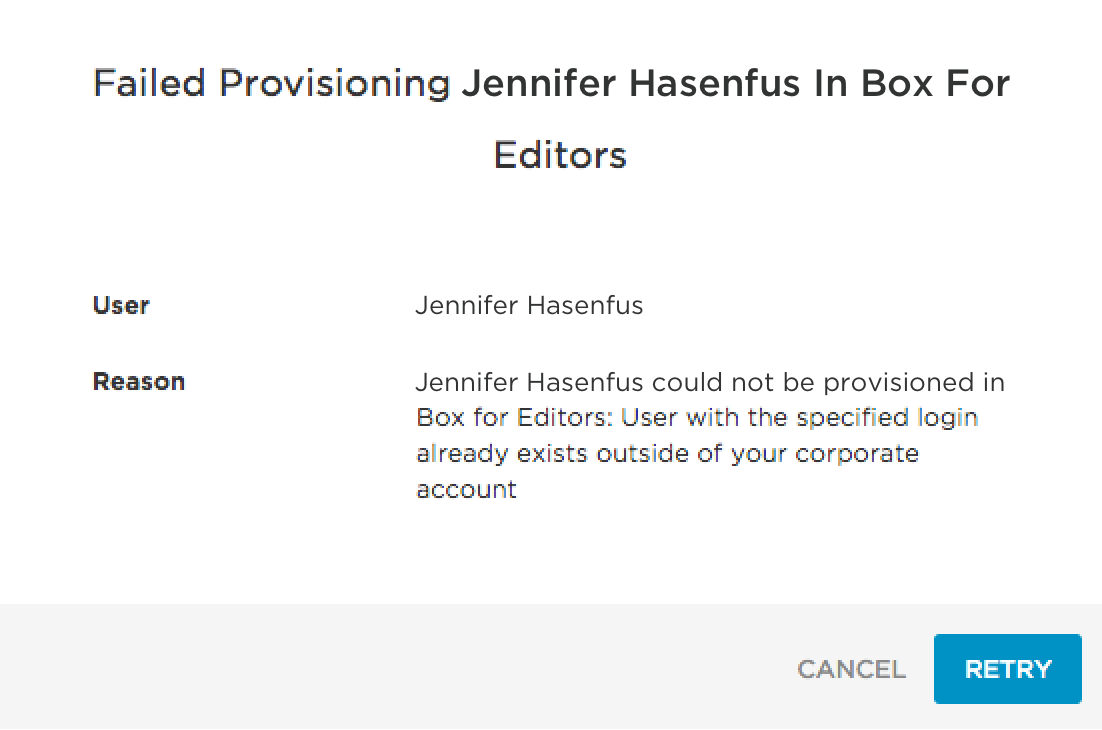
If the provisioning row shows up as Failed on the Provisioning page, click the row to view a reason for the failure. Click Retry to try again.
-
When the user has been successfully provisioned according to OneLogin, go to Box and confirm that the new user has been added.
-
Continue to test for user updates and user deletions.
|