|
OneLogin's Active Directory Connector (ADC) is the perfect tool for companies that use Microsoft Active Directory as a domain controller (DC).
Active Directory Connector 5 provides significant performance improvements, firewall-friendliness, and support for HTTP proxy servers. If your HTTP proxy server requires authentication, ADC 5 provides it with Windows domain authentication.
ADCs manage OneLogin user authentication against Active Directory and provide real-time synchronization of users between Active Directory (AD) and OneLogin. ADCs also function as the redirect service in a Windows Domain Authentication implementation.
The OneLogin Active Directory Connector must be installed on Windows Server 2012 R2 or later. As of April 3rd, 2024, no previous versions of Windows Server operating systems are supported for the OneLogin ADC.
Check out our video training on configuring Active Directory connectors:

Prerequisites
Before proceeding with the steps in this article, you should:
- Run Outbound TCP Port 443 from the server to the network ranges listed in OneLogin Domains and IP addresses.
- Safe List the domain
smux.us.onelogin.com (this replaces adc.onelogin.com).
- Verify that your browser is supported by OneLogin.
- Review Create a Domain Service Account to run Active Directory Connector to understand where to install the ADC.
- Review your Account Settings, as they can affect the way OneLogin treats AD passwords:
- Enable directory fallback password cache: Enabled by default. Caches a hash of the user AD passwords that enables OneLogin to authenticate a user with the last successful password, in the event of lost communication between OneLogin and AD.
- Enable password mapping: Caches encrypted AD passwords in OneLogin to provide access to apps that use SSO password for app authentication.
- If your organization uses any workstations running Windows 10 or later, activate your licenses with Office 365.
- If your Windows Server isn't a domain controller, verify that you have access its AD, DS, and AD LDS Remote Server Admin Tools.
System Requirements
- .NET Framework 4.5.1 and up
- Processor: Pentium 4 or better
- RAM: 512MB
- Disk space: 120MB, configurable to less than 50
- Windows Server 2012 R2 or higher
Note: Do not attempt installation in FIPS Compliance Mode. The installation will succeed, but startup aborts with an error in ADC.LOG.
DMZ Installation Requirements
- Review the Microsoft Windows Server requirements for installing a OneLogin ADC in the DMZ (perimeter network).
- OneLogin Active Directory Connector uses only the following network ports for connections to AD:
- TCP 389 – For the ADC to connect to AD using LDAP
- TCP 636 – For the ADC to connect to AD using LDAPS
- Additionally, because the ADC depends upon DNS for connections, TCP/UDP Port 53 must be open.
- Active Directory itself depends upon the availability of other ports to properly perform services. For example:
- TCP/UDP 88 – For Kerberos authentication
- TCP/UDP 464 – For Kerberos set/change password
Installing Active Directory Connector 5
Important! We recommend you install the connector on a member server machine in the same physical network as your Active Directory service.
Initiating the Active Directory Setup Wizard
-
Sign in to the OneLogin admin portal and go to Users > Directories. If you have previously configured a directory, click New from your directories list. Otherwise, you're taken directly to the Select a Directory Type page.
-
Choose Active Directory from the list of available directory types. This launches the Active Directory Setup Wizard.
|
A.
|
Name your directory. OneLogin supports the simultaneous integration of multiple directories as long as they each have a unique name. You'll use these names often, so choose something simple and descriptive.
|
|
B.
|
Click Download AD Connector to download the most recent version of the installer file.
If you've previously installed ADC 4 and are upgrading your connector to ADC 5, you may see an option to Upgrade Remotely. Click this option, wait a minimum of 5 minutes, then refresh the Connector Instances page in your OneLogin Active Directory configuration. You will not see a progress indicator during the 5-minute wait, but if the refreshed page now shows the most recent version number, the remote upgrade process has finished successfully.
|
|
C.
|
Copy the installation token for use during the installation.
|
Running the ADC Installer
-
Sign in as a domain administrator on the machine that will host your Active Directory Connector.
-
Run the Active Directory Connector installer you downloaded in the previous section.
-
Welcome
Click Next.
End-User License Agreement
Review and Accept the license terms.
Connector Token
Paste the token you previously copied from the Active Directory Setup wizard and click Next.
Service Log On Credentials
Select the appropriate option, depending on your current system setup:
|
Use existing OneLogin Service Account
|
This option is only visible if you're upgrading an existing ADC.
|
|
Create a OneLogin Service Account
|
Select this option for new ADC installations. It creates a domain service account in the local Domain named OneLoginADC with Builtin\Administrators credentials.
Note: If you have more than one domain in your Active Directory Forest, you will need to add this new account to the Domain Administrators or Builtin\administrators groups in the other domains.
|
|
Run service as:
|
If no ADC is installed on this machine and you want to use an existing domain service account, select this option and enter the Domain and account used to run the ADC.
Note: This must be a domain service account with privileges to read the directory tree throughout your Forest and Domains as well as the ability to reset passwords.
|
|
Run Service as LocalSystem
|
Select this option if you use a single domain and you're planning on installing the ADC only on DCs, not on member servers.
Note: The Active Directory Connector can only be installed on a full Read-Write Domain Controller.
|
Click Next.
Select Port for Desktop SSO
Set the port that will be used by Windows Domain Authentication to authenticate ADC and click Next.
-
Enter port 443 if you intend to enable SSL for this connector (recommended for most configurations, and required to support multible ADC instances).
-
If you choose to accept the default port of 8080 or enter another port, be sure to disable the Windows Host Firewall Rule or open any other server-based firewalls for inbound connections to that port.
Select Shard
Select the location (US or EU) of your organization's OneLogin database. If you're unsure, or if your organization is headquartered outside the US or Europe, contact your OneLogin representative for confirmation. Click Next.
Ready to install OneLogin Active Directory Connector
Click Install. When the installation is complete, click Finish to exit the installer.
The service runs under the domain service account by default, but you can use the Domain Configuration Wizard to customize the domains and universal security groups that the ADC syncs with OneLogin. Open the wizard when prompted at the end of installation, or at any time later by launching ADConfigWizard from the ADC installation directory. See Synchronizing Domains and Security Groups with OneLogin for more information.
Importing Users
-
Once you have completed the installation, the Active Directory Installation Wizard in OneLogin will automatically progress to the Import Users stage.
-
Select the organizational units and/or domains you wish to synchronize with and click Finish.
-
To initialize the first synchronization, open the More Actions menu and select Synchronize Users. Users will now automatically sync from Active Directory to OneLogin when they're created or updated in Active Directory.

Configuring Active Directory
Once the Active Directory Connectors are successfully installed, configure the integration between your instance of Active Directory and OneLogin.
Verifying Your Active Directory Connection
-
Go to Users > Directories and select the directory.
-
Verify that the Active Directory Connector instance is successfully connected.

- The number of users whose authentication source is set to this ADC instance
- The number of users who are both synced by the directory and associated to it
- The current connection status
Mapping Active Directory Attributes with OneLogin
Caution! Be careful when adding, changing, or deleting mappings. Incorrect mappings could potentially affect users' access rights or overwrite Active Directory identities.
To review and update directory attribute mappings, go to Directory Attributes.
Default Mappings
OneLogin syncs the following fields from Active Directory to OneLogin:
| Active Directory Field |
OneLogin Field |
| company |
Company |
| department |
Department |
| manager |
Manager |
| manager's objectGUID |
manager_guid |
| objectGUID |
Object GUID |
| title |
Title |
| givenName |
firstname |
| sn |
lastname |
| mail |
email |
| distinguishedName |
distinguished_name |
| userPrincipalName |
userprincipalname |
| sAMAccountName |
samaccountname |
| memberOf |
member_of |
| status |
status |
Custom Mappings
The attributes in the default mappings are hardcoded, but you can map other Active Directory attributes to custom OneLogin fields:
-
Create a custom user field for your mapping.
-
In Directory Attributes, click Add Attribute. A new attribute row is added to the bottom of the list.

-
Select the fields you would like to map together from the two drop-down menus.
Importing & Exporting Managers
You can use custom attribute mappings to import and export the manager field between OneLogin and AD/LDAP.
-
To import the Manager field, choose Set Manager and by distinguished name.

-
To export the Manager field, create a new mapping macro called {manager_distinguished_name}.

Syncing Organizational Units
Go to OU Selection. A display tree beginning with your domain's Base DN appears in this format: DC=your-company,DC=com. Expand the tree and select the AD organizational units you want to import into OneLogin.
As of version 5.1.3, you can deselect a child OU from the selected parent OU in order to exclude it from the synchronization process. The users under the deselected OU aren't synchronized, including the OUs under this deselected branch of the OU tree. All ADC connectors must be running at least this version in order for this feature to work.
In this example, New York and its child objects won't synchronize:

Advanced ADC Settings
Go to Advanced to set granular Active Directory Connector settings:

|
Base DN
|
OBSOLETE: Used with ADC Version 3.x, which is no longer supported
|
|
Mappings
|
When toggled on, enables OneLogin to assign roles, groups, and other user attributes based on AD security groups. See Mappings for more information.
|
|
Stage users
|
When toggled on, moves AD users to OneLogin's staging environment during sync, requiring manual approval. You can activate users individually in their user detail page, or all at once by selecting Approve all users from the More Actions. When toggled off, synced AD users are automatically converted to active OneLogin users without approval steps.
|
|
Sync User Status from Active Directory
|
When checked, any users disabled in AD are automatically also disabled in OneLogin and deprovisioned from OneLogin apps.
|
|
Ignore computed user access control
|
OBSOLETE: Used with Windows Server 2003, which is no longer supported.
|
|
Enable Smart Password
|
When checked, users' SSO passwords are synced to AD without requiring password reset. This is useful if you migrate an LDAP directory to this Active Directory instance.
OneLogin uses the domain from the Distinguished Name (DN) that's synced from the LDAP directory and stored in the OneLogin user record. In a multi-domain environment, the dc= value in the DN must match the user's Active Directory domain for password provisioning to work.
|
|
Enable auto-switch sync failover
|
When checked, OneLogin automatically switches to another ADC if the one responsible for synchronization fails, provided that multiple ADCs are configured for this Active Directory instance.
|
|
Login username attribute
|
Select the attribute used to match the user and prevent duplicates. The default value is email address. Users can log in with samAccountName or Email regardless of which field is selected to match to the username attribute, but the username attribute must be unique for each user.
|
|
Exporting users
|
When checked, user attributes are exported from OneLogin to Active Directory. By default, attributes are imported from AD to OneLogin, but this setting reverses the direction, exporting attributes from OneLogin to AD; this can be useful when user records are maintained in both Active Directory and another system synced to OneLogin, such as if you use Workday or UltiPro to manage HR for your users, but AD to manage their access to network resources.
Note: The export user checkbox requires a restart of ADC.
You can switch the sync direction for each individual attribute by clicking the arrows between them in Directory Attributes.
Changing the direction of the sync can cause custom mapping attributes to break. If this happens:
- Remove all custom attribute mappings from the directory.
- Stop the ADC service.
- Clear the ADC domain cache file(s).
- Re-add the custom attribute mappings and save your changes.
- Start the ADC service.
|
|
Deleted users in AD...
|
Decide what occurs when users are deleted in Active Directory:
|
unaffected in OneLogin
|
no changes are made
|
|
suspended in OneLogin
|
users are given the Inactive status but their user record remains
|
|
deleted in OneLogin
|
user record is completely deleted from OneLogin directory
|
Warning: Account owners aren't suspended or deleted from OneLogin regardless of what action is selected, but if their account is authenticated by AD they may be prevented from logging in to OneLogin when deleted in AD. For this reason, Account Owner accounts should not be authenticated against external directories like Active Directory.
|
|
Enforce OneLogin password expiration policies
|
When checked, OneLogin's password expiration policy overrides AD's policy if it has a shorter expiration interval so that the more restrictive policy is always applied. When unchecked, AD's password expiration policy is always used regardless of interval.
|
|
Check users status before authenticating the user.
|
When checked, users' AD statuses are not automatically synced to OneLogin upon authentication. Instead, OneLogin checks the status and does not pass the authentication request to AD if the user is locked.
|
|
Do not write user status back to Active Directory
|
When checked, users' OneLogin statuses are not automatically synced to AD. Instead, the admin can unlock users in OneLogin regardless of the user status in Active Directory or if OneLogin can change the user status in Active Directory.
|
Optional Configurations
Synchronizing Domains and Security Groups with OneLogin
Open the Domain Configuration Wizard when prompted at the end of installation or by launching ADConfigWizard from the ADC installation directory.
-
Domains
By default, all domains are selected; uncheck any that you want to prevent from syncing with OneLogin. Previously unselected domains are hidden from the list but can be viewed by selecting Show unselected domains.
-
Security Groups
By default, all security groups are synchronized. However, once you add one security group, all others are excluded from synchronization unless you manually add them as well. If you select a security group with any child security groups, the child groups groups sync with OneLogin as well.
Configuring Proxy Settings
To deploy a proxy server that manages network traffic to and from your AD server, configure the Windows settings below after installing your ADC.
Note: If you use Windows Domain Authentication with Active Directory Connectors, the traffic travels between the browser and the ADC. It doesn't pass through the HTTP proxy.
- Log in to the Active Directory host with the same account used with Service Log On Credentials when you installed ADC.
- Go to the Control Panel and select Network and Internet.
- Click Internet Options to open the Internet Properties dialogue.
- In Connections, click LAN settings.
- On the Local Area Network (LAN) Settings dialogue, select Use a proxy server for your LAN
- Enter your proxy server settings; use the Advanced option if required.
Enabling SSL for Each ADC Instance
To best support your organization's security and provide a user-friendly experience, we recommend enabling SSL for each ADC instance you install. Additionally, SSL is required if you use Windows Domain Authentication and have configured multiple AD Connectors for load balancing.
Follow the process described in Enabling SSL for Active Directory Connectors for each instance.
Managing Active Directory Connectors
Go to Connector Instances in your OneLogin Active Directory configuration to view a list of all current connectors, along with their statuses, enabled tasks, and version numbers. The Sync Status column refreshes every 15 minutes and provides additional details about the connectors' reachable domains, backlogged users, and health checks.
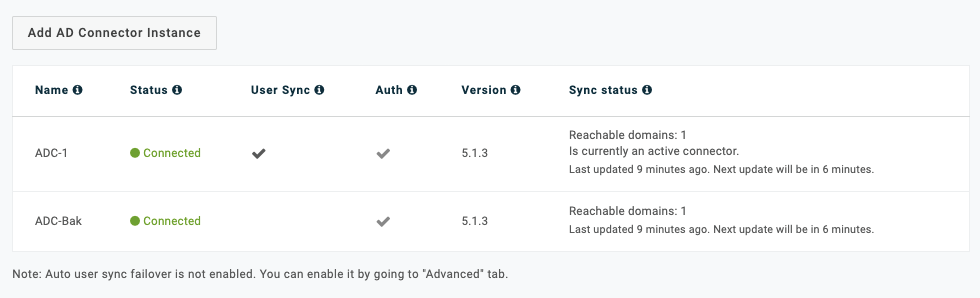
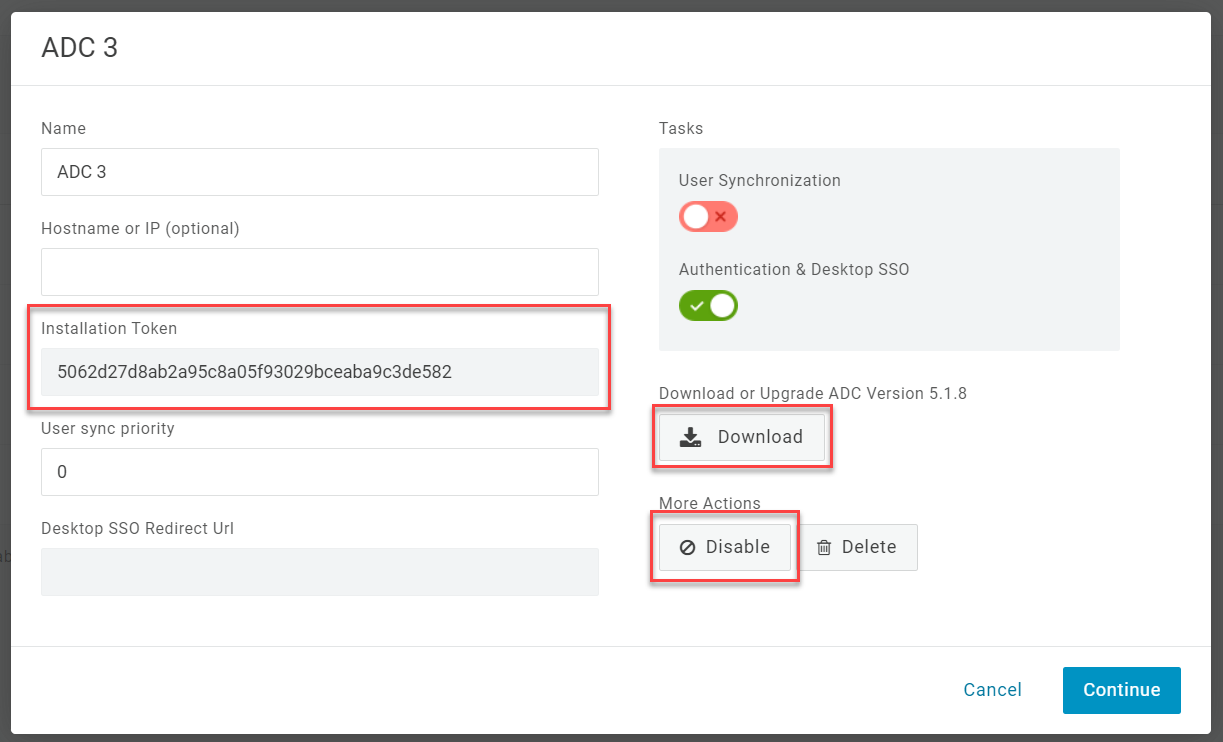
Select any connector to manage its tasks and options and to disable, upgrade, or remove it.
Upgrading an ADC Instance
Note: If you have multiple ADCs, we recommend that you upgrade your authentication connectors first, then switch an upgraded authentication connector to User Synchronization before upgrading the old user sync connector.
-
Open the connector and click Disable to stop it, then Download the connector installer and copy its Installation Token.
-
Run the downloaded installer on the connector's host machine, selecting Use existing OneLogin Service Account for the Service Log On Credentials.
-
After verifying that the upgraded connector has successfully installed, return to the connector instance in your OneLogin admin portal and re-enable it.
User Syncing
By default, the OneLogin ADC synchronizes most users in real-time by subscribing to Active Directory Change Notifications. If a user is added or removed, or one of their mapped or required attributes changes, AD sends the change to OneLogin for immediate update.
Additionally, a full directory sync is performed every 15 minutes to capture any changes missed by the real-time sync. To change this interval, launch Notepad or a similar text editor as an admin and open C:\Program Files (x86)\OneLogin Inc\OneLogin Active Directory Connector\connectorService.exe.config. Locate the setting MinSyncPollWorkerWaitTimeout and modify its value in the HH:MM:SS format.

For extremely large or active organizations, the directory change notifications may fail to capture all events. In this case, you may wish to instead use Microsoft's DirSync control or OneLogin's directory sync cookie.
To enable the cookie, locate the ChangeNotificationMethod setting in your connectorService.exe.config file and replace the NormalChangeNotification value with DirectorySyncCookie. The default polling interval for the directory sync cookie is 5 seconds, but this can be changed by entering a new HH:MM:SS value in the ChangeNotificationPollInterval setting.
|