These steps will guide you through setting up the single sign-on functionality between OneLogin and Juniper Secure Access VPN.
Set up SSO in OneLogin:
-
Go to Apps > Add Apps.
-
Search for Juniper SSL VPN and select it.
-
Click Save to display additional configuration tabs.
-
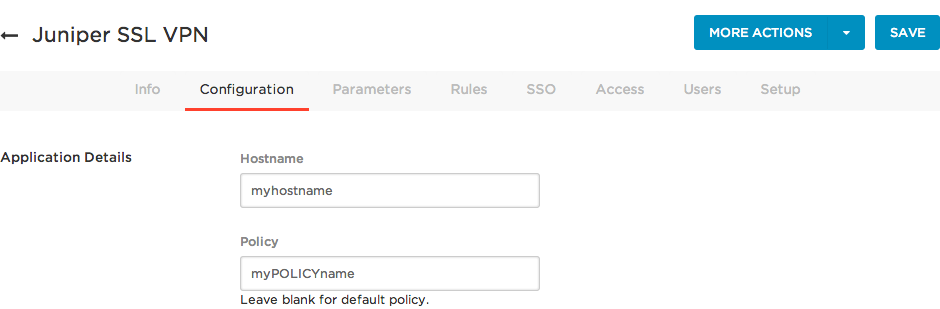
On the Configuration tab, enter your hostname and policy.
-
Under Hostname, enter your Juniper SSL VPN / Pulse Connect Secure VPN hostname.
- Under Policy, enter the name of the policy.
Leaving the field blank results in the default policy being applied.
Click Save.
-
On the Parameters tab, map Juniper VPN user attributes to OneLogin attributes.
Username maps to Username by default.
-
On the SSO tab copy the SAML Endpoint (HTTP) and the Issuer URL.
These will be entered into Juniper SSL VPN / Pulse Connect Secure VPN.
-
Go to the SSO tab and click View Details to see the X.509 certificate.
-
Select .PEM from the dropdown menu and click Download to get the certificate file.
-
Under the Access Control tab choose which roles will have access to Juniper VPN.
Set up SSO in Juniper VPN:
- Log into the admin pages of the Juniper SSL VPN / Pulse Connect Secure VPN appliance.
-
Go to Authentication > Auth Servers and add and configure a new SAML Server.

-
Name your server and select SAML Version 2.0.
-
For Identity Provider entity ID, enter your SAML Issuer URL.
-
For Identity Provider Single Sign On Service URL, enter your SAML Endpoint (HTTP).
-
For Allowed Clock Skew, insert 5.
-
In the Metadata Validity section, enter 365 for days.
-
Select Choose File to select and upload your X.509 certificate file.
-
Click Save Changes.
- Go to Users > User Realms.
-
Select the user realm for which you want to apply SAML sign on.
-
In the Servers section, select OneLogin
-
Click Save Changes.
Configure OneLogin
-
Back in your OneLogin account, go to Settings > VPN.
-
Select Enable SSL VPN, and then add your VPN Server URL and Gateway IP Addresses.
-
Select the applications that you wish to access through your Juniper SSL VPN and then.

-
Click Save.
Now when your users access these applications, they will authenticate through your configured Juniper SSL VPN / Pulse Connect Secure VPN.
Test SO
-
Login to OneLogin.
-
Make sure you are logged out of Juniper SSL VPN / Pulse Connect Secure VPN .
-
Click the Juniper SSL VPN / Pulse Connect Secure VPN icon on your dashboard. This logs you into Juniper.
-
Now you are done, and users will be able to launch the SSL VPN from OneLogin’s portal either directly or implicitly when launching another application that is located behind the corporate firewall.
|