| This article describes a legacy method for setting up single sign-on for Amazon Web Services (AWS) through the multi-role service, giving users the ability to choose their own AWS role when they sign in using OneLogin. We make it available for customers who have already configured AWS for multiple roles using this method.
For the current recommended method, which takes advantage of OneLogin's provisioning functionality and is considerably less complex, see Configuring SAML for Amazon Web Services (AWS) with Multiple Accounts and Roles. It was designed to accommodate multiple accounts, but it works equally well if you have just one account.
Note. Please don't confuse AWS roles with OneLogin roles. When we mention roles in this article, we are referring to AWS roles, unless otherwise noted.
This article includes the following topics:
Prerequisites
-
OneLogin plan that includes provisioning.
The SAML SSO configuration described in this article requires that you enable provisioning. If you need to upgrade your account, contact your OneLogin account manager.
-
An AWS Access Key ID and Access Secret Key for access to AWS through the API.
These keys should provide read-only access to the iam:List* and iam:Get* actions.
See the AWS documentation: Managing Access Keys for IAM Users.
Adding the AWS Multi Role app to OneLogin
- Log in to OneLogin as an admin.
- Go to to Apps > Add Apps.
- Search for Amazon Web Services (AWS) Multi Role and select it.
You can edit the Display Name and display icons.
- Click Save to add the app to your Company Apps and display additional configuration tabs.
-
Go to the More Actions menu and select  SAML Metadata to download the SAML metadata XML file. SAML Metadata to download the SAML metadata XML file.
You will provide this file when you configure the integration in your AWS account.
Configuring OneLogin as an Identity Provider for your AWS account
- Log in to your Amazon Web Services Management Console.
-
Select Identity and Access Management.

- In the Identity & Access Management (IAM) console, select Identity Providers from the left menu.
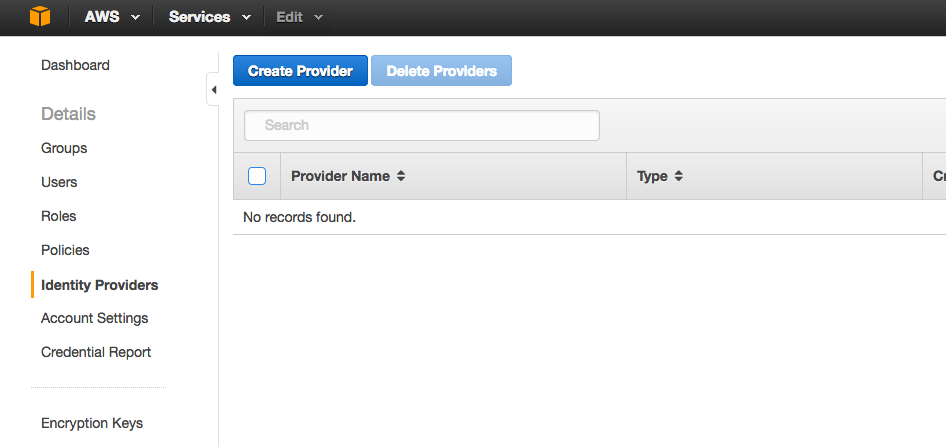
- Click the Create Provider button.
- For Provider Type, click Choose a provider type and select SAML from the dropdown menu.
-
Provide a name for the Identity Provider.
- For Metadata Document, click Choose File to specify and upload the SAML metadata XML document that you downloaded earlier.
- Verify your configuration and click Create.
-
Select your new identity provider from the list and copy the Provider ARN: value from the Summary tab.
You will provide this value to OneLogin in the task Configuring OneLogin to pass user identifiers and roles to AWS.
Adding or updating AWS Roles to use OneLogin as the SAML provider
For each AWS role that you want users to be able to access through OneLogin SSO, you must grant OneLogin SSO access to the role in AWS.
The instructions that follow cover the basic process for creating roles in AWS that are enabled for SAML federation using OneLogin. For more detailed instructions about creating AWS roles for SAML federation, see Amazon Web Service's own documentation: Creating a Role for SAML 2.0 Federation (AWS Management Console).
You may want to update existing roles to enable them for SAML federation using OneLogin. To do so, you must update the role's trust policy and select your OneLogin identity provider as the SAML provider. For instructions, see Modifying a Role in the AWS documentation.
To create an AWS role that is enabled for SAML federation using OneLogin:
- In the AWS Identity & Access Management (IAM) console, select Roles from the left menu.
- Click the Create New Role button or select a role that you want to update.
- Provide a user-friendly name for your role, and click Next Step.
- Select Role For Identity Provider Access.
- Select Grant Web Single Sign-On (Web SSO) access to SAML Providers.
-
For SAML provider, select the identity provider that you created for OneLogin in the previous task.
-
(Optional) Add attribute conditions to this role.
The SAML:aud attribute is added automatically and set to the URL of the AWS SAML endpoint (https://signin.aws.amazon.com/saml).
To add additional attribute-related conditions, click Add Conditions, select the condition, specify a value, and click Add Condition.
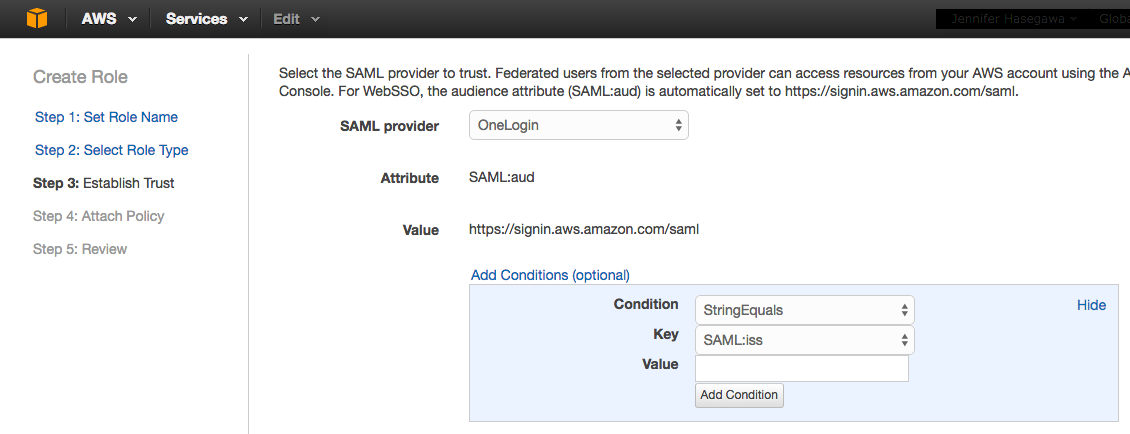
- Click Next Step to view the trust policy that was created from the settings you entered.
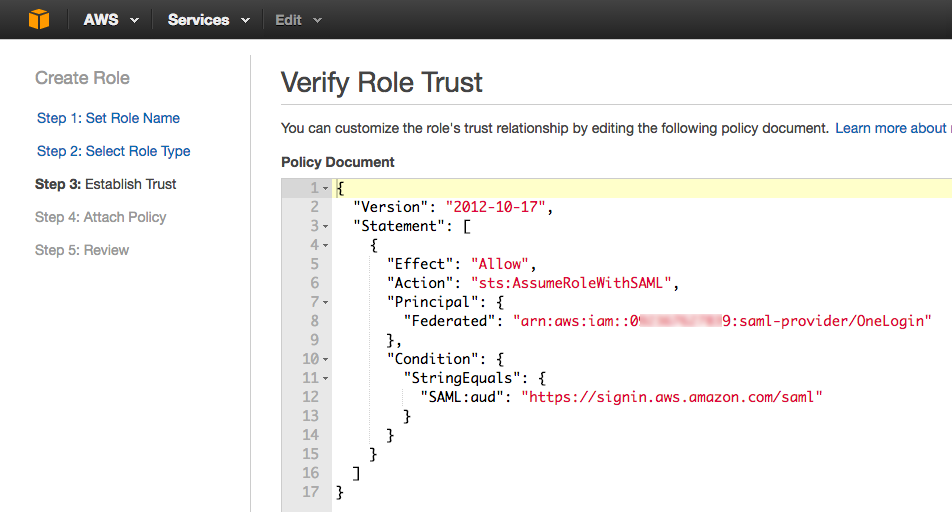
-
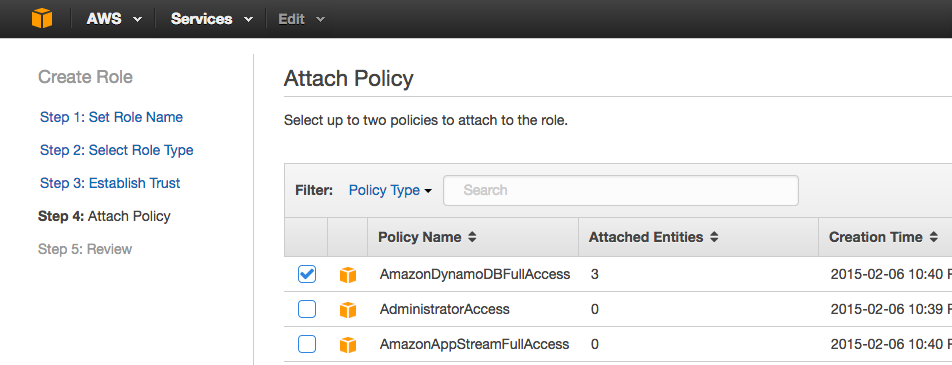
Select the access policy that assigns the permissions that federated users will inherit when they use this role, and click Next Step.
-
Review your settings and click Create Role.
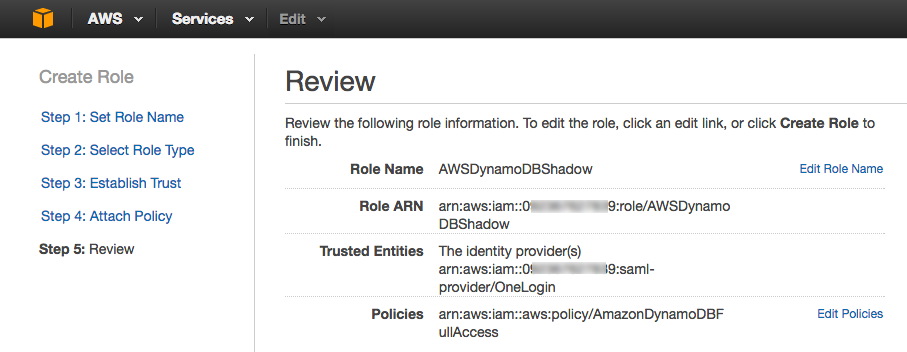
- Repeat for each role that you want users to be able access through OneLogin SSO.
Configuring OneLogin to pass user identifiers and roles to AWS
You can pass AWS role values in the SAML assertion, assigning the roles using OneLogin parameter defaults and rules. When a user accesses AWS through OneLogin SSO, AWS automatically gives them access to the functionality permitted by the AWS role memberships set in OneLogin.
-
On the Configuration tab, provide the ARN of the AWS Identity Provider and authenticate to the AWS API.
-
Enter the AWS Identity Provider ARN (Amazon Resource Name) for the identity provider that you created in AWS in the task Configuring OneLogin as an Identity Provider for your AWS account.
-
Enter your AWS Access Key ID and Access Secret Key. Note. This is case sensitive.
-
Click Enable.
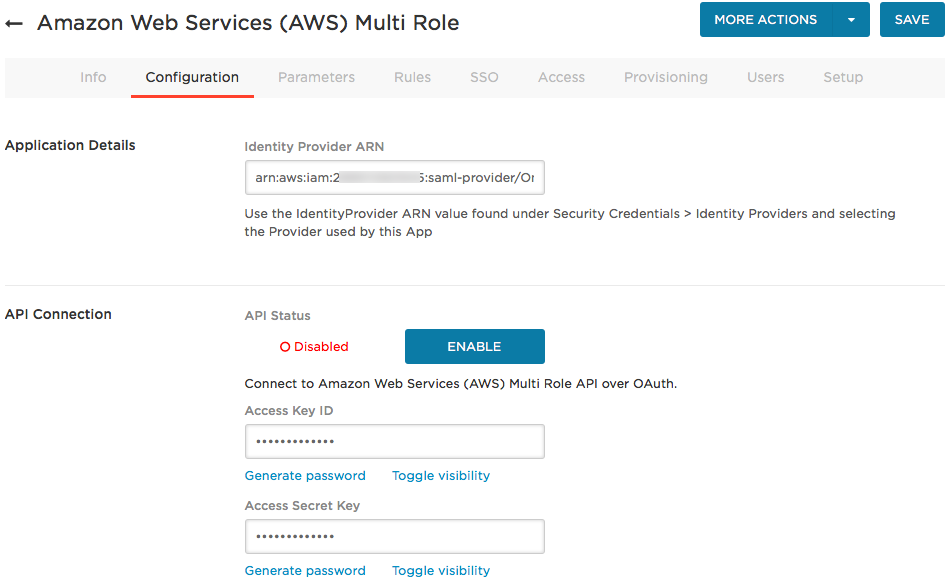
- Click Save.
-
Go to the Provisioning tab, click Enable provisioning for Amazon Web Services (AWS) Multi Role, and click Refresh.
This populates the Role parameter with the roles that are defined for your AWS account.
Important! This Refresh process populates the Role parameter with all roles defined for your AWS account, whether or not they are enabled for SAML 2.0 federation with OneLogin. In the steps that follow, you should take care only to select roles that have been enabled for SAML 2.0 federation.
-
On the same tab, verify that all three of the Require admin approval before this action is performed in Amazon Web Services (AWS) Multi Role checkboxes are cleared.
OneLogin doesn't actually provision users to AWS; Onelogin simply uses the provisioning engine to populate Role values in parameters and rules so that you can select them for inclusion in SAML assertions. Therefore you do not want provisioning events to sit in a pending approval status in OneLogin.

- Click Save.
-
Go to the Parameters tab to map AWS attributes to OneLogin values.
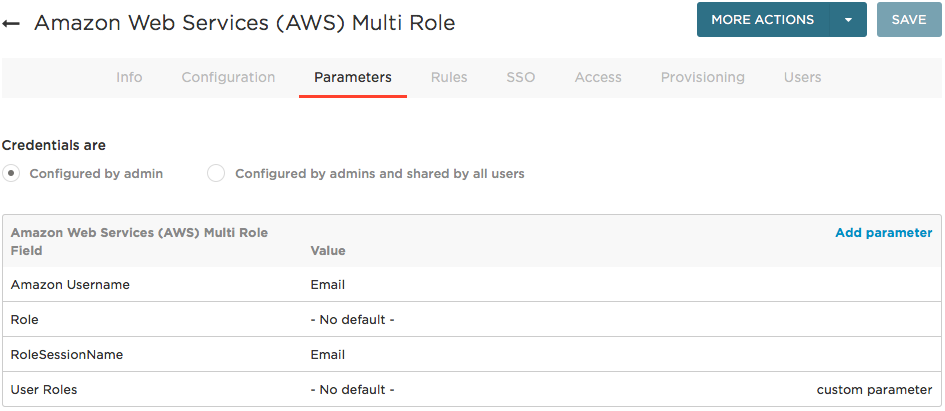
The attributes listed on this tab will be included in the SAML assertion that OneLogin passes to AWS.
RoleSessionName and Amazon Username are used to identify a username that is displayed in the AWS interface and a user identifier while the session is active. This value must be between 2 and 32 characters long, can contain only alphanumeric characters, underscores, and the following characters: +=,.@-. and cannot contain spaces. The default OneLogin value is email, but if your users have email addresses greater than 32 characters, we recommend using userPrincipleName or AD username instead.
Role is used to pass the user's AWS roles to AWS. Click the Role parameter to open the Edit Role Field dialog, and select the Include in User Provisioning option. This is required!
If you want all users to be assigned to the same roles, add the roles you want to assign by selecting them in Available values and clicking the right arrow to add them to the Selected values field.
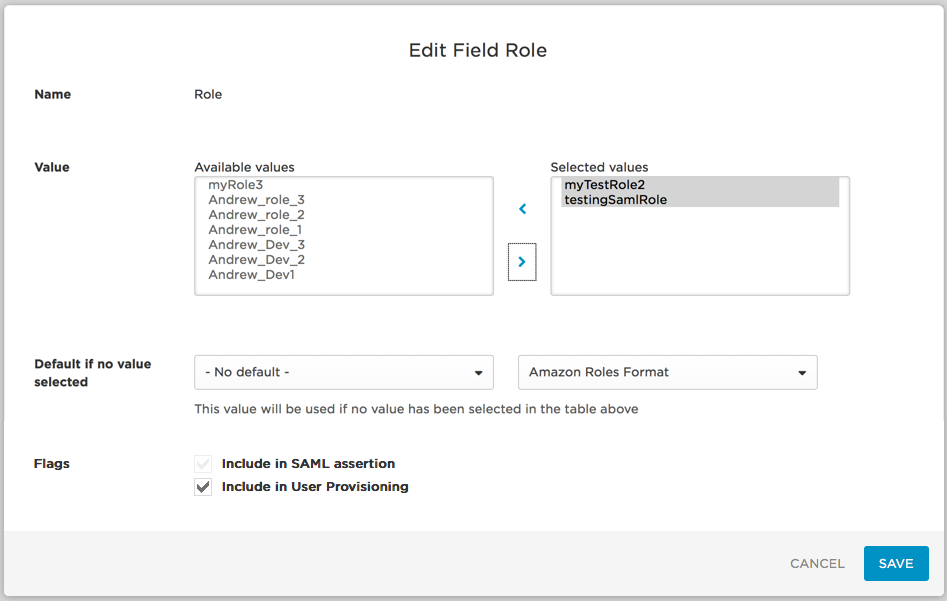
If instead you want to use Rules to assign specific sets of roles based on users' OneLogin attributes, skip the value selection, accept the Default if no value selected values, and go to the next step.
-
Go to the Rules tab to create rules that assign AWS roles to users based on their OneLogin attributes.
-
Click New Rule.
-
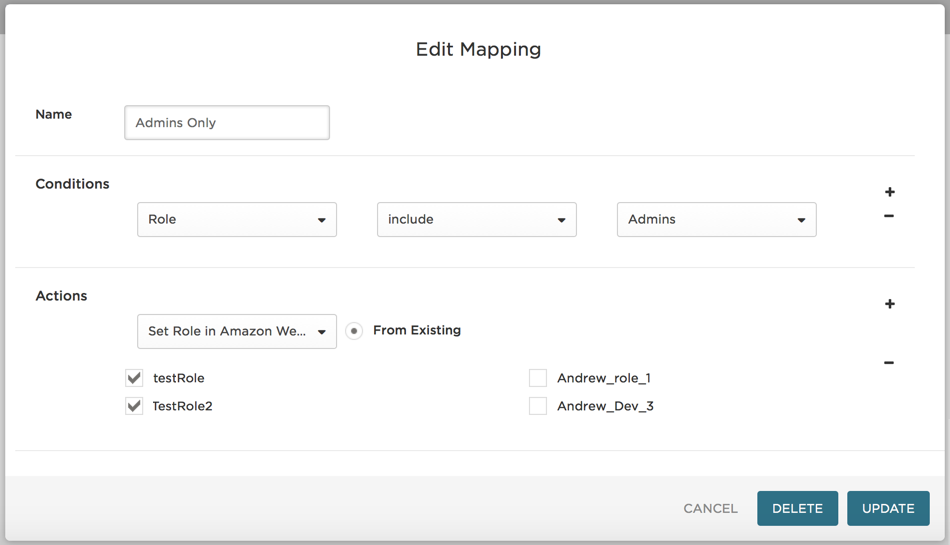
On the New Mapping page, enter the Conditions that will trigger the role assignment.
In the screenshot below, the condition is defined as users who are members of the OneLogin Admins role.
-
In the Actions drop-down, select Set Role in Amazon Web Services (AWS) Multi Role and select the roles you want to assign to the users who meet the conditions.
In the screenshot below, the users that meet the conditions will be assigned the AWS roles testRole and TestRole2.
- Click Update.
- On the Rules tab, click Save.
-
On the Access tab, assign the OneLogin roles that should have access to the AWS Multi Role app and provide any app security policy that you want to apply.
For example you can attach a policy to the app to require multi-factor authentication.
You can also go to Users > All Users to add the app to individual user accounts.
- Click Save.
-
Go to the More Actions menu and click Reapply Provisioning Mappings to apply any rules that you created.
Important! You must reapply mappings any time you create or update rules if you want them to apply to users!
Important! In order for a user's AWS roles to be included in the SAML assertion when they use OneLogin SSO to log into AWS, they must first have been subject to a provisioning event, like reapplying a provisioning mapping.
Once you have given a user access to the AWS Multi-Role app and kicked off a provisioning event for that user, the AWS roles assigned to that user through the Parameters tab or Rules will be included in the SAML assertion when they use OneLogin SSO to access AWS. When they are logging in to AWS, they will be able to select which of these roles they want to use in their AWS session. |