Multi-factor authentication (also MFA, 2FA or two-factor authentication, strong authentication) adds an extra layer of security to user accounts, drastically reducing the chances that bad actors can steal sensitive information.
To learn more about Smart Factor Authentication see Smart MFA & Access (SmartFactor Authentication).
There are three types of authentication factors:
-
Something you know – username, password, age, birthplace, pet's name etc.
-
Something you have – a phone, card, fob, or token
-
Something you are – a biometric such as a fingerprint, iris, voice pattern
Multi-factor authentication uses two or more of the above to confirm a user's identity. A typical scenario involves the use of a one-time password (OTP) application like OneLogin Protect, to generate a code that is entered, along with a user's credentials to log in. This combines the code from the phone (something you have) with a password (something you know) to create a strong barrier against unauthorized access.
OneLogin reduces the login process to single steps so admins can customize the authentication process to meet your org's needs. You may require different elements rather than username and password, other times you won't require a password but instead require MFA. The login flow is where custom authentication begins. Read more about Multi-step Login.
OneLogin supports many multi-factor authentication providers.
| Solution | Type |
| OneLogin Protect for iOS | One-time password with push |
| OneLogin Protect for Android | One-time password with push |
| OneLogin OTP SMS | One-time password |
| OneLogin Security Questions | Security questions |
| Duo Security | One-time password with push |
| Authenticator | One-time password |
| PKI Browser Certificate | Authentication certificate |
| RADIUS | Hardware/Software One-time password |
| Symantec VIP Access | Hardware/Software One-time password |
| Yubico Yubikey | Hardware One-time password |
| Google Titan | Hardware One-time password |
| WebAuthn | Web Authentication |
Note: OneLogin Desktop functions as a second authentication factor. OneLogin Desktop uses a certificate to establish trust with your OneLogin account, making the certificate an additional auth factor. If you registered one of the above authentication factors with your OneLogin account, you won't be prompted for it when you log in to OneLogin.
OneLogin support for multiple authentication factors means that your users can use redundant factors. If you lose a factor, you can access your OneLogin account using another.
This also allows you to support users with different needs. Users in the office might prefer a hardware factor like YubiKey because of its ease of use, while users who travel prefer OneLogin Protect because it's conveniently on their phone.
Best authentication practices
Because OneLogin allows nearly complete control over user access to all of your company apps, it is important to plan out your desired authentication process carefully. To maximize security and ease of access, set up multi-factor authorization through user groups and policies. The following tasks are required to set up a fully functional multi-factor authentication process:
• Add users to groups
• Create a policy for each group
• Assign authorization factors to each policy
A policy can have as many authorization factors as you want.
Which authentication process is right for you?
Use the following list of scenarios to determine how to set up your authentication process.
-
Users can access their OneLogin apps only from the office or other specific locations as designated by IP addresses: See Restrict user access to logins from specific IP addresses below.
-
Users can access their OneLogin apps only from the office (or other specific IP addresses) and they should be required to use multi-factor authentication: See Restricting user access to logins from specific IP addresses and Enable Authentication Factors below.
-
Users can access their OneLogin apps from any IP address, but they must use a multi-factor authentication process for some or all IP addresses: See Enable Authentication Factors. Do not follow the steps in Restrict user access to logins from specific IP addresses.
-
You have already set up multi-factor authentication, but now you want to change it so that users are no longer required to use MFA when they are in the office: See How can I disable the OTP requirement for logins in the office? below.
-
You want to forget about all of the nuances of the above bullet points, and let machine learning calculate the risk of each login attempt and determine when a user is challenged for a second authentication factor. See Adaptive Authentication.
Restrict user access to logins from specific IP addresses
Regardless of how many (if any) factors you want to use for authentication, configure your authentication policies to limit OneLogin logins to the office or other designated IP addresses.
Note: These instructions are NOT for setting up authentication to require MFA for some IP addresses and bypass it for others. For those instructions, see Enabling Authentication Factors.
To restrict users on a particular policy to accessing their OneLogin apps only from designated IP addresses:
-
Go to Security > Policies.
-
Click the policy that you want to restrict.
-
Go to the IP Addresses tab.
-
To whitelist specific IP addresses, enter them in the Allowed IP addresses field. If you enter more than one IP address, separate them by spaces.
192.128.20.14 192.130.1.1 192.130.1.40When users (on the policy you selected) log in from any IP addresses other than those that you list here in Allowed IP addresses, they can't successfully log in or access their apps.
When users log in from one of the IP addresses listed in Allowed IP addresses, but you haven't set up multi-factor authentication, they will be able to log in with credentials. However, if the admin requires multi-factor authentication, the user is required to register an MFA factor if they're on whitelisted IP.
If you require multi-factor auth for users in the office or other allowed IP addresses, you should enter the IP addresses as indicated above, then follow the steps in the next section, Enabling Authentication Factors.
To allow users to access company apps from any IP address & require multi-factor auth, then leave Allowed IP addresses field blank. Simply follow the steps in the next section, Enabling Authentication Factors.
Enable authentication factors
You can set up multi-factor authentication so that your users can access their OneLogin apps only in the office or from anywhere. Once you have determined the location (which IP addresses) that users can access their apps from, you can (and should) set up multi-factor authentication to authenticate users whenever they log in from acceptable IP addresses.
Here are the steps to set up multi-factor authentication, with more detail below:
Add your authentication factor
In order to use multi-factor authentication with OneLogin, you must enable one or more authentication factors for your OneLogin account. You can also create multiples of the same factor (remember to name them descriptively) for different audiences, such as partners or new business units.
-
Log in to your OneLogin account as an administrator.
-
Go to Security > Authentication Factors.
-
On the Authentication Factors tab, click New Auth Factor.
-
Select an authentication provider.
OneLogin provides a number of authentication factors including OneLogin Protect, OneLogin Security Questions, and others such as Google Authenticator and Yubikey.
Note: As of May 2019, Duo, Symantec VIP, RSA SecurID, and Yubikey allow multiple instance creation. OneLogin Protect, SMS, Voice, and security questions do not, and support for those will follow in subsequent releases. -
Enter your client account information and name the factor, especially if you configure multiple Yubikeys or multiple Duo instances.
Admins can upload custom icons for MFA Factors. To upload a custom icon for an Authentication factor, click on the icon in the small blue circle to upload an image.
Custom icons are available for the following MFA factors:
- OneLogin Email
- OneLogin SMS
- OneLogin Voice
- OneLogin WebAuthn
- OneLogin Security Questions
- Authenticator
- RADIUS
Note: The square icon should be at least 96 x 96 pixels and a transparent image in PNG or SVG format.

-
Click Save.
The authentication factor is listed on the Authentication & Security page.Display Name- The text you entered in User Description field.
Users- The number of users authenticating with this factor.

Add the authentication factor to a user security policy
-
Go to Security > Policies.
-
Select a user policy or click New User Policy.
-
Go to the MFA tab to enable OTP Auth Required.

-
Select an authentication factor.
-
(Optional) Add any whitelisted IP addresses. The policy will not be applied to anyone logging in from a listed address.
Note: This serves a totally different purpose from the Approved IP addresses field on the IP Addresses tab. Whitelisting an IP address on the MFA tab causes the multi-factor authentication policy you are creating to be bypassed when users log in from a listed IP address. However, entering addresses in the Allowed IP addresses on the IP Addresses tab causes users to be restricted to logging in only from the addresses listed in the Allowed IP Addresses field, regardless of any multi-factor authorization methods such as OneLogin One Time Password.
-
Select which users will require OTP:
-
Administrator Only: Will only apply to Super Users and Account Owner
-
Configured Users Only: Will only apply to end users who have already manually added and configured an authentication factor
-
All Users: Will apply to all users. Users will be prompted to set up an authentication factor during their first login attempt.
-
-
Define when OTP will be required.
Choose between At every login or only on Unknown browsers. If you select Unknown browsers, you can set the Security cookie expiration to the number of days until a browser becomes "unknown" again. -
Click Save.
Assign MFA security policies to Groups
The ideal way of associating users with MFA security policies is through a group.
-
Go to Users > Groups.
-
Click New Group.
-
Name your group, and then select your policy from the dropdown menu.
-
Click Save.
Now you can add users to this group individually or through mappings.
For more information, see Groups and Mappings.
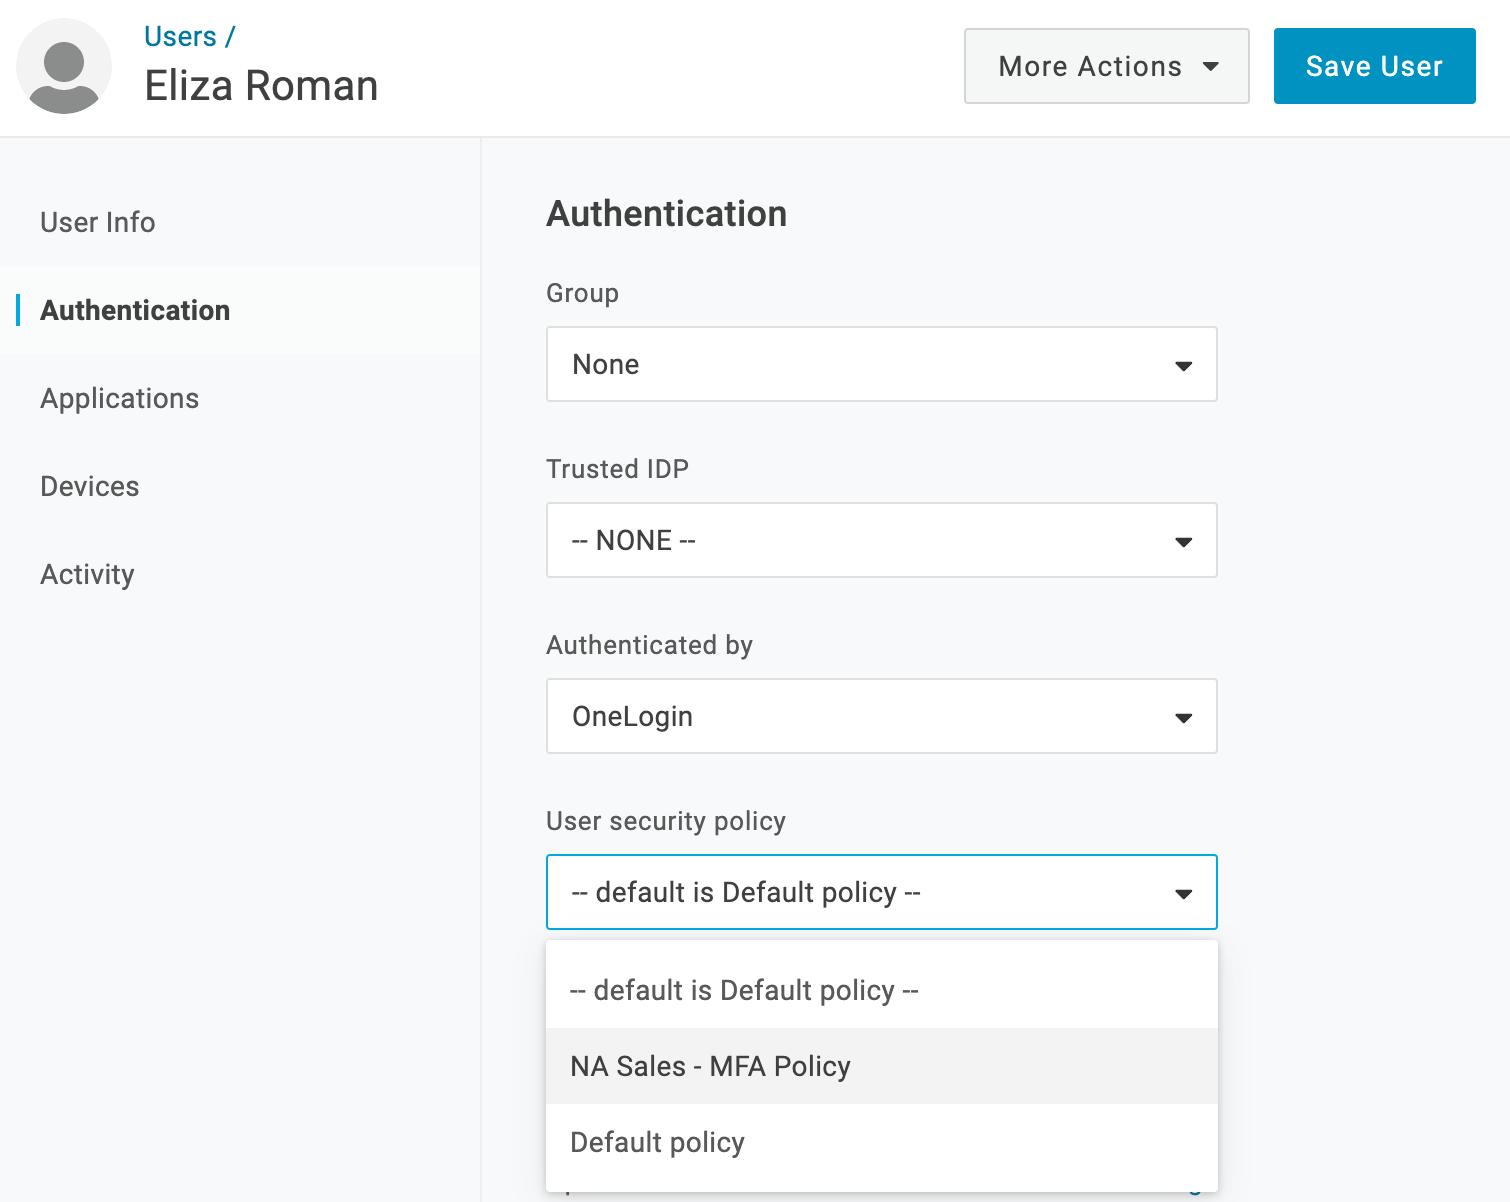
Assign MFA security policies to individual users
You can also associate MFA requirements on a user-by-user basis.
-
Go to Users > Users.
-
Select a user.
-
Select the Authentication tab.
-
Under the User Security Policy dropdown, select your MFA policy.
-
Click Save User.
The user is now associated with the MFA policy. Ensure that your users have the corresponding MFA application installed on their device. When the user logs in, they will be required to register their device.
Login & factor registration
Users assigned to a security policy that requires multiple auth factors are prompted to provide that auth factor with their username and password.
If the user hasn't registered their device with OneLogin before logging in, they will be prompted to register it upon first logging into their account.
End User Provided
Administrators can require users to enter a custom value (phone, email) when registering for Email, SMS, or Voice MFA. This allows end users to define their own custom values for MFA factors, such as personal email etc.
To configure this, go to Security > Authentication Factors > Choose OneLogin Email/Voice/SMS and select End User Provided in the second field: Send to email attribute if you're configuring the OneLogin Email factor.
This differs from the user policy setting as the value is connected to the MFA device and isn't added to the user profile.
Note: Don't use this setting if you want to sync the phone number or email address to the user profile.
The prompt below appears when the user opts to register an Email factor that requires an End User Provided value.

Configure OneLogin to support OneLogin Protect
To configure your OneLogin account to make OneLogin Protect available to your users, you must:
-
Go to Settings > Authentication Factors and add OneLogin Protect as an authentication factor for your OneLogin account.
-
Go to Settings > Policies and add OneLogin Protect as an authentication factor for a user policy.
-
Assign the user policy to Groups or individual users.
Security Tip: You can require users to secure devices using the Passcode feature or with their phone's biometric identification. You can also prevent users from using OneLogin Protect on a jailbroken phone. We strongly recommend you enable these options. For second-factor authentication with OTP to provide a strong second line of defense against intrusion, the device that hosts the OTP app must itself be secure. You don't want a stolen password, a stolen phone, or a cloned phone to provide easy entry to your OneLogin user account.
To enable the Passcode requirement, select Require screen lock when you configure OneLogin Protect.
To block jailbroken iPhones and iPads, select Block jailbroken devices when you configure OneLogin Protect.
If Require biometric verification is checked, users who haven't secured their device using Android biometrics or FaceID/TouchID on iOS will be prompted to do so when they install or try to use OneLogin Protect.

OneLogin Protect: Set up notifications of denied authentication requests
When a user has denied an authentication request sent to their device by push notification, an event is logged in your OneLogin account, called <Username> Denied Auth Via OTP Push Request. You can view these events at Activity > Events.
You can also set up notification emails to be received by admins when a user denies a pushed authentication request:
-
Go to Activity > Notifications.
-
Click the New Notification button.
-
Create a notification with the following Condition setting:
Event > is > User denied auth via OTP push request
For more information, see Notifications.
What happens if the MFA factor or device is lost?
In the case of critical OTP device failure (losing the device, breakage, etc.) generate a temporary OTP by going to Users > Find and select user > Authentication tab. Under Multi-Factor Methods, select Generate in the Temporary OTP section.
You can avoid user lockout from missing or failed OTP devices by configuring redundant factors. See Redundant MFA Factors.
How can I disable the MFA requirement for logins in the office?
If you have added an MFA method as a required authentication factor in your security policy settings, it will, by default, always be applied to the users in the groups to which the policy was assigned. If you do not want a policy to be applied in a certain location, such as the office, you must whitelist the IP addresses in your account security policy settings. This will cause the policy to be bypassed when users attempt to log in from the IP addresses you list.
To disable MFA in the office:
-
Go to Security > Policies.
-
Click the name of the policy you want to disable for office logins.
-
Go to the MFA tab.
-
In the field OTP bypassed for the following IP address, enter the IP addresses that should not require OTP for login.
-
Click Save.

Note: Enter office IP addresses and any other IP addresses that should not require users to provide a second authentication factor. In the example above, when users log in from the IP addresses 191.128.20.14 and 191.130.1.1-192.140.1.30, the MFA factor will be bypassed.
Smart MFA and Smart Access
Smart MFA & Smart Access uses a machine learning algorithm that calculates risk to determine whether a login requires MFA. It can be a powerful way to provide both convenience for your users and increased security for your organization. For more information, see Smart MFA & Access.